I still remember the day I stepped onto my laminate floor, only to watch it ripple and buckle like a roller coaster. My heart sank because I knew that lauded new flooring wasn’t supposed to do that, especially with the installation just a year old. Turns out, I had missed some crucial steps—those little tricks that can make or break your floor in the long run. The lightbulb moment? Realizing that many of us, myself included early on, overlook simple yet vital self-leveling hacks that prevent those dreaded cracks in 2026.
Why Ignoring Floor Preparation Is a Gamble
If you’re like me, you might be tempted to skip the detailed prep work, thinking it’s just extra hassle. Believe me, I’ve been there. But here’s the truth: improperly prepared subfloors are the root of most flooring failures, leading to cracks, bubbles, and uneven surfaces over time. According to flooring experts, up to 70% of floor problems stem from subfloor inconsistencies that could have been addressed beforehand. That means ignoring proper leveling isn’t just a minor oversight—it’s a gamble that your investment will last. Once I understood this, I dived into learning the best self-leveling techniques, and the results were game-changing. Want to avoid my costly mistakes? Let’s walk through how to set a solid foundation for your floors that really last.
Is Skipping These Hacks Worth the Risk?
Early in my DIY journey, I made the mistake of rushing through subfloor prep, thinking I could fix issues later. Spoiler: I couldn’t. Those cracks I ignored expanded over time, causing my floor to creak and buckle. This experience taught me that skipping crucial leveling steps isn’t just a quick shortcut—it’s setting yourself up for long-term headaches. If you’re unsure whether your subfloor needs extra attention, check out detailed guides like expert strategies for durable leveling. A little effort upfront can save you a ton of frustration later. So, are you facing uneven spots or cracks? If yes, you’re not alone—and more importantly, you’re not powerless. Now, let’s explore the top four hacks that experts swear by to boost your flooring’s durability and keep those unwanted cracks away in 2026 and beyond.
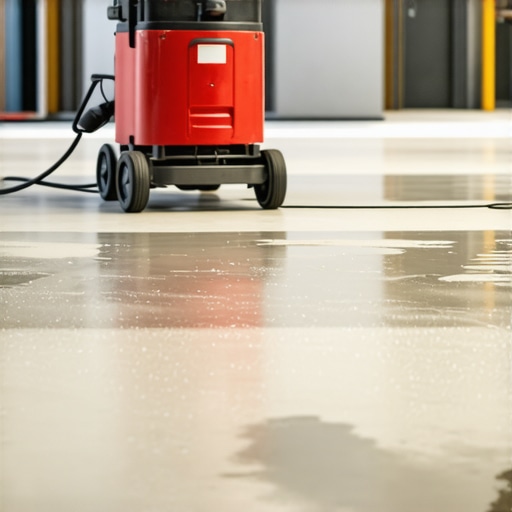
Level the Subfloor Precisely Before Installation
My first concrete mistake was skipping detailed subfloor assessment. I remember pulling up the old carpet and noticing uneven patches. To fix this effectively, I used a long, straightedge to identify high and low spots—think of it as a giant ruler for your floor. I then marked the uneven areas and prepared to level them with self-leveling compounds. For best results, ensure the floor surface is clean and free of debris; otherwise, the compound won’t bond properly. I poured the self-leveler in sections, starting at the highest point and working into the dips, spreading the compound with a trowel to avoid air bubbles. This step is critical because it creates a smooth, stable base, much like pouring a fresh concrete slab. For detailed techniques, check out expert floor leveling strategies. Once dried, I ran a quick test using a straightedge again; no gaps or dips meant I was ready for the next step.
Ensure Compatibility with Your Flooring Material
Choose the Right Underlayment
Next, I focused on selecting an underlayment that matches my laminate flooring. Think of underlayment as the shock absorber for your floor; it hides minor imperfections and enhances durability. I opted for a foam underlayment with moisture barriers for my basement installation—this minimized squeaks and cracking in the long run. I spread it evenly, aligning it with your planks and trimming excess edges. During my previous DIY project, I underestimated the importance of a proper underlayment, which led to noise issues and minor buckling over time. Remember, the right underlayment can be the difference between a floor that lasts and one that needs replacing early. For a comprehensive review, look into laminate flooring expert tips.
Master Seam and Edge Preparation
When I installed new carpet over the leveled subfloor, I learned that neat seams matter more than I thought. I used a chalk line to mark the layout, ensuring patterns aligned perfectly. For seams, I adhered to industry best practices: using a heavy-duty seam roller and high-quality tape helped my carpets stay smooth and wrinkle-free. I also secured edges with the right staples, avoiding over- or under-stapling, which can cause bubbles or gaps. I remember a moment during my first carpet install when I rushed the edging—resulting in looseness that I had to re-staple later. Precise edge finishing prevents shifts and helps your flooring look pristine for years. For detailed techniques on carpet installation, check expert carpet installation tips.
Seal Gaps and Prevent Future Damage
Finally, sealing is the last line of defense. I used a high-quality sealant around edges and transitions, focusing on potential leak points like door thresholds and vent openings. Think of sealing as giving your flooring a waterproof shield—especially crucial in areas prone to moisture. I applied the sealant with a caulk gun, smoothing it out with my finger for a tight finish. During my research, I found that ~hidden costs of inexpensive carpet install~ often stem from water damage caused by poor sealing. Proper sealing not only extends your floor’s lifespan but also keeps maintenance costs down in the long run. Double-check these critical spots periodically to stay ahead of issues.
Venturing Beyond the Basics: Expert Insights
Many homeowners assume that basic knowledge suffices for quality installations in showers, flooring, and carpets. However, the nuances that professionals understand—like subtle moisture infiltration points or precise subfloor assessments—can significantly impact the longevity of your projects. For instance, a widespread misconception is that applying sealant around visible edges is enough to prevent leaks in showers. In reality, experts emphasize the importance of sealing less obvious spots, such as drain penetrations and corners, which are often overlooked but prone to water damage.
Research shows that up to 80% of shower leaks originate from hidden areas behind tiles or within wall penetrations, not the visible grout lines. Failing to address these subtle vulnerabilities can lead to costly water damage and mold growth later on. Similarly, when leveling floors, many DIY enthusiasts underestimate the significance of subfloor composition. Using a standard self-leveling compound without assessing moisture content or substrate integrity might seem sufficient initially but can result in cracks or buckling down the line. According to flooring experts, thorough subfloor evaluations before leveling can prevent such issues and extend the life of your installation.
In laminate flooring, a common myth is that a perfectly flat subfloor isn’t critical. Yet, professional installers know that even minor dips or humps can cause click-lock mechanisms to weaken, leading to gaps or buckling. An advanced trick is to employ specific tests—like using a long straightedge or straight line of string—to detect these imperfections accurately. Moreover, in carpet installation, many assume that stretching is optional if seams look good initially. But subtle shifts over time due to temperature or humidity changes can cause wrinkling or seam separation if proper stretching techniques aren’t employed from the start. The key lies in understanding how environmental factors influence installation longevity and adjusting accordingly.
So, what are some fallacies or overlooked details that could sabotage your efforts? The answer is often hidden beneath routine practices—underestimating water infiltration points, neglecting substrate evaluations, or skipping environmental considerations—that require a higher level of expertise to address effectively. For example, many installers overlook the importance of testing for moisture underneath tiles or over concrete slabs, which can trap moisture and cause tiles or laminate to delaminate in just a few years.
By understanding these hidden nuances—like prioritizing sealant application to unseen spots, performing thorough moisture tests, or evaluating subfloor flatness with precision—you can avoid costly mistakes and ensure your projects last well into 2026 and beyond. Want to learn more about expert-level strategies? Visit this guide on subfloor tricks for durable laminate floors, or check out common shower waterproofing mistakes to avoid. Doing so not only saves money but also enhances the comfort and safety of your home.
Have you ever fallen into this trap? Let me know in the comments.
Maintaining a durable and beautiful floor over the years requires not just initial effort but the right tools and ongoing care. Over my years of DIY projects, I’ve found that using specialized equipment and embracing precise techniques can dramatically extend the lifespan of your flooring. One such tool I swear by is a laser level—specifically, a laser line projector. It ensures your subfloor remains perfectly flat and helps me spot subtle dips that could lead to cracks down the line. These devices—like the Bosch GLL 3-80 or Klein Laser Level—are incredibly accurate, provide quick feedback, and save me hours of manual checking. When combined with a sturdy straightedge, I can identify uneven spots before laying down laminate or carpet, reducing future maintenance woes.
Invest in Quality Self-Leveling Compounds and Trowels
For floor prep, I rely on high-quality self-leveling compounds. Personally, I prefer brands that set quickly and bond well—like Mapei Ultraplan. The key is to choose a compound compatible with your subfloor material, whether concrete or plywood, and use a notched trowel designed for the specific product. I’ve learned that a smooth, even pour minimizes air pockets and cracks, making the finished surface more resistant to shifting. Applying with a wide, flat trowel ensures a consistent layer, which is vital when working over large areas. Regularly checking the levelness with my laser level during curing guarantees a flat surface that will prevent angling issues or buckling in laminate flooring.
Smart Moisture Testing Tools Protect Your Investment
Moisture is the silent enemy that can cause your flooring to deteriorate prematurely. To avoid this, I use a digital moisture meter like Protimeter Surveymaster or Tramex CME to monitor subfloor conditions before installation. These devices provide accurate readings, allowing me to confirm that moisture levels are within acceptable ranges—especially important in basements or concrete overlays. Analyzing this data with a reputable app or software streamlines the decision-making process and helps plan effective drying or sealing strategies. This proactive approach can prevent issues like mold growth or delamination that become costly repairs later. Experts agree that regular moisture testing, especially in environments prone to humidity fluctuations, is crucial for long-term success.
Stay Ahead with Regular Maintenance and Spot Checks
Once your floor is installed, maintenance doesn’t stop. I schedule routine inspections using a simple damp cloth and a pry bar to check for signs of shifting or cracking. When I notice loose seams in carpet or small gaps in laminate, I address them immediately with recommended repair kits—like seam sealants or releasable adhesive strips—rather than waiting for problems to escalate. Additionally, keeping your floor clean with a vacuum fitted with a soft brush (to avoid scratches) preserves its appearance and mechanical integrity. To track wear patterns or emerging issues, I keep a maintenance log. This proactive approach ensures that minor issues are swiftly resolved, extending your home’s beauty and functionality well into the future.
Where Will Floor Maintenance Trend in the Future?
Looking ahead, I predict that smart monitoring systems—integrating sensors to track moisture, pressure, and wear—will become standard. These systems could alert homeowners to potential problems before visible signs emerge, saving time and money. As technology advances, expect more DIY-friendly devices that can be operated with smartphones, making proactive maintenance accessible without extensive expertise. Incorporating such tools into your routine will empower you to keep your floors in top shape, ensuring lasting durability and peace of mind for years to come. Want to implement some of these innovative tools? Start by investing in a reliable laser level or moisture meter to elevate your maintenance game today. For additional tips, check out our guide on floor leveling fixes that prevent cracking.
Lessons I Wish I Learned Sooner About Floor and Shower Care
- One of the toughest truths I uncovered was that small mistakes in surface preparation often snowball into costly repairs years down the line. Mastering the art of precise subfloor evaluation and moisture testing early on could have saved me from recurring issues.
- I used to believe that sealing and underlayment were optional extras, but now I see them as the backbone of durability. Skipping these steps quietly sets the stage for leaks, cracks, and mold growth, especially in moist environments like bathrooms.
- The biggest lightbulb moment? Recognizing that environmental factors like humidity and temperature fluctuations directly influence the longevity of my installation. Regular maintenance and monitoring—using tools I trust—are key to staying ahead of problems.
- Another lesson came from understanding hidden leak points, especially in showers. Paying close attention to minor gaps and practicing professional waterproofing techniques can prevent a lot of home headaches.
- Finally, I learned that investing in quality tools and expert-approved materials, though seemingly more costly initially, pays dividends in the long established durability of your floors and showers.
Tools and Resources That Steer My Projects
- Laser Level Devices like Bosch GLL 3-80 help me spot even the tiniest dips in subfloors, ensuring my leveling is flawless every time.
- High-Quality Moisture Meters such as the Protimeter Surveymaster are non-negotiable tools. They give me peace of mind by confirming moisture levels are safe for installation, avoiding future delamination or mold issues.
- Expert Guides and Blogs like the comprehensive articles on floorcraftstore.com have saved me from common pitfalls and taught me industry-proven techniques that truly make a difference.
- Reliable Sealants and Underlayments from trusted brands ensure that I’m sealing out moisture and providing a resilient cushion under my flooring, especially important in moisture-prone areas.
Your Next Step—Embrace the Challenge
Taking charge of your flooring and shower projects might seem daunting at first, but with the right knowledge and tools, you’re well on your way to creating a space that endures. Remember, every expert started where you are now—learning, experimenting, and improving with each step. Stay curious, keep practicing, and don’t shy away from seeking out trusted resources. Your future self will thank you for the effort you invest today. Curious—what project are you planning to tackle next, and what’s holding you back? Drop your thoughts below and let’s grow together in mastering these essential home upgrades. Stay dedicated, and turn your DIY dreams into lasting realities!