Have you ever stepped onto a newly installed carpet or laminate floor only to feel that unsettling unevenness beneath your feet? I remember the day I first experienced it. I was so proud of my DIY renovation project, eager to enjoy the fresh new look of my living room. But as I walked across the floor, I immediately noticed the creaks, dips, and wobbles. That lightbulb moment hit me—without proper flooring techniques, all my effort could be wasted on an unstable surface that would soon wear out. If you’ve faced similar frustrations, you’re not alone, and the good news is—there’s a way to fix that.
Why Proper Floor Leveling and Installation Matter More Than Ever in 2024
In 2024, home comfort and durability are at the forefront of remodeling priorities. With increasing expectations for long-lasting results, more homeowners are realizing that rushing through flooring projects or applying out-of-date methods can lead to costly repairs down the line. Proper floor leveling and expert installation ensure your investment pays off. An uneven surface not only looks unappealing but can cause furniture instability, trip hazards, and accelerated wear on your flooring materials. According to industry reports, subpar installation significantly shortens the lifespan of floors, with some studies indicating that poorly installed floors can deteriorate three times faster than correctly laid ones. That initial mistake I made early on was neglecting the importance of a pristine subfloor—something I learned the hard way. Want to avoid those pitfalls? Let’s dive into the key strategies that will make your floors truly durable and beautiful for years to come.
Is Cutting Corners Worth the Risk of a Rookie Mistake?
When I first started DIY flooring, I convinced myself I could skip the meticulous leveling process. Big mistake. I ended up noticing dips and bumps just months after installation, which compromised the aesthetics and functionality. Experience taught me that taking shortcuts in floor preparation can lead to uneven wear and annoying issues that are costly to fix later. If you’re skeptical about whether expert-level leveling makes a difference, I get it. But the truth is—neglecting this step is like building a house on an uneven foundation. It might hold up initially, but cracks will appear. For comprehensive guidance on avoiding these common mistakes, I recommend checking out expert floor leveling tips. Ensuring your subfloor is perfectly smooth and stable sets the stage for durable flooring that will stand up to the test of time, kids, pets, and everyday life.
Prep the Subfloor Thoroughly
Start by removing all furniture and rugs from the area. Inspect the subfloor for damage, moisture, or debris. I once neglected moisture testing and ended up with a warped floor months later. Use a moisture meter to ensure the subfloor’s dryness, especially in basements or areas prone to humidity. Clean the surface meticulously, sweeping away dust and sweeping out any loose particles. This prepares a clean, stable base for the leveling process.
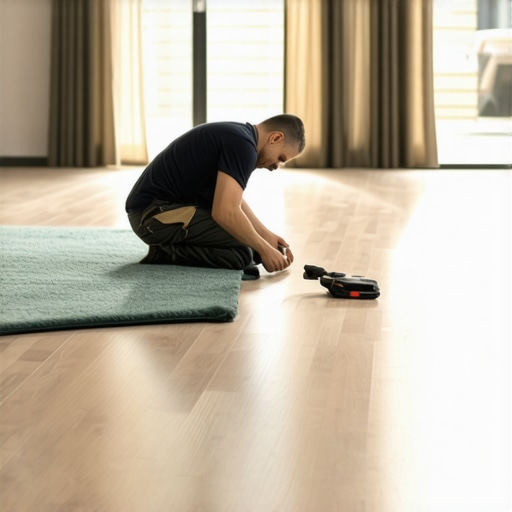
Identify and Address Irregularities Precisely
Use a long, straight edge or a laser level to detect dips or bumps. For deeper depressions or high spots, mark these areas clearly. I remember drilling small test holes in suspicious spots to verify the depth—better to be thorough than surprise later with uneven flooring. These markings will guide your work, ensuring you target problematic spots effectively.
Create a Smooth, Even Surface with Fillers
If you find low spots, fill them with a high-quality self-leveling compound or floor patch mix. When I first attempted this, I poured the mixture directly into depressions without stirring thoroughly—resulting in uneven patches. Follow the manufacturer’s instructions carefully, pouring slowly and spreading evenly with a trowel. For high spots, use a grinder or sander to bring the surface down; think of it like shaving a thick layer of ice down to a flat sheet. The goal is to have a uniform, smooth surface before installing your new flooring.
Tip: Use a level or laser device during the filling process to verify flatness continually. Consistency here ensures your finished floor won’t wobble or dip, much like balancing a boat to prevent it from listing.
Ensure Proper Adhesion and Stability
Once the subfloor is level, apply an appropriate primer if required, especially for concrete or other porous surfaces. When I installed laminate floors, I made the mistake of skipping primer, which caused slight shifting later. Use a quality adhesion layer or contact cement, depending on the flooring type, to prevent future movement. This step is like laying a solid foundation under a house—essential for long-term durability.
Check Levelness One Last Time
Use your laser level or long straightedge across the entire area, checking different sections. Adjustments might be necessary if you notice discrepancies. I learned to do this twice—once after filling, and again after installation—to catch any minor unevenness that could cause headaches later.
Best Practices for Different Flooring Types
While these steps are generally universal, specific materials require tailored preparation. For instance, carpet installation benefits from a perfectly flat subfloor to prevent wrinkles, which can be verified with a floor leveler. For showers or waterproofed bathroom areas, proper leveling is vital to avoid water pooling or leaks—see expert shower renovation tips for detailed guidance. Remember, a well-leveled subfloor is the foundation of any lasting floor, whether laminate, carpet, or tile, so don’t skimp on these preparatory steps.
Many homeowners assume that once they lay the foundation correctly, everything else will follow naturally. However, there’s a common misconception about the nuances involved in premium shower installations, carpet layering, and laminate flooring—mistakes that can sabotage long-term durability. For instance, many believe that the choice of flooring material alone determines the lifespan, but in reality, the preparation process, especially floor leveling, plays a crucial role in preventing future issues. Skipping meticulous subfloor assessments or relying solely on surface-level fixes can lead to buckling, mold issues, or uneven surfaces over time.
Why is the floor leveling process more complex than most think?
Most people underestimate the importance of subfloor integrity, assuming that minor dips or bumps are negligible. In truth, even small irregularities can cause significant problems down the line, especially under high-traffic or moisture-prone areas. Advanced mistakes often involve improper diagnostics—forgetting to use long straightedges or laser levels can result in undetected imperfections. These oversights might seem minor initially, but they can lead to uneven wear, cracking, or water pooling, ultimately reducing the lifespan of your installation. To avoid these pitfalls, invest time in precise diagnostics and leverage professional tips, like those found at laminate floor leveling guides.
Another critical nuance is the misconception that the surface finish can conceal underlying issues. For example, some think that adding a thick layer of underlayment can fix an uneven subfloor; however, this often exacerbates problems by amplifying imperfections or trapping moisture. Experts emphasize that proper subfloor prep must precede any surface treatment, aligning with findings from the industry standards.
How can advanced mistakes in shower installation jeopardize your home’s integrity?
Many homeowners overlook the critical aspect of waterproofing. While a shower might look flawless initially, insufficient sealing or improper slope can lead to water seepage behind tiles, causing mold, rot, and structural damage. A common misconception is that applying waterproof membrane once is enough; however, detailed layering, correct slope design, and thorough sealing are essential to prevent issues. Neglecting these steps can result in costly repairs, often hidden until serious damage manifests. For a comprehensive approach, check out expert shower renovation insights.
In the context of carpet installations, many believe that a smooth, clean subfloor is all that’s required. Contrarily, the placement of carpet tack strips, padding, and seams requires precision. One advanced mistake is neglecting to test moisture levels; high humidity can cause carpet delamination or mold growth. Moreover, improper leveling can lead to wrinkles or uneven piles, which not only look unprofessional but also reduce comfort. To avoid these pitfalls, refer to carpet installation strategies designed for longevity.
Why skimp on the prep can lead to disastrous results—particularly for laminate flooring
Many assume that a slightly imperfect subfloor is tolerable when installing laminate, but in reality, even minor imperfections can cause squeaks, buckling, or cracks. An advanced mistake is failing to recognize the necessity of proper underlayment and the importance of testing for moisture migration. Laminates are especially sensitive to underlying subfloor conditions, and neglecting these factors often results in costly replacements much sooner than expected. The key is to understand that each step in the preparation process—such as thorough leveling, moisture testing, and using quality adhesives—is instrumental to the long-term success of the installation. To master this process, explore laminate flooring expert tips for lasting results.
In summary, while surface choices like tile, carpet, or laminate are visible and enticing, the real challenge—and often the overlooked opportunity—lies beneath. The hidden nuances of precise subfloor preparation, advanced waterproofing, and detailed installation strategies make all the difference. Remember, superficial fixes may seem easier initially but often lead to regret and costly repairs later. Investing in expert-level understanding and execution helps you avoid common pitfalls and ensures your home improvement projects not only look good but also stand the test of time. Have you ever fallen into this trap? Let me know in the comments.
Maintaining your well-installed floors and showers is just as crucial as the initial setup. To keep everything functioning smoothly over time, investing in the right tools and adopting systematic maintenance routines is essential. Personally, I rely on a combination of precision measurement devices and advanced cleaning equipment to ensure longevity. For instance, a high-quality moisture meter is invaluable for monitoring substrate conditions, especially in moisture-prone areas like bathrooms or basements. Regularly checking moisture levels prevents issues such as mold or subfloor warping that can compromise your investment.
When it comes to floor leveling, I recommend using a professional-grade self-leveling compound and a concrete trowel for seamless application. These tools allow for a more controlled and smooth finish, which is necessary for high-traffic or moisture-sensitive areas. Additionally, a laser level is indispensable for verifying flatness after applying leveling compounds or during ongoing maintenance. Utilizing laser technology ensures you catch subtle dips or high spots early, saving headaches down the line. For ongoing upkeep, a gentle yet effective cleaning routine tailored to your flooring type—whether laminate, carpet, or tile—can dramatically extend its lifespan. Using appropriate cleaning solutions and avoiding excessive water exposure prevents deterioration caused by moisture infiltration, especially in shower areas.
Looking ahead, I believe technological advancements will make maintenance even more intuitive. Smart moisture sensors integrated into floors and walls could alert homeowners proactively before issues escalate, and robotic cleaners could take over routine cleaning tasks, ensuring consistent care. Embracing such innovations will help homeowners maintain their renovations effectively, preserving both beauty and functionality for decades.
How do I keep my floors and showers working well over time?
To achieve long-lasting performance, establish a regular inspection schedule using tools like moisture meters and laser levels. Regularly verify that your subfloor remains dry and flat, especially after heavy use or seasonal changes. It’s also wise to adopt a maintenance routine that includes gentle cleaning with products designed for your specific flooring or tile type. For example, using pH-neutral cleaners on laminate and tile can prevent damage and keep surfaces looking new longer. Additionally, sealing grout lines annually helps prevent water seepage, which is critical for shower longevity. For expert strategies on maintaining your laminate or shower upgrades, visit this guide. Lastly, don’t neglect small repairs; addressing scratches, chips, or grout deterioration promptly preserves the integrity of your investment. Try implementing a moisture monitoring routine supplemented by precision leveling tools, and you’ll see a significant difference in the durability of your home improvements.
Lessons I Wish I Heard When I Started
One of my biggest surprises was discovering that the tiniest imperfections can snowball into major issues years later. I once ignored a small dip in the subfloor, thinking it was insignificant. Fast forward a few months, and I faced squeaks, uneven surfaces, and costly repairs. That lightbulb moment taught me that patience and precision during preparation are your best allies in flooring projects. Also, I underestimated how moisture plays a silent, yet destructive role—testing and sealing are non-negotiable. Lastly, I learned that even seemingly minor tools like laser levels or moisture meters can be game-changers, saving time and money while elevating the quality of your work.
http://Anna%20Carter
Reading through this detailed guide really resonates with my own experiences in DIY flooring projects. I once tried to save time by skipping the thorough inspection of my subfloor, only to find out months later that small dips and bumps caused squeaks and uneven wear. It’s a clear reminder that investing time in proper leveling pays off in the long run. I especially agree with using a laser level for continuous verification—that extra step helped me catch errors early and save me from bigger headaches later. One thing I’d add is that having the right tools, like a quality moisture meter, can make all the difference, particularly in humid areas like bathrooms or basements. My question is, for homeowners doing this on their own, how crucial is it to hire a professional for the final leveling and inspection stages, or can this be confidently handled with the right equipment and patience? Would love to hear others’ thoughts or experiences on the value of professional help in these steps.