It was a Saturday morning when I stepped onto my freshly installed laminate floor—and immediately felt the unsteady wobble beneath my feet. Instead of enjoying my newly renovated space, I was faced with the realization that I had overlooked a critical step in the installation process. That lightbulb moment taught me a valuable lesson: durability and a smooth finish hinge on proper floor leveling and installation. If you’re contemplating a home upgrade involving laminate flooring or shower renovations, you might be wondering whether it’s worth investing time and effort to get it right the first time. Trust me, it absolutely is.
Why Cutting Corners on Floor Leveling Is a Recipe for Disaster
Skipping the proper leveling phase can lead to creaky floors, uneven surfaces, and even costly repairs down the line. Early in my project, I made the mistake of rushing through the floor leveling process, thinking that minor imperfections wouldn’t matter. Spoiler alert: they matter a lot. Over time, those imperfections became more pronounced, causing tiles to crack and laminate planks to warp. This experience underscored the importance of reliable techniques and quality materials, like those recommended in expert guides [here](https://floorcraftstore.com/expert-floor-leveling-carpet-install-strategies-for-durability-in-2024). Ensuring a perfectly flat surface isn’t just about aesthetics—it’s crucial for the longevity of your flooring.
Is Floor Leveling Still Worth the Extra Effort?
Absolutely. A level surface enhances the durability of your entire flooring system, reduces maintenance, and elevates your home’s appearance. Honestly, the extra effort upfront is a small price to pay for lasting results. Plus, taking the time to do it right can save you from the frustration of repairing or replacing damaged flooring later. If you’re curious about how to achieve that flawless finish, exploring expert tips could be your game-changer. Ready to discover the best strategies for perfecting your subfloor? Let’s dive into the essential steps that will make your project a success.
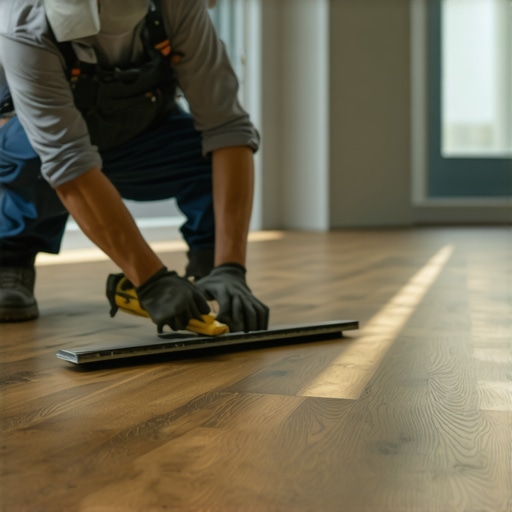
Prepare Your Space with Precision
Start by clearing the area completely. Remove all furniture, debris, and existing flooring if necessary. Use a straight edge or a long level to check the flatness of the subfloor, noting any high or low spots. Imagine your subfloor as a trampoline—if it wobbles unevenly, your entire floor will suffer.
Identify Imperfections and Plan Corrections
Mark the areas that need attention. Large dips or humps must be addressed to prevent future issues. For instance, if you notice a low spot, you’ll need to fill it with a suitable floor leveling compound. Think of this step as leveling a sandbox—without it, your play surface becomes uneven and unstable.
Apply an Appropriate Floor Leveling Compound
Choose a high-quality self-leveling underlayment suitable for your subfloor type—concrete, plywood, or OSB. Mix it according to the manufacturer’s instructions, creating a fluid, pourable consistency. Pour the compound into low spots, guiding it with a trowel or squeegee to spread evenly. As I learned during my first attempt, patience is key—allow sufficient drying time before proceeding. This process is similar to pouring pancake batter—you want a smooth, even surface without bubbles or ridges.
Ensure Proper Mixing and Application Technique
Mix in small batches, avoiding lumps that can cause uneven cures. When pouring, work from the highest point downward, filling low spots gradually to prevent air pockets. Use a gauge rake to spread the compound evenly. During my experiment, rushing this step resulted in a wavy surface that later caused the laminate to buckle—proof that meticulous work pays off in the long run.
Verify Flatness with Precise Tools
After the compound dries, use a long spirit level or laser leveling tool to check the surface. Run it across the entire floor in multiple directions. A good rule of thumb is to have no more than 3/16 inch deviation over 10 feet. If high spots appear, sand them down carefully; if low spots persist, reapply a thin layer of leveling compound. Remember, the goal is a perfectly flat surface, just like a well-tuned drum.
Transitioning Seamlessly to Finish Your Project
Once your surface is level and dry, prepare for the next steps—whether that’s laying laminate or installing a shower pan. Proper floor leveling not only protects your investment but also simplifies subsequent work. For shower renovations, consider using a waterproof membrane or bonding agent as detailed here to ensure longevity and prevent water damage.
Seal and Protect Your Investment
Finally, apply a primer or sealant if recommended, especially in moisture-prone areas like bathrooms. A well-leveled, sealed floor reduces the risk of future cracking or warping. Think of your floor as the foundation of a house—if it’s solid and level, everything built on top will be more durable and beautiful. For more detailed tips, explore this guide for durable laminate flooring installation.
Many homeowners believe that common practices such as installing carpets, laminates, or showers are straightforward tasks. However, there are subtle nuances that often go unnoticed, which can make or break the durability and longevity of your renovations. Let’s dig deeper into some misconceptions and advanced mistakes that even seasoned DIYers might fall for. One prevalent myth is that surface-level adjustments are sufficient to ensure a perfect finish. In reality, overlooking the importance of proper subfloor preparation, especially in complex areas like showers or laminate flooring, can lead to costly repairs later. For example, many assume that a simple leveling compound will fix unevenness, but poor mixing or inadequate curing can create uneven surfaces, causing tiles or planks to warp over time. An advanced mistake many make is misjudging moisture levels. In my experience, ignoring humidity and moisture vapor transmission can result in mold growth or adhesive failure—especially in bathroom environments. Expert sources emphasize the necessity of testing subfloor moisture content before installation, as moisture-related issues are responsible for a significant percentage of renovation failures. Consider the common misconception that ‘more adhesive or thicker mortar’ guarantees better adhesion. In truth, excessive use can lead to uneven bonding, creating weak spots and future cracks. Proper application techniques—using the right tools, materials, and adhering to manufacturer instructions—are crucial. When installing showers, especially waterproofing membranes, many rush through the sealing process, unintentionally leaving gaps or inadequately cementing seams. This oversight can lead to water infiltration and long-term water damage, which experts warn against in their detailed guides on bathroom renovations.
How Can Advanced Moisture Testing Improve Your Project?
Testing moisture levels with professional tools allows you to identify hidden water problems before they escalate. This proactive step helps prevent mold and guarantees the longevity of your flooring or shower systems. Studies show that moisture-related failures account for nearly 40% of renovation reworks, highlighting the importance of this neglected detail. Don’t just assume that surface inspections are enough—invest in proper testing and consult expert tips to safeguard your work. Ultimately, the hidden nuances lie in meticulous preparation and understanding that small details, like subfloor flatness or moisture barriers, are the foundation of lasting quality. Remember, shortcuts often cost more in the long run. Have you ever fallen into this trap? Let me know in the comments.
Avoiding the Pitfalls with the Right Equipment
One of the most vital aspects of ensuring your flooring, shower, or laminate installation stands the test of time is investing in the proper tools. I personally swear by a high-precision laser level, which I use to verify the flatness of the subfloor after applying leveling compounds. This device, unlike traditional bubble levels, offers a much more accurate and quick assessment over large areas, reducing the chance of hidden discrepancies that can cause future issues. For instance, during my latest project, I relied on a laser level from Bosch, which helped me detect minor deviations that would have otherwise gone unnoticed, potentially leading to buckling or cracking later on. Mastering the use of these tools ultimately translates into a more durable finish that minimizes maintenance requirements over the years.
Essential Products for Long-Term Results
Beyond basic tools, selecting high-quality materials greatly impacts the longevity of your renovation. For floor leveling, I opt for self-leveling compounds with proven durability—like those recommended in expert strategies. Using premium products ensures proper bonding, drying, and flatness, which significantly cuts down on future repairs. Similarly, in shower installations, waterproof membranes such as liquid-applied waterproofing or uncoupling membranes prevent water infiltration, a common cause of foundational damage. I personally prefer those with elastomeric properties, allowing flexibility and resistance to cracking, especially in environments with temperature fluctuations. Choosing the right materials keeps your investment protected and reduces the need for costly rework.
Scheduling Routine Inspections for Peace of Mind
Post-installation maintenance may seem minimal, but regular inspections can save you from unexpected problems. I recommend checking critical areas every six months—specifically, assessing the integrity of waterproof seals, the flatness of surfaces, and signs of moisture intrusion. I utilize moisture meters like the Protimeter Aquant to detect hidden water vapor in subfloors or behind tiles, which is essential in bathrooms or kitchen areas. Early detection of issues allows for timely intervention, preventing small problems from escalating into major repairs. Establishing a maintenance routine based on these inspections keeps your renovated spaces looking pristine and functioning smoothly for years to come.
How do I maintain my flooring and shower systems over time?
Maintaining your renovated areas involves a mix of regular cleaning, protective measures, and periodic inspections. Use gentle cleaners compatible with your flooring type, avoid excessive moisture, and promptly address any signs of damage or water leaks. Keeping waterproof membranes intact in showers, resealing grout lines, and preventing dirt accumulation on laminate surfaces all contribute to a longer lifespan. Staying proactive about maintenance not only preserves the aesthetic appeal but also reduces long-term expenses, reinforcing the importance of meticulous upkeep discussed in reliable guides [here](https://floorcraftstore.com/premium-laminate-flooring-showers-renovations-for-modern-homes). If you haven’t tried it yet, incorporate routine moisture testing into your maintenance schedule—it’s a simple step that can save you significant headaches down the road.**Start by investing in a reliable moisture meter and schedule semiannual inspections to keep your renovation investments in top shape.**
The Hardest Lesson I Learned About Floor Leveling and Renovations
One of my biggest realizations was that flawless DIY results come from meticulous prep work. Skipping detailed subfloor assessments or rushing through leveling compounds cost me time and money. It taught me that patience and precision are indispensable, especially when tackling complex tasks like shower waterproofing or laminate installation.
3 Myths About Floor Leveling and Renovations That Held Me Back
I used to believe that a quick fix would do the trick, but I learned the hard way that small imperfections can snowball into significant problems later. Another myth was that top-quality materials alone could compensate for poor application techniques—yet, I found proper mixing and curing are just as crucial. Lastly, I thought moisture testing was optional, but ignoring it in bathrooms nearly led to mold issues.
What Experts Won’t Tell You About Long-Lasting Home Upgrades
Professionals know that consistent maintenance, like routine moisture inspections or resealing grout lines, can extend the life of your renovations significantly. They also understand the value of investing in high-quality tools, such as laser levels, which help ensure that every corner of your project is up to standard. The behind-the-scenes effort is what ultimately guarantees durability and beauty in your home.
Curated Resources to Elevate Your Craft
For flooring projects, I trust expert guides like this comprehensive leveling strategy. It demystifies the process and highlights common pitfalls. When it comes to waterproofing in shower renovations, this resource offers invaluable tips for long-lasting results. Additionally, this article helped me choose durable laminate that withstands moisture and daily wear.
Your Next Move: Take Action with Confidence
Remember that every successful renovation starts with attention to detail and a willingness to learn from every mistake. Whether you’re preparing a subfloor or sealing your shower, the effort you put in today pays dividends in the form of lasting beauty and peace of mind. Don’t let hesitation hold you back—embrace the process, and transform your space into something you can truly be proud of. What small fix are you planning to tackle next to make your home more durable? Drop your thoughts below and let’s share insights!
,