The ‘Masking Tape’ Secret for Cutting Laminate Without Jagged Edges
I spent three days grinding concrete on a job last month just so the floor wouldn’t click like a castanet. Most guys skip the leveling compound. They think the underlayment will hide the dip. It won’t. I was in a basement in the humid outskirts of the city, working on a slab that looked like the surface of the moon. If I had just laid the laminate over those ridges, every single joint would have failed within six months. That is the reality of this trade. It is not about the pretty wood on top. It is about the grit, the dust, and the microscopic physics of the surface you are standing on. My boots are covered in dried thin-set and my lungs have tasted more oak dust than fresh air, but that is what it takes to understand why a floor stays flat or why it falls apart.
The physics of the masking tape barrier
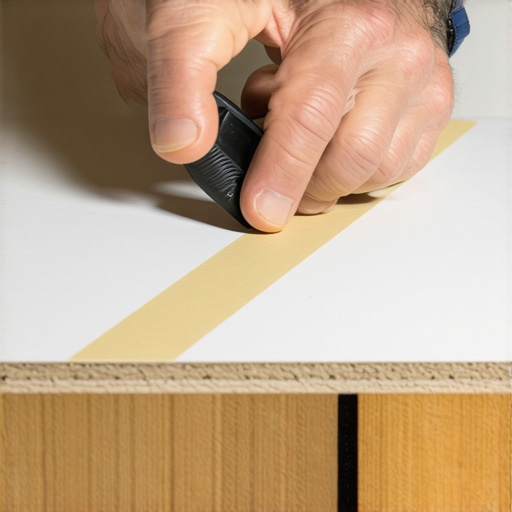
Masking tape serves as a sacrificial surface stabilizer during the cutting process of laminate flooring by providing lateral tension to the aluminum oxide wear layer. This prevents the saw teeth from lifting the brittle decorative paper away from the high-density fiberboard core. When you apply a high-quality painter’s tape to your cut line, you are effectively changing the physics of the exit wound created by the saw blade. Laminate is essentially a sandwich of resin and paper. The top layer is incredibly hard, often reaching a high rating on the AC durability scale, but it is also incredibly brittle. When a circular saw blade or a jigsaw tooth travels upward through the material, it wants to shatter that top layer. The adhesive on the tape holds those micro-particles in place. It prevents the vibration of the blade from radiating through the melamine resin. This is the difference between a cut that looks like it was done at the factory and one that looks like it was chewed by a dog. You need to use a tape with a medium tack. If the tape is too sticky, it might pull the finish off a cheap builder-grade board. If it is too weak, it will vibrate loose before the blade even touches it. Press it down hard with your thumb. Ensure there are no air bubbles. You want a 100 percent bond between the tape and the wear layer before the steel meets the resin.
Why your saw blade destroys the wear layer
The carbide-tipped saw blade is a violent tool that creates micro-fractures in the melamine resin because of rotational torque and tooth geometry. Most DIYers use a standard framing blade with 24 teeth. That is a recipe for disaster. A framing blade is designed to move fast through soft pine, not to precision-cut a dense laminate plank. You need a high tooth count, ideally 60 or 80 teeth, to distribute the impact across a larger surface area. Every tooth that hits the laminate creates a shockwave. If you have fewer teeth, each shockwave is larger. By using more teeth and a masking tape buffer, you are dampening those shockwaves. Think about the RPM of your saw. A typical circular saw spins at around 5,000 revolutions per minute. At that speed, the teeth are hitting the board hundreds of times per second. If the board is not supported by tape, the resin just explodes on impact. The tape acts as a shock absorber. It keeps the energy of the blade localized to the path of the cut rather than letting it bleed out into the surrounding surface. This is why I always tell people that the tool is only half the battle. The preparation of the material is what determines the final aesthetic of the joint. If you are doing a carpet install, you don’t worry about this, but laminate is a different animal entirely. It demands respect for its structural limits.
| Blade Type | Tooth Count | Cut Quality Result | Vibration Rating |
|---|---|---|---|
| Rip Blade | 24 | Severe Chipping | High |
| General Purpose | 40 | Moderate Chipping | Medium |
| Finish Blade | 60 | Clean with Tape | Low |
| Ultra-Finish | 80+ | Cabinet Grade | Minimal |
The subfloor secret that saves the job
Floor leveling is the most critical step in any laminate installation because any subfloor deflection will eventually cause the locking mechanisms to snap under foot traffic. You can have the cleanest cuts in the world, but if your subfloor has a dip deeper than 3/16 of an inch over a 10-foot span, the floor is going to fail. I have seen guys try to use double layers of underlayment to fill a hole. That is a crime in the flooring world. Underlayment is for sound dampening and moisture protection, not for structural leveling. When you step on a plank that is hovering over a dip, the tongue and groove joint acts as a hinge. It was never designed to be a hinge. It was designed to be a static connection. Eventually, the friction of that movement will wear down the fiberboard and the joint will open up. Then moisture gets in. Then the board swells. Then you are calling me to rip it all out and start over. I use a straight edge and a bag of high-flow self-leveling compound on every single job. I don’t care if the house is brand new. Builders are notorious for leaving humps in the plywood or ridges in the concrete. You have to be the one to fix it. If you don’t, the tape on your cuts won’t matter because the whole floor will be a mess within a year.
“A floor is only as good as the subfloor beneath it; deflection is the enemy of every joint.” – Master Flooring Axiom
- Use a 10-foot straight edge to find low spots
- Grind down high spots in concrete with a diamond cup wheel
- Apply a primer before using self-leveling compound
- Check moisture levels with a calcium chloride test
- Allow 24 hours for leveling compound to cure fully
Why carpet install habits ruin laminate jobs
Transitioning from a carpet install mindset to laminate flooring requires a complete shift in tool handling and precision requirements. When you are putting in carpet, you are dealing with a flexible, forgiving material. You can stretch it, tuck it, and hide a multitude of sins against the baseboard. Laminate is the opposite. It is an unforgiving rigid system. If your wall is not straight, you can’t just ‘stretch’ the laminate to fit. You have to scribe the plank. Many old-school carpet guys try to use a knee kicker on laminate. Don’t do that. You will break the locking profile. You need a pull bar and a tapping block. And you need to maintain that 3/8 inch expansion gap around the perimeter. I have seen floors buckle in the summer because someone didn’t leave room for the floor to breathe. The floor grows. It is made of wood fibers. It reacts to the humidity in the air. If it hits a wall and has nowhere to go, it goes up. I once saw a floor in a hallway that had lifted four inches off the subfloor because the installer pinned it under the baseboards with no gap. It looked like a bridge.
How moisture from the shower kills your joints
Installing laminate near showers is a high-risk maneuver that requires silicone sealing and moisture barriers to prevent hydrostatic pressure from delaminating the planks. People see ‘waterproof’ on the box and they think they can submerge it. That is a lie. Most laminate is only waterproof on the surface. The joints are the weak point. If water sits on a joint for more than an hour, it seeps into the HDF core. The core acts like a sponge. It swells. The edges of the planks turn upward, a phenomenon we call cupping. If you are running laminate up to a bathroom, you must leave a gap at the transition and fill that gap with a 100 percent silicone caulk. This allows the floor to expand but keeps the water out. Even better, don’t use laminate in the bathroom. Use an LVP with a stone-polymer core or stick to traditional tile. But if you must use it, that masking tape trick becomes even more important for your cuts. Any chip in the wear layer is an entry point for moisture. A jagged cut is a thirsty cut. You want that factory edge or a tape-protected custom cut to keep the core sealed as tightly as possible.
“The integrity of a floating floor is maintained only through the strict adherence to perimeter expansion requirements.” – NWFA Technical Guidelines
The 1/8 inch that ruins everything
Precision in flooring measurements is not a suggestion but a mathematical necessity where a single millimeter of misalignment can derail an entire layout grid. If your first row is off by an eighth of an inch, by the time you get across a twenty-foot room, that error has compounded. You will find yourself struggling to click the planks together. You will start using a hammer harder than you should. You will break the tongues. This is why I use a laser line for the starter row. I don’t trust the wall. Walls are never straight. I find the center of the room and work my way out, or I snap a chalk line that is perfectly square to the longest run. When you are cutting those end pieces, use the masking tape. Mark your line on the tape. Use a sharp pencil. A fat carpenter’s pencil is useless for precision work. It leaves a line that is a sixteenth of an inch wide. Which side of the line are you cutting on? That little bit of play is enough to ruin a tight fit against a door casing. I spend more time with my tape measure and my square than I do with the saw. That is the mark of a professional. Anyone can pull a trigger on a saw. Not everyone can plan a layout that lands a full plank at the opposite wall. It takes patience. It takes a willingness to stand back and look at the geometry before you commit to the first cut.
{“@context”:”https://schema.org”,”@type”:”Article”,”headline”:”The Masking Tape Secret for Cutting Laminate Without Jagged Edges”,”author”:{“@type”:”Person”,”name”:”Master Floor Installer”},”description”:”Learn the professional secret to cutting laminate flooring without chipping using the masking tape method and proper subfloor preparation.”,”articleSection”:”Flooring Installation”}