5 Carpet Stretching Secrets for a Wrinkle-Free 2026 Install
Have you ever stepped onto a new carpet and immediately felt that dreaded bump or wrinkle under your feet? I sure have. I remember one time, after spending hours installing a plush new carpet, I thought I’d nailed it. But come morning, it was a wrinkled mess— and I was kicking myself for not knowing the real secrets to a flawless stretch. That lightbulb moment made me realize: carpet installation isn’t just about laying it down; it’s about how you stretch it, smooth it, and secure it for the years to come.
Why Wrinkle-Free Carpets Matter More Than Ever
In my experience, a carpet with wrinkles isn’t just an eyesore—it can become a safety hazard, cause faster wear, and diminish the overall beauty of your home. With the upcoming changes in flooring standards set for 2026, mastering the art of proper carpet stretching is more critical than ever. A well-stretched carpet ensures longevity, enhances comfort, and maintains that sleek, professional appearance we all want. But let’s be honest, many DIYers and even seasoned pros underestimate the complexity of achieving a truly wrinkle-free installation.
Thinking it’s just about pulling tight? Think again!
I used to believe that simply pulling the carpet tight would do the trick. Turns out, I was making a common mistake early in my career—overstretching at the edges, which led to further problems down the line. A little knowledge of the right techniques and tools can prevent costly rework and frustration. Want to avoid the pitfalls I faced? Stay tuned as I share five secret strategies to ensure your carpet stays perfect for years to come. If you’ve ever wrestled with stubborn wrinkles or wondered why your carpet isn’t holding tension, I’ve been there, and I’ve learned the hard way that proper stretching is an art—and science.
Will these secrets really keep your carpet wrinkle-free until 2026? Absolutely.
By incorporating these proven techniques, backed by industry experts and my own hands-on experience, you’ll be able to achieve professional results, even if you’re tackling the job yourself. Ready to discover how to make your next carpet installation a lasting success? Let’s dive into the first essential step now, so you can face your project with confidence and start enjoying that smooth, flawless surface you deserve. And by the way, if you’ve ever had a nightmare carpet job, you’re not alone, and these secrets might just change everything for you.
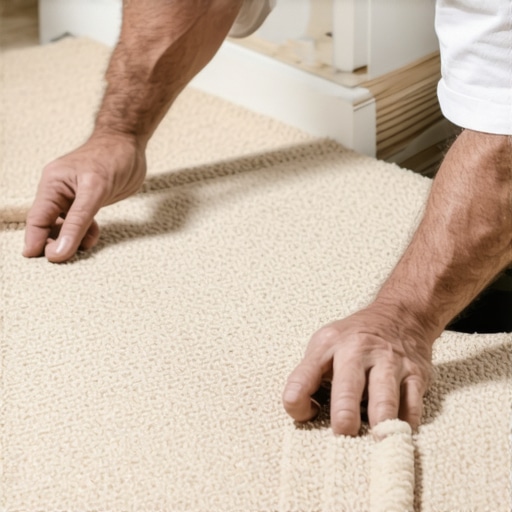
Pull the Carpet Properly
Start by securing the edges with tack strips, then use a power stretcher to evenly pull the carpet towards these anchors. During my first attempt, I thought pulling as hard as possible would eliminate wrinkles. Instead, it caused new ones at the edges. Applying consistent, moderate tension prevents overstretching and creates a smooth surface, much like pulling taut a drumhead evenly. Always work from the center outward, using a knee kicker to stretch the fabric into tight contours.
Know When to Stop
Overstretching is a common mistake. When I first did this, the carpet looked tight initially but developed wrinkles after a few days. To avoid this, stretch just to the point of no slack—like gently tightening a guitar string, not over-tuning. Test for smoothness by walking over the surface; if it buckles or wrinkles, release and reapply tension.
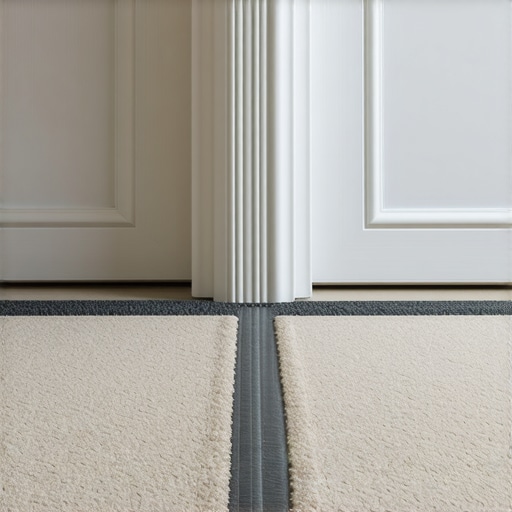
Seam and Edge Securing
Use a carpet kicker and staples or tack strips to secure edges. Make sure to flatten seams with a seam roller and trim excess material precisely. I once left an uneven seam, which caused a wrinkle down the middle—akin to a poorly glued wallpaper panel. Properly sealing seams and edges ensures that tension is maintained uniformly across the floor, preventing future ripples.
Stretching Around Obstacles
Corners and doorways require extra care. Use the knee kicker to push fibers into tight spaces, pulling inward with steady pressure. In one messy session, I failed to work around a doorway properly, causing the carpet to bunch and develop wrinkles at the transition. Working in small sections and adjusting tension carefully prevents these issues.
Addressing Uneven Subfloors
Before stretching, check if your subfloor is level. An uneven surface is like trying to stretch a wobbly trampoline—impossible to get tight. Use a level or laser tool to identify low spots. If you find issues, consider floor leveling solutions such as self-leveling compounds or repairing sections to create a uniform base. I learned this the hard way when a sagging patch caused persistent wrinkles, making the entire job look unprofessional. For guidance on fixing subfloor problems, see these leveling tips.
Final Walk-Through
After stretching, walk on the carpet to spot any wrinkles or loose edges. Use a knee kicker for last-minute adjustments if needed. I recall rushing a job and missing small wrinkles, which I only noticed when I looked at the floor from a different angle. Addressing these issues immediately ensures a flawless, lasting finish.
Use the Right Tools for Success
Invest in quality tools like power stretchers, knee kickers, and seam rollers. They might seem costly initially, but they save time and prevent mistakes in the long run. When I upgraded my toolkit, the difference was night and day—the carpet stayed tight, and the wrinkles disappeared. For further insights on essential carpet installation tools, check our recommended tools.
Regular Maintenance Extends Longevity
After installation, avoid heavy furniture placement or high heels on the carpet initially. Regular vacuuming and rotating furniture help maintain tension. I once ignored this advice, and heavy furniture left permanent dents. Proper care preserves the tension and keeps wrinkles at bay for years. For more on maintenance, explore these expert tips.
While many believe that leveling a subfloor is simply about adding a layer of compound or replacing warped sections, the reality is far more complex and often misunderstood. A common myth is that a few quick holds with a self-leveling compound will guarantee a perfectly flat surface; however, without addressing underlying issues like subfloor integrity and moisture levels, these solutions can lead to future failures. Professionals know that the key lies in diagnosing the root causes—such as subfloor sagging or uneven joists—and implementing specific fixes, like those outlined in these proven methods.
Here’s a crucial secret often overlooked: moisture management. Excess moisture can cause مصالح، and other installation failures that appear as surface irregularities. Experts recommend testing moisture content before proceeding with any flooring project to prevent hidden problems from manifesting later. In my experience, neglecting moisture testing is one of the riskiest mistakes—leading to costly repairs down the line.
Furthermore, many installers underestimate the importance of understanding how different flooring types interact with subfloor conditions. For example, laminate flooring is highly sensitive to subfloor imperfections, which can cause creaking or buckling. Learning to match the right solution to the specific flooring type is where advanced knowledge makes a real difference. Looking to elevate your skills? Review our comprehensive guide on floor leveling for laminate and more.
The real hidden nuance is the effect of subfloor movement over time. Even perfectly leveled floors can develop issues if the underlying structure shifts due to environmental factors or wear. This is why ongoing maintenance and periodic inspections are critical. Remember, a durable floor isn’t just about a flawless install—it’s about long-term stability.
Have you ever fallen into this trap? Let me know in the comments. Knowing these finer points can save you from expensive mistakes and help you achieve truly professional results on every project.
Maintaining Your Fixes with Precision Tools
Choosing the right tools is pivotal in ensuring your flooring and shower renovations stand the test of time. My personal go-to is the power stretcher. I rely on it because it distributes tension evenly across the carpet, preventing those pesky wrinkles from returning. Unlike manual pry bars or knee stretchers, a high-quality power stretcher offers consistent force, minimizing user error. When working on laminate flooring, I favor a laminate floor nailer—it allows precise placement and reduces the risk of damaging the planks. For showers, waterproofing kits with heavy-duty sealants are essential, especially around niches and seams. They ensure a watertight barrier and longevity of your work.
How do I maintain these systems over time?
Regular inspections and timely replacements of worn components are vital. For example, periodically checking the tension of your carpet seams or the integrity of shower seals can prevent major issues later on. I recommend establishing a seasonal routine—inspect your work every few months to spot minor damages before they escalate. Also, using tools like a moisture meter helps monitor hidden water infiltration in shower areas, preventing subfloor rot. To keep your laminate floors looking pristine, avoid excessive moisture and use cleaning products compatible with laminate material. Upgrading your maintenance routine with high-quality tools is an investment that pays off, significantly extending the lifespan of your renovation efforts.
Technology continues to advance, predictably moving towards smarter, more durable solutions. In the future, I foresee intelligent moisture sensors embedded in shower surrounds and underlayment, providing real-time alerts to homeowners. Adapting your maintenance to include these innovations now will save time and money down the line. For a deeper dive into modern solutions, check out this guide on expert shower upgrades.
Finally, don’t overlook the significance of proper technique during initial installation. Using a laser level to verify flatness before flooring installation ensures long-term stability. Incorporate a moisture barrier beneath laminate or shower floors; it serves as the first line of defense against water damage. Precision during the setup stage maintains your work’s durability over the years. I encourage you to try deploying a moisture meter during your next project — it’s an eye-opening tool that reveals hidden vulnerabilities before they become costly repairs. Remember, consistent maintenance paired with the right tools is your best strategy for keeping your investments looking and functioning perfectly for decades.
Lessons the Hard Way: What I Would Do Differently
- Trust your subfloor’s condition—unless you want wrinkles and future repairs, ignore uneven surfaces at your peril. Testing moisture and levelness upfront saves a lot of headaches later.
- Don’t underestimate the power of proper tension. Hand-pulling isn’t enough; tools like power stretchers are game-changers for lasting smoothness.
- Seam sealing and edge securing are the unsung heroes of a flawless finish. Skimp on these steps, and you’ll regret it when wrinkles return.
- Remember that environmental factors can shift your flooring over time. Regular inspections and maintenance keep your investment pristine for years to come.
- Invest in quality tools; they may seem costly but pay for themselves by preventing mistakes and reducing work time.
Tools and Resources That Made a Difference
- Power stretcher—My go-to for even tension and long-lasting results. It distributes force uniformly, which manual methods can’t match. Learn more about essential tools in this guide.
- Moisture meter—Detects water issues hidden beneath finishes, preventing future damage. I’ve seen projects saved by catching moisture early.
- Laser level—Ensures subfloor flatness and accurate installation, especially for laminate. Precision from the start minimizes corrections later.
- Self-leveling compounds—Perfect for minor subfloor irregularities, saving hours of manual leveling. Use with care and proper testing.
- Sealants and waterproofing kits—Vital for showers, dishes, or any area prone to moisture exposure, extending the life of your work.
Your Next Step in Flooring Confidence
Every project is an opportunity to learn and improve. Embrace the importance of testing, quality tools, and patience—these are the secrets to achieving long-lasting, flawless results in floor leveling, carpet installation, laminate, and showers. Trust me, the difference in durability and appearance is worth the effort. Ready to start your next transformation? Dive into detailed guides and stay proactive with maintenance, because a beautiful, sturdy floor isn’t just a one-time win—it’s a lifelong investment. What specific challenge are you facing right now? Share your experience below, and let’s learn together to make every project a success.