How to Stop Your Laminate Flooring from Bouncing Near the Walls
The ghost in the expansion gap
To stop laminate flooring from bouncing near the walls, you must address subfloor flatness and perimeter clearance issues. Identifying a dip in the subfloor, removing baseboards to inspect expansion gaps, and applying self-leveling compound or specialized shims under the planks will eliminate the vertical movement and clicking sounds.
Most guys skip the leveling compound. They think the underlayment will hide the dip. It won’t. I spent three days grinding concrete on a job last month just so the floor wouldn’t click like a castanet. I remember walking into a high-end condo where the owner had spent five thousand dollars on a beautiful driftwood-colored laminate. Every time they walked near the sliding glass door, the floor sank nearly half an inch. It felt like walking on a trampoline. They thought the floor was defective. I had to tell them the truth. Their subfloor was shaped like a bowl. The installer just threw the underlayment down and hoped for the best. That is not craftsmanship. That is laziness. I had to pull up forty percent of that floor, pour ten bags of leveler, and wait for it to cure. It was a mess that could have been avoided with a simple six-foot straightedge and some professional pride. Flooring is not just about what you see on the surface. It is a structural engineering challenge that begins at the substrate. If your subfloor is not within three sixteenths of an inch over a ten foot radius, your laminate will fail. It is a mathematical certainty. The physics of a floating floor system rely on a flat plane. When you leave a void, the tongue and groove joints become the primary load bearers. They are made of pressed HDF, high density fiberboard. They are not designed to support the weight of a human body over a hollow space. Eventually, those joints will snap. You will hear a sharp crack, and then the floor will stay down because the mechanical bond is dead.
“A floor is only as good as the subfloor beneath it; deflection is the enemy of every joint.” – Master Flooring Axiom
Why your subfloor is lying to you
Subfloor deception occurs when installers assume a plywood or concrete surface is flat without using a laser level or straightedge. Environmental factors like settling or moisture can cause subfloors to dip near the foundation walls, creating a void that causes laminate planks to bounce under foot pressure.
You cannot trust your eyes. A subfloor can look perfectly fine until you lay a long piece of rigid material over it. In new construction, the joists often shrink at different rates. Near the exterior walls, the rim joist might stay high while the inner joists settle. This creates a slope or a valley. In older homes, the foundation might have settled, leaving the floor near the walls lower than the center of the room. When you install a floating laminate floor, it spans these gaps like a bridge. But it is a bridge made of wood dust and resin. It has a specific modulus of elasticity. If the gap is too wide, the material reaches its limit and deflects. This movement is what you feel as a bounce. It is often worse near the walls because that is where the run ends and the floor is least supported. You might also be dealing with a carpet install carryover. Sometimes installers leave the old tack strip holes or uneven transitions from a previous carpet installation near the walls. This creates a jagged or uneven perimeter that prevents the laminate from sitting flush. You have to be meticulous. You have to be the guy who crawls around with a flashlight and a level. If you see light under that level, you have a problem. You do not just cover it up. You fix it. Use a high-quality Portland cement-based leveler. Do not use the cheap gypsum stuff if you want it to last twenty years. The chemistry of the bond matters. A modified thin-set or a high-flow leveler creates a rock-hard surface that will not crumble under the constant micro-movements of a walking family.
The structural mechanics of deflection
Deflection in laminate flooring is the vertical movement measured when weight is applied to a plank spanning a subfloor void. To stop this, the void must be filled with a non-compressible material or the subfloor must be ground down to achieve a flat, rigid installation surface.
Let’s talk about the molecular reality of your floor. Laminate is a composite. It usually consists of a wear layer made of aluminum oxide, a decorative paper layer, an HDF core, and a balancing layer on the bottom. The HDF core is the heart of the system. It is dense, but it is not indestructible. When the floor bounces, the core is being flexed. This creates heat and friction inside the locking mechanism. If you live in a place like Phoenix, the dry heat makes that HDF core more brittle. If you are in the swampy humidity of Houston, the core absorbs moisture and expands, which can actually make the bounce worse as the floor grows and hits the wall. You need to understand the Janka hardness scale does not apply here the same way it does to solid oak. Laminate is about impact resistance and stability. But stability is lost when the floor is in the air. You are essentially asking the plastic and wood fiber locking system to act as a structural beam. It will fail. I have seen the locking tabs ground into fine white powder from the constant rubbing of a bouncing floor. That powder is the remains of your investment. You can’t just glue it back together. Once the profile is gone, the plank is junk. This is why floor leveling is the most important step in any install. If you are going over concrete, you need to check for moisture first. A damp slab will turn your leveler into mush and ruin the laminate from the bottom up.
| Subfloor Material | Max Allowable Dip | Recommended Fix | Cure Time |
|---|---|---|---|
| Concrete Slab | 1/8 inch per 6 feet | Self-Leveling Compound | 24 to 48 Hours |
| Plywood Subfloor | 3/16 inch per 10 feet | Patching Compound or Sanding | 4 to 12 Hours |
| OSB (Oriented Strand Board) | 3/16 inch per 10 feet | Sanding High Spots only | Immediate |
Why too much cushion kills the joint
Using an underlayment that is too thick or soft is a primary cause of laminate flooring bounce and joint failure. While homeowners often want more cushion, a soft underlayment allows the floor to compress too much, putting extreme stress on the locking mechanisms and causing them to snap.
This is my biggest pet peeve. A homeowner goes to a big box store and the salesperson tells them to buy the thickest, softest underlayment possible for “comfort.” That is a lie. That is a recipe for disaster. Too much cushion is the enemy of a floating floor. You want a high-density underlayment that is no more than three millimeters thick. Anything more than that creates a trampoline effect. When you step on the plank, the underlayment compresses. The plank sinks. The plank next to it, which you aren’t stepping on, stays up. This puts a shearing force on the tongue and groove. It is like trying to snap a pencil in half. Over thousands of footsteps, that pencil—your floor joint—will break. If you are installing in a bathroom or near showers, you also have to worry about moisture getting trapped in that thick foam. It becomes a mold factory. I always recommend a high-density rubber or felt underlayment. They offer better sound dampening anyway. They have better IIC (Impact Insulation Class) ratings without the squish. If you want a floor that feels solid underfoot, like a site-finished hardwood, you need a firm base. You do not want your floor to feel like a yoga mat. It should feel like stone. That only happens with a flat subfloor and a dense, thin underlayment. It is a counter-intuitive truth that most DIYers miss.
“Subfloor flatness must be within 3/16 inch in a 10 foot radius for floating floor installations.” – NWFA General Standards
The 1/8 inch that ruins everything
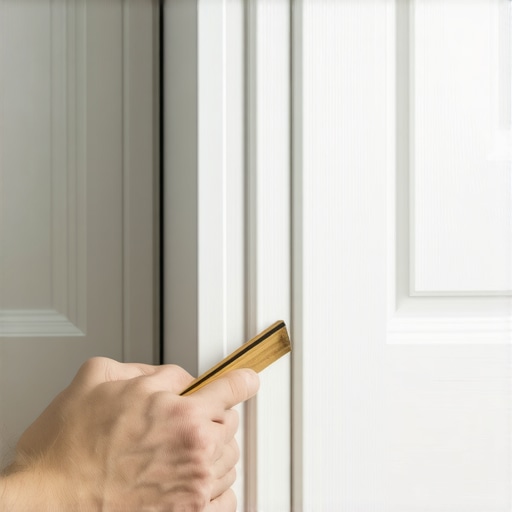
The expansion gap is the space left between the laminate flooring and the wall to allow for natural movement caused by temperature and humidity changes. If this gap is missing or obstructed, the floor will bind, lift, and bounce because it has nowhere to expand.
People think the baseboard is just there to look pretty. It’s not. It’s a cover for the most important part of a floating floor: the expansion gap. Laminate is mostly wood. Wood moves. It breathes. If you jam the laminate tight against the wall, the first time the humidity spikes, that floor is going to grow. Since it can’t go through the wall, it goes up. This creates a bubble. When you walk on that bubble, it bounces. You need a minimum of a quarter inch, but I prefer three eighths of an inch. I use spacers every twelve inches during the install to make sure that gap is consistent. And here is the kicker: do not nail your baseboards into the floor. I see this all the time. The installer or the homeowner nails the baseboard or the quarter round straight down into the laminate. You have just locked the floor in place. You have killed the floating system. The floor is now pinned. When it tries to move, it will buckle or the joints will pull apart. You must nail the baseboard into the wall studs, and the quarter round into the baseboard. The floor must be able to slide underneath the trim like a piston in an engine. It is a dynamic system. If you treat it like a static one, you are going to have a bad time. I have had to go into houses and pull the trim off just to run a jamb saw along the edge to recreate the gap the last guy forgot. It is a dusty, miserable job that costs the homeowner a fortune.
The professional checklist for a rock-solid floor
Achieving a stable laminate floor requires a systematic approach to preparation and installation. Following a strict protocol ensures that the perimeter is secure and the surface remains flat for the life of the product.
- Verify subfloor flatness using a 10-foot straightedge or laser level across the entire room.
- Grind down high spots in concrete using a diamond cup wheel and a vacuum shroud.
- Fill low spots with a high-compressive strength self-leveling underlayment and allow it to dry completely.
- Maintain a consistent 3/8 inch expansion gap around all vertical obstructions including walls and pipes.
- Choose a high-density underlayment with a thickness not exceeding 3mm to prevent over-compression.
- Acclimate the laminate planks in the room for at least 48 hours to match the local humidity levels.
- Ensure baseboards are nailed to the wall and not through the flooring material itself.
- Check that the locking mechanisms are clear of debris or wood chips before clicking planks together.
Leveling compound is the only salvation
Applying a self-leveling compound is the most effective way to eliminate the voids that cause laminate flooring to bounce near walls. This liquid cement finds the low points and creates a perfectly horizontal plane, providing the necessary support for the floating planks.
I have used thousands of bags of leveler in my career. There is an art to it. You don’t just dump it out and walk away. You have to prep the slab. You need a primer. If you don’t prime the concrete, the dry slab will suck the moisture out of the leveler too fast. It won’t flow, and it won’t bond. It will just sit there like a lump of cold oatmeal. I use a spiked roller to get the air bubbles out. Those tiny bubbles might seem harmless, but they create weak points in the surface. When you are dealing with the area near a wall, you have to be careful not to let the leveler run under the sill plate or into the wall cavity. I use foam weatherstripping as a dam. It keeps the liquid where it belongs. Once that leveler sets, it is like a mirror. You lay your laminate over that, and it feels like you are walking on a skyscraper foundation. No clicks. No squeaks. No bounce. It is the difference between a floor that feels cheap and a floor that feels like a permanent part of the architecture. If you are on a wood subfloor, you can use a feathering patch. It is a creamy, sandable compound that allows you to smooth out the transition between plywood sheets. Most guys don’t bother. They think the underlayment will bridge the gap. I’m telling you, the underlayment is not a bridge. It is a veil. It hides the problem for a month, and then the bounce comes back to haunt you. If you want to fix a bounce that is already there, you have to be brave. You have to pull up the floor. You can try to inject expanding foam into the void, but that is a hack move. It is messy, and it can actually lift the floor too high if you aren’t careful. Do it right the first time. Take the floor up, level the spot, and put it back down.
The physics of the perimeter lock
The perimeter lock refers to how the final rows of laminate interact with the wall and the subfloor. Proper installation involves using a pull bar to ensure the final joints are fully engaged, preventing any vertical play that manifests as a bounce.
The last row is always the hardest. You are working in a tight space. You can’t get a tapping block in there. This is where most installers fail. They just drop the last plank in and hope the baseboard hides the fact that the joint isn’t fully seated. If that joint is loose, even by a millimeter, the floor will bounce. You need a heavy-duty pull bar. Not the thin ones that come in the cheap DIY kits. You need a thick, professional-grade steel pull bar. You hook it over the edge of the plank and you whack it with a dead-blow hammer. You need to hear that specific ‘clack’ that tells you the tongue has fully entered the groove. If you don’t hear it, the joint is just sitting on top of itself. That is where the bounce comes from. It is mechanical failure at the edge. I have seen guys try to use a screwdriver to pry the planks together. All they do is damage the edge of the laminate and ruin the aesthetic. Use the right tools. If you are dealing with a doorway or a transition to a carpet install, the same rules apply. The transition strip, or T-molding, needs to be installed correctly. The track for the molding should be screwed into the subfloor, but the molding itself should not pinch the laminate. It needs room to breathe. Everything about a floating floor is about managing movement. You are not fighting physics; you are negotiating with it. If you provide the floor with a flat surface and the space to move, it will be your silent partner for decades. If you trap it or leave it hanging over a void, it will complain every time you step on it. Listen to your floor. It tells you exactly what is wrong with the subfloor if you know how to listen.