The ‘Sanding Hack’ for Removing Ridges from Self-Leveling Concrete
The 1/8 inch that ruins everything
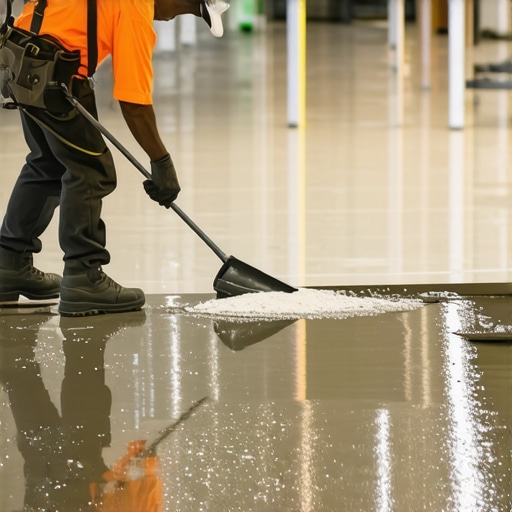
Self leveling concrete ridges occur when the compound is mixed with too little water or when the installer fails to use a spiked roller to break surface tension. These high spots prevent flooring from laying flat, leading to joint failure in laminate or puddling in showers. Sanding these ridges during the green state is the most efficient way to achieve a professional finish. Most guys skip the leveling compound. They think the underlayment will hide the dip. It won’t. I spent three days grinding concrete on a job last month just so the floor wouldn’t click like a castanet. It was a $20,000 wide-plank oak job that nearly went sideways because the previous crew thought close enough was good enough. It never is. You have to treat the subfloor like a structural engineering project, not just a surface to hide. The mechanics of a flat floor are simple but unforgiving. If your subfloor has a ridge, your finish floor has a pivot point. That pivot point leads to deflection. Deflection leads to noise, then to cracks, and finally to a full replacement. You smell the dust of a failed job before you see it. I prefer the smell of wet concrete and the sharp tang of a diamond blade hitting its mark. High ridges are the ghosts of a bad pour. They haunt every step a homeowner takes. Removing them requires more than just muscle; it requires an understanding of the chemical cure cycle of the material you are fighting. Use a level. Use a straight edge. Trust nothing but the bubble.
The subfloor secret I learned the hard way
A subfloor secret that many homeowners overlook is the reality that concrete is a dynamic, porous material that breathes moisture vapor. When you pour self-leveling compound, you are adding gallons of water to an existing slab. If that slab is not primed correctly, it sucks the moisture out of the leveler too fast. This causes the compound to stop flowing before it reaches a level state, leaving behind nasty ridges where the pours met. I remember a job in a high-rise where the HVAC was running full blast. The air was so dry it flashed the leveler in minutes. We were left with ridges that looked like mountain ranges. I had to get a floor buffer with 60-grit diamond screens and go to work before the stuff turned into granite. If we had waited 24 hours, we would have been there for a week. That experience taught me that the window for fixing a floor is small. You have to catch the compound while it is still green. In the flooring world, green means the material is hard enough to walk on but hasn’t reached its full compressive strength. It is the sweet spot for the sanding hack. If you miss this window, you are no longer sanding; you are grinding. Grinding costs more in blades and creates a dust storm that will penetrate every cabinet in the house. Always check your moisture levels before you even open a bag of leveler.
Physics of the pour and the ridge
The physics of a self-leveling pour involve surface tension and the viscosity of the calcium aluminate cement. If the viscosity is too high, the material cannot overcome the friction of the subfloor. This results in ridges at the perimeter or at the transition between buckets. Understanding the flow rate is mandatory for a flat result.
“A floor is only as good as the subfloor beneath it; deflection is the enemy of every joint.” – Master Flooring Axiom
The science of leveling is about gravity. You want the liquid to find its own level, but concrete is heavy. It has internal friction. Professionals use a gauge rake to set the depth, but even then, ridges form. The hack is to use a floor buffer with a weighted drive plate. Do not use a belt sander. The heat from a belt sander can glaze the surface, which prevents your thin-set or adhesive from biting into the concrete. You want an open pore structure. When you sand the ridges, you are opening up the capillaries of the cement. This creates a mechanical bond that is vital for the next layer. Whether you are prepping for a carpet install or a shower pan, that bond is what prevents delamination. People think waterproof means indestructible. It doesn’t. If the bond fails, the floor moves. If the floor moves, the waterproof seal breaks.
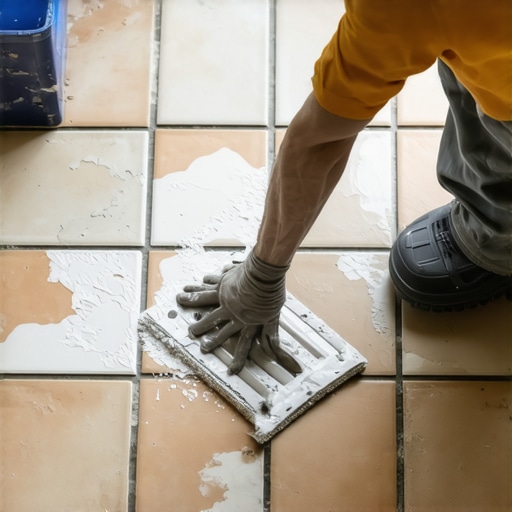
Why carpet install requires more than just a rough slab
A carpet install over a ridged subfloor will eventually show every imperfection through the padding as the fibers compress over time. While carpet is the most forgiving material, high spots in the concrete act like a serrated edge against the backing of the carpet. This causes premature wear and unsightly lines in high-traffic areas. You might think the 7/16 inch 8-pound pad will hide a ridge. It might for a month. But after a year of walking on it, that ridge will be visible. In the flooring trade, we call this telegraphing. Everything on the bottom eventually shows up on the top. This is why I treat a carpet subfloor with the same respect as a hardwood subfloor. I use a 10-foot straight edge to find the ridges. If I find a high spot, I mark it with a red crayon. Then I get the buffer. The goal is to get the floor flat within 3/16 of an inch over 10 feet. That is the industry standard for a reason. Anything more and you are asking for trouble. Carpet is not a mask for poor workmanship. It is a finish that depends on the integrity of the substrate. If you skip the sanding, you are just delaying the inevitable complaints from the customer. Do the work once and do it right.
The chemistry of the bond
The chemistry of the bond between self-leveling concrete and the final floor depends on the removal of laitance. Laitance is a weak, milky layer of cement fines that rises to the surface during the curing process. If you do not sand this off, your adhesive is sticking to dust, not the floor. Sanding ridges serves a dual purpose: it flattens the floor and removes this weak layer. I have seen entire laminate floors fail because the installer didn’t sand the leveler. The glue or the underlayment tape stuck to the laitance, and when the floor expanded, it pulled the surface right off the slab. It looked like a sheet of paper peeling away. To avoid this, you need to use a coarse grit. I start with a 40 or 60 grit diamond screen on a low-speed buffer. This is not about making it smooth like a countertop. This is about making it flat and textured. The texture is what gives the thin-set for your shower tile something to grab onto. Without that mechanical tooth, your tiles will pop the moment someone drops a heavy shampoo bottle. In a shower, that pop means a leak. A leak means mold. Mold means a lawsuit. Sand the ridges. It is the only way to be sure.
The sanding hack for green concrete
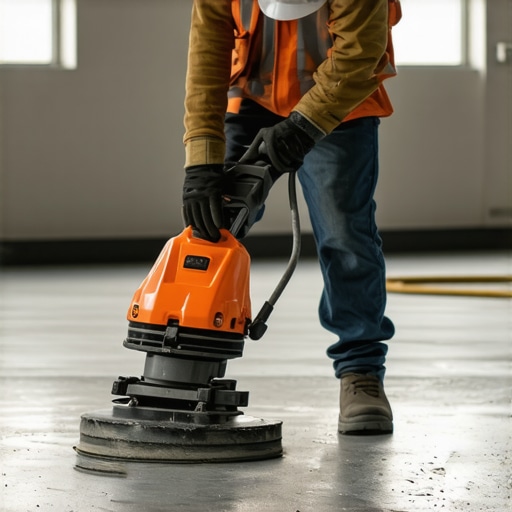
The sanding hack involves using a standard floor buffer with a 60-grit diamond screen precisely four to six hours after the pour. At this stage, the concrete is hard enough to support your weight but soft enough that the high ridges can be shaved down with minimal dust. This window is the secret to a fast job. If you wait until the next day, the PSI of the leveler will have jumped from 1,000 to 3,000. At 3,000 PSI, you are in for a long day. I use a circular motion, focusing the weight of the machine on the high spots. You can feel the machine jump when it hits a ridge. You stay on that spot until the machine runs smooth. It takes a certain touch. You can’t be timid with it. You have to manhandle the buffer to keep it from walking away from you. The dust produced at this stage is heavier and drops to the floor rather than floating in the air. It is easier to clean. Once you have knocked down the ridges, you vacuum the floor with a HEPA vac. Never sweep. Sweeping just pushes the fine dust into the pores you just opened. You want those pores clean and ready for the primer or the glue. This hack saves hours of grinding and keeps the job site much cleaner for the other trades.
Technical metrics for subfloor flatness
Flatness metrics are measured in F-numbers or by using a straight edge to detect gaps between the floor and the tool. For most residential installs, a floor must be flat to within 1/8 inch over a 6 foot span or 3/16 inch over 10 feet. These numbers are the law of the land for installers.
| Metric Type | Requirement for Laminate | Requirement for Tile/Showers | Requirement for Carpet |
|---|---|---|---|
| Maximum Gap (10ft) | 3/16 inch | 1/8 inch | 1/4 inch |
| Surface Texture | Clean/Dust-free | Porous/Mechanical Tooth | Smooth/Flat |
| Moisture Vapor Rate | < 3 lbs / 1000 sqft | Per manufacturer spec | < 5 lbs / 1000 sqft |
| Sanding Window | 4-8 hours post-pour | 4-8 hours post-pour | 4-8 hours post-pour |
Maintaining these standards ensures that the locking mechanisms on laminate floors do not snap under load. While most people want the thickest underlayment, too much cushion actually causes the locking mechanisms on LVP or laminate to snap under pressure because the floor flexes too much into the dips. A flat floor needs less cushion. A flat floor is a quiet floor. When you sand those ridges, you are essentially building the foundation of a silent house. Nobody wants to hear their floor clicking like a telegraph machine every time they walk to the kitchen at night.
Laminate floors and the click of death
Laminate floors are particularly sensitive to ridges because the click-lock joints have a very low tolerance for vertical deflection. If a ridge exists under a joint, every step causes the tongue to rub against the groove. This eventually wears down the HDF core until the joint snaps. I call this the click of death. Once a laminate floor starts clicking, there is no fix except to rip it up and address the subfloor. Homeowners always ask why their waterproof vinyl is buckling. Usually, it’s because they locked it under a heavy kitchen island, killing the floor’s ability to breathe, or they installed it over a ridged subfloor that didn’t allow the planks to sit flat. When you sand those ridges, you are giving the laminate a stable platform to float on. Remember, a floating floor is a giant sheet. It needs to move as a single unit. A ridge acts like a speed bump, catching the floor and causing it to bind. When it binds, it buckles. If you see a hump in your laminate, 99 percent of the time, there is a ridge in the concrete beneath it that should have been sanded down during the install.
Shower pans and the geometry of drainage
In showers, ridges in the self-leveling compound can create birdbaths where water collects under the tile, leading to mold and eventual waterproofing failure. A shower floor must have a consistent slope toward the drain, typically 1/4 inch per foot.
“Water follows the path of least resistance; a ridge is a dam that directs water to your wall studs.” – TCNA Guide Commentary
Ridges disrupt this slope. When I am prepping a shower, I am even more aggressive with the sanding. I want that surface to be perfectly inclined. If I find a ridge, I sand it until the straight edge shows no light underneath it. This is especially vital when using topical waterproofing membranes like Kerdi. These membranes are thin. If they are stretched over a sharp ridge of concrete, they can be punctured or stressed, leading to a leak that you won’t find until the ceiling below starts to brown. The geometry of a shower is unforgiving. You are fighting gravity and water. Don’t let a poorly poured bag of leveler be the reason your shower fails in three years. Sand the ridges and ensure your slope is a true plane. It is the difference between a dry house and a rot-trap.
Tools of the trade for leveling success
The right tools for removing ridges include a low-speed floor buffer, diamond abrasive screens, and a high-quality straight edge. You cannot eyeball a flat floor. You need tools that do not lie.
- 10-foot aluminum straight edge for identifying high spots and ridges.
- Low-speed floor buffer (175 RPM) for controlled sanding without burning the concrete.
- 60-grit diamond screens or silicon carbide sanding discs.
- HEPA-rated industrial vacuum with a floor wand to remove all laitance.
- Non-marring knee pads because you will be spending a lot of time checking the floor.
- Crayons or chalk to mark the ridges before you start the machine.
If you try to use a hand sander for a large room, you will end up with a wavy floor. The large diameter of a floor buffer is what creates the flatness. It bridges the low spots and only cuts the high spots. It is a self-correcting system. If the buffer is vibrating wildly, you have a major ridge. When the buffer starts to glide smoothly, you have achieved your goal. It is a tactile process. You feel the flatness through the handle of the machine. It is satisfying when that machine finally goes quiet and smooth.
The final word on substrate prep
Substrate preparation is the most important part of any flooring job. If you spend your time on the subfloor, the finish floor installs itself. If you rush the subfloor, you will fight the finish floor every step of the way. Sanding ridges in self-leveling concrete is a dusty, physical task that most people want to skip. But in 25 years of doing this, I have never regretted the time I spent on my knees with a sander. I have only regretted the times I thought a ridge was small enough to ignore. It never is. The physics of the floor will always find that ridge. The chemistry of the bond will always fail over that laitance. Take the extra half day. Get the buffer. Sand the ridges while the concrete is green. Your floor will be flatter, your joints will be stronger, and your customers will be happier. A master floor installer knows that the beauty of the floor is in the parts you can’t see. It is in the flat, gray, sanded slab that sits beneath the wood or the tile. That is where the quality lives. Do the work. Sand the floor.