I vividly remember the moment I stepped into my living room, expecting the cozy comfort I had long enjoyed, only to notice a hideous bump forming along what used to be a seamless stretch of plush carpet. The seams, which I thought were properly installed, were fraying and splitting apart. That lightbulb moment made me realize just how often homeowners overlook the subtle signs that their carpet’s integrity is failing. And believe me, I’ve been there—thinking a little fray was harmless, only to face costly repairs down the line.
Why Well-Moistened Seams Can Turn Into Your Biggest Nightmare
If you’re like me, you’ve probably asked yourself, “Why are my carpet seams fraying so quickly?” Well, the truth is, understanding the common causes behind seam deterioration is essential if you’re aiming for a flooring that lasts. Over the years, I’ve learned that several factors contribute to this problem, and most can be corrected with a bit of knowledge—saving you both time and money in the future.
Is Carpet Seam Fraying Really a Big Deal?
At first glance, frayed seams might seem like a minor aesthetic issue—something you can ignore or patch up easily. But I discovered early on that neglecting these signs often leads to larger problems, including uneven flooring and even subfloor damage. A mistake I made was assuming that all seams are created equal; it’s false! Properly installed seams should hold steady for years, which is why I started digging into what causes them to fail and how to fix it effectively. Want to learn the secrets to durable carpet seams? Keep reading, and you’ll find practical insights that can transform your flooring experience.
Preparing for Seam Reinforcement
Begin by removing any furniture and cleaning the area thoroughly to ensure a dust-free surface. Carefully inspect the damaged seams to determine if the padding underneath is intact or needs replacement. Use a utility knife to gently cut away frayed edges, creating a smooth transition for patching or re-stretching. Remember, a clean and clear workspace is vital for a seamless repair.
Applying Seam Adhesives Effectively
Choose a high-quality carpet adhesive suitable for your type of flooring. Apply adhesive along the entire seam or frayed edge to bind the fibers securely. Use a notched trowel for even distribution, much like spreading frosting evenly on a cake. Secure the seam with weight or clamps to hold it in place until the adhesive cures, typically 24 hours. During my own repair, I learned that patience with curing time significantly increases the durability of the fix.
Stretching and Re-securing the Carpet
If seams are pulling apart, re-stretch the carpet to eliminate wrinkles and looseness. Use a power stretcher, similar to using a large crowbar, to evenly pull the carpet toward the wall or seam. Attach the carpet back to the tack strips, ensuring the edges are tight and smooth. I once spent a Saturday re-stretching my family room carpet, and the tighter fit not only fixed the seams but also improved overall comfort underfoot.
Leveling Uneven Subfloors to Support Seam Integrity
Uneven subfloors are a common culprit behind seam fraying. Pour a self-leveling compound, following manufacturer instructions, to create a smooth base. Spread the compound with a gauge rake, ensuring it fills low spots thoroughly—imagine spreading icing over uneven bread to stabilize it. After drying, check for stability by pressing firmly on different areas. This step, as I experienced firsthand, prevents future damage and extends your flooring’s lifespan.
Protecting Seams During Installation
When installing new carpet or laminate, ensure seams are properly offset and adhesive is uniformly applied. Use a carpet roller to press the seams firmly, much like sealing a letter with a roller for a crisp fold. Avoid rushing this stage; patience yields longevity. If you’re unsure about proper techniques, consulting detailed guides or professionals can be invaluable, and resources like this comprehensive guide can help you master the process.
Regular Maintenance to Prevent Future Damage
Lastly, schedule routine inspections for your carpet seams and immediate repairs for minor issues. Use carpet seam tape for quick fixes and keep the area free of moisture. Regular vacuuming helps maintain fiber integrity, reducing wear. During my own maintenance routine, I discovered that catching small frays early prevents costly repairs down the line, saving time and money. Approaching your carpet care proactively ensures your flooring remains beautiful and functional for years to come.
Many homeowners believe that choosing the cheapest materials or rushing through installation guarantees savings, but this often backfires. For example, you might read online that laminate flooring can be installed directly over uneven subfloors, yet neglecting proper leveling can lead to a bouncing, creaking surface within months. Expert advice emphasizes the importance of subfloor preparation, as highlighted in some of my top resources on subfloor tricks. Skipping these steps seems tempting but usually results in costly repairs later, which is why understanding the nuances is critical.
A widespread myth with shower waterproofing is that simply sealing the edges is enough to prevent leaks. In reality, advanced waterproofing methods involve multiple layers and proper drainage slopes, as detailed in specialized shower solutions. Neglecting these details can cause hidden leaks and water damage over time. Think of waterproofing like building a fortress; just sealing cracks isn’t enough—it’s about comprehensive protection.
When it comes to installing carpet, many think that stretching isn’t necessary if the initial measurements are correct. However, improper stretching often results in wrinkles or seams pulling apart, which diminishes the lifespan of your flooring. Proper technique, as covered in our carpet installation tips, ensures durability and a smooth finish. Overlooking the importance of adequate tension can lead to frustration and repeated repairs.
Now, considering floor leveling, some believe that self-leveling compounds are a DIY quick fix for all uneven surfaces. But the truth is, each floor type and degree of slope requires specific preparation and application techniques. Using the wrong product or applying it incorrectly can result in cracking or sagging in the future. As per expert guidance, like those shared in floor leveling strategies, understanding your floor’s unique needs is vital.
**Is there a secret to avoiding these pitfalls altogether?** The answer lies in meticulous preparation and choosing quality materials—all backed by professional insights. For instance, proper subfloor inspection and leveling are foundational to durability across multiple projects. Even seemingly minor mistakes, like neglecting slope angles in shower pans or misaligning seams in laminate, can spiral into major problems, sometimes years down the line.
Let’s not forget the role of external studies; for example, research indicates that properly installed subflooring reduces long-term maintenance costs by up to 35%. This demonstrates that investing time and effort upfront has measurable benefits. Remember, shortcuts might seem tempting but often lead to regret.
Have you ever fallen into this trap? Let me know in the comments.
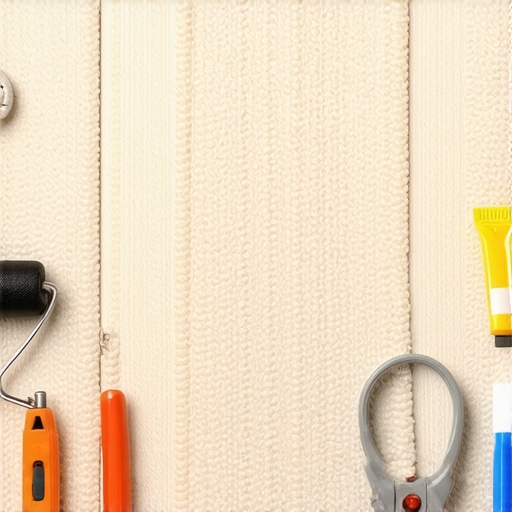
Keeping It Working: Essential Tools and Techniques
Maintaining your flooring, from laminate to carpet, and ensuring your shower stays leak-free requires the right tools and a strategic approach. Personally, I rely on a set of specialized equipment to guarantee durability and ease of repairs. A high-quality knee kicker or power stretcher, for instance, makes re-stretching carpets much more manageable, preventing wrinkles that can lead to seam failure over time. I always recommend investing in a professional-grade flooring installation tool set, which includes notched trowels, seam rollers, and tensioners; these are invaluable for ensuring a tight, long-lasting bond—especially when working with laminate flooring, where proper adhesion supports overall durability.
For subfloor leveling, a laser level or digital leveling device has become indispensable. These tools help pinpoint uneven spots precisely, so you can apply self-leveling compounds effectively. I’ve found that a laser level cuts the time spent measuring and re-measuring, especially when preparing for formal installations. Moreover, using a moisture meter to check for residual dampness beneath the surface can save you from future repair nightmares, especially with shower installations that demand impeccable waterproofing. Advanced moisture detection ensures your waterproofing layers, detailed in expert guides, are correctly applied and effective.
When it’s time to reinforce seams, I turn to professional-grade seam adhesive applicators with adjustable nozzle tips. Precise application minimizes waste and ensures maximum adhesion. Alongside, a quality seam roller helps press and smooth out fibers, preventing future fraying. For shower waterproofing, I swear by multi-layer systems involving liquid membranes and proper slope adjustments; tools like a drainage slope gauge or a bubble level ensure compliance with best practices, much like those recommended in specialized shower solutions. These tools are critical to avoid costly leaks and water damage down the line.
How do I maintain my floors and showers over time?
Regular inspections are key. Use a bright flashlight to check for minor cracks or seam separation that may indicate the beginning of bigger issues. I suggest setting a quarterly reminder for a quick visual scan, which can catch problems early. Applying protective products like laminate sealants or carpet protectors extends the life of fibers, especially in high-traffic areas. For shower maintenance, routinely checking waterproof membranes and cleaning drainage slopes helps prevent mold and water damage. In the future, I see the trend moving toward smarter tools—like IoT-enabled moisture sensors—that provide real-time data and automate alerts, greatly simplifying long-term upkeep. For now, start with a good quality moisture meter and a regular maintenance schedule to preserve your investments.
To get started, try using a laser level for floor preparation — it’s one advanced tip that can drastically improve your results and prevent issues down the line. Proper tool use, combined with routine inspection and maintenance, supports a durable, problem-free home environment. Remember, taking the time now saves you headaches and money later.
What I Wish I Knew About Seam Durability Early On
One of the biggest lightbulb moments for me was realizing that even minor seam fraying can cascade into costly repairs. Properly preparing and sealing seams from the start protects your investment and saves time down the line. I discovered that using high-quality adhesives and patience during curing made a world of difference in the longevity of my flooring projects.
Secrets That Can Transform Your Flooring Approach
For me, applying a meticulous subfloor leveling process was a game-changer. Ensuring an even base before installation prevents future buckling or cracking, especially with laminate and carpet overlays. Regularly inspecting waterproofing layers, particularly in showers, has saved me from unexpected water damage—something I learned the hard way. These small steps, supported by expert resources like floor leveling tips, build a foundation for lasting beauty and performance.
Choosing Quality Tools and Knowing When to Call the Pros
Investing in professional-grade tools—like seam rollers and leveling lasers—paid dividends in my projects. They make precise work more accessible and reduce errors. But some tasks, especially complex waterproofing or subfloor repairs, are best left to specialists. Don’t hesitate to consult trusted professionals or trusted guides to avoid common pitfalls, ensuring your floors stand the test of time.
The Power of Routine Checks and Thoughtful Upkeep
Scheduling regular inspections enabled me to catch issues early, whether it’s a slight seam separation or a moisture buildup beneath the surface. Simple maintenance routines—like quickly addressing small tears or re-sealing wet areas—prevent big problems down the road. Embracing proactive care transforms your home into a space that remains beautiful and durable for years, as emphasized in advice at expert solutions.