The ‘Masking Tape’ Trick for Cutting Carpet Straight
The jagged edge of amateurism
Most guys skip the leveling compound because they think the underlayment will hide the dip. It won’t. I spent three days grinding concrete on a job last month just so the floor wouldn’t click like a castanet. That job was a wake up call for the homeowner who thought they could save a few bucks by ignoring the substrate. When you are dealing with a high end carpet install, the margin for error is thinner than a worn out utility blade. I have seen fifteen thousand dollar projects ruined because an installer tried to freehand a cut against a baseboard without a guide. A jagged edge in a doorway is not just an eyesore, it is a structural failure of the installation. The fibers begin to unravel the moment they are stressed by foot traffic. If that cut is not surgically straight, your transition strip will never sit flush, and you will be left with a trip hazard that collects dust and hair until the whole thing looks like a mess. I remember a specific project where the client wanted a plush pile right up against a custom tile shower. The transition had to be perfect. Without the right prep, that carpet would have frayed and pulled away from the moisture barrier within six months. Precision is the only thing that separates a professional from a guy with a knife.
Why your subfloor is lying to you
Floor leveling is the foundational process of creating a flat plane using self-leveling underlayment or grinding to ensure the finished floor remains stable and free from structural noise. If your subfloor has a dip greater than one eighth of an inch over ten feet, your carpet will eventually stretch and ripple in those voids. The physics of carpet tension require a perfectly flat surface to maintain the integrity of the secondary backing. When you walk over a low spot, the carpet flexes down. This constant movement pulls at the tack strips and loosens the stretch. I always tell people that a floor is only as good as what is underneath it. You can buy the most expensive wool in the world, but if your plywood is delaminating or your concrete slab is sweating, that floor is doomed. I use a six foot level and a canister of chalk to map out every square inch before a single roll is brought inside. We are talking about the structural engineering of a walking surface. If you ignore the humps, your furniture will wobble and your seams will split. It is non-negotiable.
“A floor is only as good as the subfloor beneath it; deflection is the enemy of every joint.” – Master Flooring Axiom
The physics of the masking tape trick
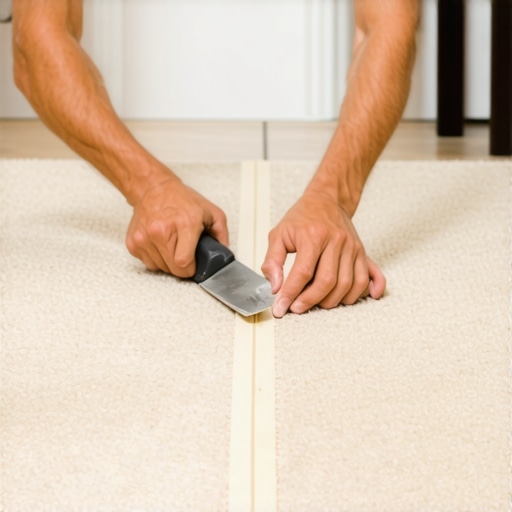
The masking tape trick for cutting carpet straight uses the high friction surface of painter’s tape to stabilize carpet fibers and provide a high visibility guide for the utility blade. When you apply a strip of two inch masking tape to the back of a carpet roll, you are essentially creating a temporary reinforcement for the latex binder. As the blade passes through the tape and into the backing, the tape prevents the woven yarns from shifting. This is particularly vital for loop pile carpets like Berbers where a single caught thread can run the entire length of the room like a snag in a sweater. The tape acts as a stabilizer. It allows the blade to glide with consistent resistance. Without the tape, the blade often gets hung up on the tough jute or polypropylene backing, causing the hand to jerk and the cut to veer off course. You need a fresh blade every ten feet. I do not care if the blade feels sharp, if it has touched concrete or a metal transition, it is dead. A dull blade is the fastest way to ruin a straight line. By cutting through the tape, you also leave a clean edge that is ready for seam sealer. Never skip the sealer. If you do not seal the edges of a cut carpet, the primary and secondary backings will separate over time. It is a slow death for a floor.
How to level a floor for superior results
Proper floor leveling requires a clean substrate free of old adhesive residues and the application of a high quality primer to ensure the leveling compound bonds permanently. You cannot just pour compound and hope for the best. You have to understand the chemistry of the bond. If there is old yellow carpet glue on that slab, the new leveler will pop off in sheets. I spend more time with a floor scraper and a vacuum than I do with the actual carpet. Once the floor is prepped, you mix the compound to a specific viscosity. It should look like heavy cream. If it is too thin, it loses structural strength. If it is too thick, it will not flow into the low spots. After the pour, you use a spiked roller to release air bubbles. Those tiny bubbles are the weak points where a floor will eventually crack. For areas near showers or high moisture zones, you need to ensure the leveling compound is rated for wet environments. I have seen levelers turn back into mush because someone used a gypsum based product in a bathroom. Use Portland cement based levelers for anything near a water source. It is about building a floor that lasts thirty years, not thirty days.
| Material Type | Janka Rating / Density | Acclimation Time | Expansion Gap Required |
|---|---|---|---|
| Solid White Oak | 1360 lbf | 7 to 14 Days | 3/4 Inch |
| Engineered Maple | 1450 lbf | 3 to 5 Days | 1/2 Inch |
| Premium LVP | N/A (Rigid Core) | 48 Hours | 1/4 Inch |
| High Density Carpet | 65 oz Face Weight | 24 Hours | None (Tension Based) |
The hidden chemistry of carpet adhesives
Carpet adhesives utilize complex polymers that require specific flash times to reach maximum shear strength and prevent the carpet from shifting under heavy furniture. Many installers are too impatient. They spread the glue and drop the carpet immediately. That is a recipe for bubbles and failure. You have to wait for the adhesive to become tacky. The technical term is the open time. If you drop the carpet while the glue is still wet, the moisture in the adhesive gets trapped. This can lead to mold growth or the breakdown of the carpet backing itself. I use a premium pressure sensitive adhesive for most commercial jobs. It stays tacky forever, allowing for minor adjustments during the install but holding like iron once the rollers go over it. You also have to consider the VOC levels. Nobody wants a house that smells like a chemical factory for a month. Low VOC options are the standard now, but they require even more precision with timing. If the humidity in the room is too high, the glue will never set. I always bring a hygrometer to the job site. If the air is at eighty percent humidity, I am not spreading glue. We turn on the AC or the heat and wait until the environment is stabilized.
“Proper moisture testing of the slab is the only way to guarantee the longevity of a bonded floor installation.” – NWFA Technical Manual
The danger of moisture near showers
Installing carpet near showers requires a non-permeable moisture barrier and a transition strip that prevents water wicking into the carpet fibers. This is where most residential builders fail. They run the carpet right up to the edge of the bathroom tile. When someone steps out of the shower and drips water on that edge, the water travels under the carpet and into the pad. The pad acts like a giant sponge. Within a year, you have a colony of black mold growing under your feet. I always recommend a wide transition of stone or tile at the bathroom door. If you must have carpet near the shower, use a synthetic pad that does not absorb water. The masking tape trick is especially useful here because you need a perfectly straight line to butt up against the transition track. Any gap at the shower entrance will collect water and rot the subfloor. I have seen floor joists completely rotted out because of a poorly installed carpet transition. It is not just about looks, it is about protecting the skeleton of the house. You want a tight fit that is reinforced with a bead of silicone sealer at the junction.
Comparing carpet to modern laminate
Laminate flooring offers superior scratch resistance compared to carpet but requires a much flatter subfloor to prevent the clicking mechanisms from snapping under load. While carpet is forgiving of minor floor defects, laminate is a snitch. It will tell you exactly where your floor is uneven. Every time you walk over a dip, the boards flex. Eventually, the tongue and groove will fail. This is why I stress floor leveling so much. Homeowners love the look of wood but the budget of laminate. I tell them that the savings on material should go straight into the prep work. For carpet, the comfort factor is unbeatable, especially in bedrooms. But for high traffic areas, a high pressure laminate or a rigid core vinyl is more practical. The trick is the transition. When moving from a thick carpet to a thin laminate, you need a reducer strip that is properly anchored. Do not just glue it down. Use a track and screw it into the subfloor. This ensures that as the seasons change and the materials expand and contract at different rates, the floor stays put. Precision cutting with the masking tape method ensures the carpet side of that transition looks as sharp as the hard surface side.
The final checklist for precision cutting
- Verify subfloor levelness with a straight edge before unrolling material.
- Acclimate the carpet to the room temperature for at least twenty four hours.
- Apply high tack masking tape to the cut line on the carpet backing.
- Use a brand new heavy duty utility blade for every major cut.
- Seal all cut edges with a thermoplastic or latex seam sealer.
- Maintain a consistent one eighth inch gap for tucking at the baseboards.
- Check the pile direction to ensure all pieces run the same way.
The mastery of the craft comes down to the details that no one sees once the furniture is back in place. It is about the tension of the stretch and the straightness of the cut. While most people want the thickest underlayment, too much cushion actually causes the locking mechanisms on LVP to snap under pressure. For carpet, too much pad causes the backing to stretch beyond its limit. You want a firm, high density pad that supports the fiber without allowing too much vertical movement. This is the structural reality of flooring. It is a performance surface that must withstand thousands of pounds of pressure over its lifetime. Treat it like the engineering challenge it is, and you will never have to deal with a callback. If you follow the tape trick and respect the subfloor, your work will stand the test of time.