I spent three days grinding concrete on a job last month just so the floor wouldn’t click like a castanet. Most guys skip the leveling compound. They think the underlayment will hide the dip. It won’t. I had a client last year who bought the most expensive laminate on the market, but the installer left a 1/4 inch ridge right in the transition between the kitchen and the dining room. Within three weeks, the locking mechanism had snapped because that ridge acted as a pivot point. Every time someone walked over it, the floor flexed until the plastic tongue literally sheared off. That is the reality of subfloor failure. You can buy the fanciest planks in the world, but if your subfloor has a ridge, you are just installing a very expensive drum. My hands still vibrate from the grinder, but that floor is dead flat. That is the difference between a floor that lasts thirty years and one that fails in thirty days.
The hump in the hallway
Floor leveling ridges are elevated peaks in self-leveling underlayment or concrete caused by improper mixing, cold joints, or surface tension during the pour. Fixing these ridges requires mechanical abrasion using diamond cup wheels or high-grit floor pads to ensure a flat surface within 1/8 inch over 10 feet. When you pour a self-leveling compound, the chemistry of the polymers and Portland cement reacts with the ambient humidity. If the mixture is too thick, it fails to achieve its own level. It stops moving and creates a ridge at the point where the new pour meets the old one. These ridges are often less than a quarter-inch high, but in the world of floating floors, that is a mountain. The physics of a floating floor relies on a flat plane. When a plank spans a ridge, it creates a void on either side. Every step you take forces the plank down into that void, putting immense stress on the locking joint. Eventually, the friction causes the material to fatigue. You will hear it first, a small clicking sound. That is the sound of your investment dying. We prevent this by attacking the ridge with specific mechanical methods designed to shear off the high points without compromising the structural integrity of the slab.
“A floor is only as good as the subfloor beneath it; deflection is the enemy of every joint.” – Master Flooring Axiom
High spots and the geometry of failure
Subfloor high spots act as a fulcrum that causes laminate and LVP planks to teeter, leading to joint separation and core cracking. Identifying these ridges requires a 10-foot straightedge and a marking pencil to map the topographical height of the floor before any flooring material is laid. You have to look at your floor like a topographical map. Those little lines where the leveler didn’t flow correctly are structural hazards. If you are installing in a moisture-heavy environment like a basement, the ridge can also trap tiny pockets of air under your moisture barrier, leading to condensation points. I have seen mold colonies form in the 1/8 inch gap created by a ridge because the air couldn’t circulate and the moisture had nowhere to go. We use a 10-foot straightedge because it reveals the gradual slopes that a 4-foot level misses. You slide the straightedge across the floor, and when it rocks, you have found your ridge. You mark it with a graphite pencil, circling the entire high area. This is not about aesthetics. This is about preventing the mechanical failure of the click-lock system which is only rated for a very specific amount of deflection.
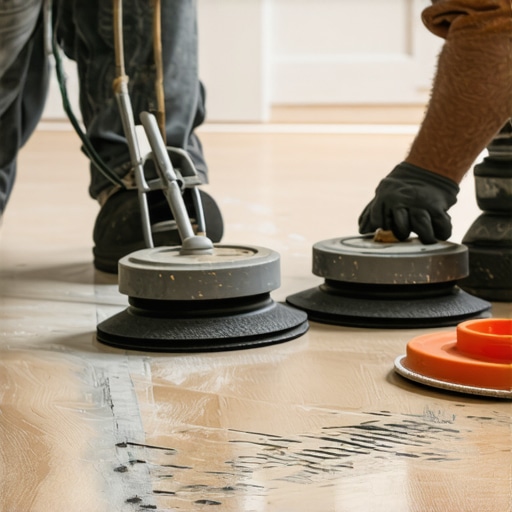
Diamond cup grinding for concrete high points
Diamond cup grinding is the most effective tactic for removing ridges in concrete-based leveling compounds because the industrial diamonds shear through the cementitious matrix with high torque. This method uses a 7-inch angle grinder equipped with a dust shroud and a vacuum system to maintain visibility. When you are dealing with a high-density leveling compound, a standard sander is useless. You are trying to sand something that has a compressive strength of 4,000 to 5,000 PSI. You need diamonds. The diamond cup wheel has segments of industrial-grade diamonds embedded in a metal matrix. As the grinder spins at 10,000 RPM, the diamonds cut into the ridge. You must keep the grinder moving in a sweeping, circular motion. If you stay in one spot for more than a second, you will dig a hole deeper than the ridge was high. The chemistry of the dust is also a factor. Concrete dust is silica-heavy, which is why a vacuum-shroud is mandatory. You are not just sanding, you are engineering a flat plane. I prefer a 16-grit or 30-grit diamond segment for the initial knockdown. This grit size is aggressive enough to eat through a 1/4 inch ridge in minutes. Once the ridge is flush with the straightedge, you stop. You don’t need it to be smooth, you just need it to be flat.
The orbital approach for gypsum based levelers
Gypsum based levelers are softer than Portland cement and require a less aggressive sanding tactic using an orbital floor sander with 40-grit to 60-grit sandpaper. This method prevents the gouging often caused by heavy grinders while effectively smoothing out the transition lines between different pour batches. Gypsum is a different beast. It is lighter and more brittle. If you hit it with a diamond grinder, you will turn the whole floor into white powder in five minutes. For gypsum ridges, we use a heavy-duty floor buffer with a sanding plate. The 60-grit paper is the sweet spot. It has enough bite to remove the ridge but is fine enough that it won’t leave deep scratches that might show through thin vinyl. You want to walk the machine slowly over the marked high spots. The orbital action ensures that the pressure is distributed evenly. One mistake installers make is using too much downward pressure. Let the weight of the machine do the work. If you force it, you will create a dip. The goal is to blend the ridge into the surrounding floor so that the transition is invisible to the straightedge. After sanding, you must vacuum the floor twice. Gypsum dust is incredibly fine and will prevent your adhesive or underlayment from bonding if even a thin layer remains on the surface.
Physics of the fulcrum point
The fulcrum point created by a ridge causes vertical movement in the flooring planks which eventually leads to the failure of the wear layer and the internal core. Sanding these ridges eliminates the pivot point and allows the floor to distribute the weight of foot traffic across the entire subfloor surface. Think about a seesaw. That is what your floor plank becomes when it sits on a ridge. On one side, you have the weight of your furniture. On the other side, you have the weight of a person walking. The ridge is the center point. Every time someone walks on the floor, the joint is stressed in a way it was never designed for. Laminate cores are made of high-density fiberboard, which is essentially glued sawdust. It has great compressive strength but very poor shear strength. The constant bending at the ridge shears the internal fibers of the core. Once that happens, the plank is compromised. No amount of wood glue or repair kit will fix a broken core. The only solution is to remove the planks, sand the ridge, and replace the damaged material. This is why I tell my guys that the floor is built in the subfloor, not the boxes of planks. If the subfloor is wrong, the whole job is a failure.
| Method | Tooling | Grit Range | Best Use Case |
|---|---|---|---|
| Diamond Grinding | Angle Grinder / Cup Wheel | 16 to 30 | Concrete high spots |
| Orbital Sanding | Floor Buffer | 40 to 60 | Gypsum leveler ridges |
| Manual Abrasion | Rub Stone | 20 | Small localized bumps |
- Verify moisture content with a calcium chloride test before sanding
- Check flatness using a 10-foot straightedge in a grid pattern
- Identify high spots with a graphite marking pencil and circle them
- Vacuum dust before and after every sanding pass to prevent glazing
- Re-prime the surface if sanding exposes raw aggregate in the leveler
- Check the wear layer thickness of your flooring to ensure it can handle minor variations
Wet sanding versus dry dust containment
Wet sanding techniques involve using a small amount of water to lubricate the sanding disc and trap dust particles before they become airborne, though this is rarely used on absorbent subfloors like plywood or gypsum. Dry sanding with HEPA-filtered vacuum systems is the industry standard for 2026 floor leveling ridge removal. While wet sanding is common in the stone polishing industry, it is a nightmare for floor leveling. Most leveling compounds are porous. If you introduce water during the sanding process, you are essentially creating a slurry that will soak back into the leveler and potentially weaken the bond with the slab. I always stick to dry sanding with a high-volume extractor. The key is the CFM (Cubic Feet per Minute) of your vacuum. You need a vacuum that can pull the dust away the microsecond it is created. If you allow dust to build up under the sanding disc, it acts as a lubricant and prevents the grit from biting into the ridge. This is called glazing. You will see the sanding disc get shiny and stop cutting. When that happens, you are just generating heat and wasting time. Keep the surface clean, keep the vacuum running, and you will cut through those ridges like a hot knife through butter.
“Modern thin-set and leveling compounds require a surface profile that is both flat and clean; mechanical sanding provides the necessary tooth for adhesion.” – TCNA Installation Guide Reference