Most guys skip the leveling compound. They think the underlayment will hide the dip. It won’t. I spent three days grinding concrete on a job last month just so the floor wouldn’t click like a castanet. That floor was a high-rise slab in a humid coastal zone and it was wavy like the Atlantic. If I had just slapped down the laminate, the locking joints would have snapped within a month. I am a master installer with twenty-five years of sawdust under my nails and I have seen every shortcut turn into a disaster. My knees have the scars to prove it. When you talk about shower grout pinholes, you are talking about physics and chemistry, not just a cosmetic wipe. Those tiny craters are the result of trapped air escaping from the mortar bed or the grout itself as it cures. They are not just ugly. They are an entry point for moisture that will eventually rot your subfloor. This article explains the technical mechanics of the sponge trick to end those pinholes forever.
The physics of the pinhole and how air escapes
Shower grout pinholes are caused by air being displaced from the thin-set or substrate during the curing process. When you press grout into the joints, you are often trapping air underneath. As the grout loses moisture and begins to harden, that air seeks the path of least resistance, which is upward through your fresh grout line. If the grout is too wet, the air escapes and leaves a void. If it is too dry, it does not pack correctly. The sponge trick solves this by manipulating the surface tension of the grout at the exact moment of the initial set. This requires a high-density sponge, not the cheap polyester ones from the discount bin. You need a sponge with a specific pore density that can hold water without dripping. The mechanical pressure you apply during the strike phase is what collapses those microscopic air tunnels. Most people wipe too much water on the floor, which dilutes the Portland cement and weakens the bond. This leads to soft grout that will eventually flake and crack. I hate seeing a $10,000 tile job ruined because someone wanted to finish lunch early. You have to respect the chemistry of the hydration process. Every bag of grout has a specific water-to-powder ratio that is determined by the manufacturer to ensure the polymer chains link up correctly. When you deviate, you invite failure. This is why a moisture meter is as vital for tile as it is for a hardwood install.
“A floor is only as good as the subfloor beneath it; deflection is the enemy of every joint.” – Master Flooring Axiom
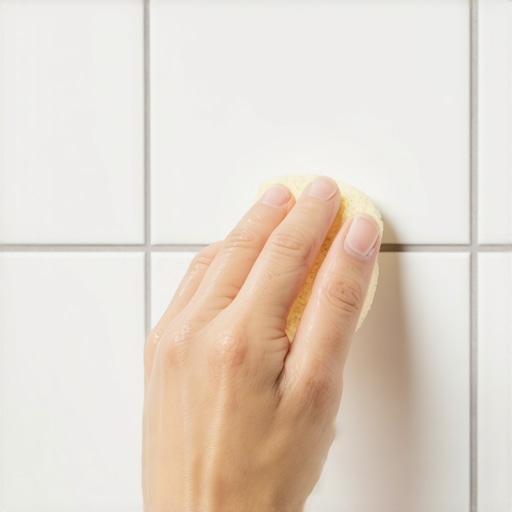
The double wash sponge trick explained
The double wash sponge trick involves a primary cleaning pass followed by a secondary compaction pass with a nearly dry sponge. This second pass is where the magic happens. You are not cleaning the tile anymore. You are polishing the grout and forcing the particles to settle into a dense, non-porous mass. This prevents pinholes by mechanically closing the exit points for air. You must wait for the haze to appear. If you go too early, you pull the grout out of the joint. If you go too late, you cannot shape it. I always tell my apprentices that the grout will tell you when it is ready. You touch it with a clean finger. If it does not stick to your skin but feels like firm clay, it is time. The sponge must be wrung out until no water can be squeezed from it. You then use a circular motion to strike the joints. This circular movement is essential because it packs the grout from multiple angles. When you do a straight wipe, you often leave a trough that collects water. In 2026, we are seeing more advanced grout formulas with faster set times, making this timing even more vital. If you are working in a region with high heat, like Phoenix, you might only have a fifteen-minute window. In a damp climate like Seattle, you might have forty minutes. You have to adapt to the environment or the environment will destroy your work.
| Grout Type | Particle Size | Best Use Case | Risk Factor |
|---|---|---|---|
| Sanded Grout | 0.5mm and up | Large joints over 1/8 inch | Surface scratching |
| Unsanded Grout | Very Fine | Thin joints under 1/8 inch | Shrinkage and cracking |
| Epoxy Grout | Resin Based | Commercial and high moisture | Difficult cleanup |
| High-Performance Grout | Engineered Polymer | All-purpose 2026 standard | Rapid set time |
Why floor leveling is the foundation of a pinhole free shower
Floor leveling is the most overlooked step in shower construction and it directly impacts the integrity of your grout lines. If your substrate has dips and humps, the mortar bed will be uneven in thickness. Thick mortar takes longer to cure and releases more gas. This gas is what causes the pinholes you see in your finished product. I have seen guys try to fix a bad slope by using extra thin-set under the tile. That is a rookie mistake. Thin-set is meant for bonding, not for building up height. When you have a massive heap of mortar under a tile, it shrinks as the water evaporates. This creates tension that can snap the tile or cause the grout to pull away from the edges. You need a flat, stable surface before the first tile ever touches the floor. This is especially true when you are transitioning from a different material like laminate. Laminate floors are floating systems that require a very specific flatness tolerance, usually 1/8 inch over ten feet. If your shower subfloor is not level, the transition to your laminate will be a trip hazard. I despise T-moldings that are used to hide poor planning. A master floor architect plans the heights of the subfloor, the underlayment, and the finished surface so they meet at a zero-threshold. This requires a grinder, self-leveling underlayment, and a lot of patience. If you do not have the stomach for the dust, you should not be in the trade.
- Check subfloor deflection to meet L/360 standards for ceramic tile.
- Apply a high-quality primer before using self-leveling compound.
- Ensure the shower pan is sloped at exactly 1/4 inch per foot toward the drain.
- Mix grout with a low-speed drill to avoid whipping air into the paste.
- Use a high-density sponge for the final strike to collapse air pockets.
- Allow grout to cure for at least 72 hours before testing with water.
The relationship between carpet install and shower transitions
Carpet install techniques often clash with tile work because of the height difference and the moisture requirements of the substrate. When I am doing a job that involves both, I always install the tile first. You want that hard edge to work against. The tack strip for the carpet should be placed about 3/8 of an inch away from the tile edge to allow for a clean tuck. If you get grout on the carpet, you are in for a bad day. The moisture from the shower can also migrate into the carpet pad if the transition is not sealed correctly. This leads to that musty smell that homeowners hate. I prefer to use a transition strip that anchors to the subfloor and provides a solid bridge. In the old days, we just tacked the carpet down and hoped for the best. Now, with high-end luxury installs, the expectation is a flush finish. This brings us back to floor leveling. If the subfloor under the carpet is lower than the shower slab, you have to build it up. I have used everything from plywood sheets to feathered-out patches to get that height perfect. It is about the geometry of the entire room, not just the section you are working on. A floor is a singular engineering challenge. If one part is off, the whole thing feels cheap. And I don’t do cheap work. I do work that lasts thirty years.
“Grout is the structural bridge between tiles; if the bridge is porous, the foundation will fail.” – Master Flooring Axiom
The chemistry of grout curing and moisture barriers
The chemical curing of grout is a hydration reaction that requires a stable environment to avoid defects like pinholes and efflorescence. When you mix Portland cement with water, you are starting a process that creates calcium silicate hydrate crystals. These crystals grow and interlock to create strength. If you use too much water during your sponge wash, you are essentially drowning these crystals. The water takes up space, and when it evaporates, it leaves behind voids. These voids are the pinholes. Furthermore, if you do not have a proper moisture barrier under your tile, the subfloor can suck the water out of the grout from below. This is why I always use a liquid-applied waterproofing membrane or a bonded sheet membrane. This keeps the moisture in the grout where it belongs, allowing it to cure slowly and reach maximum density. Most people think grout is waterproof. It is not. Grout is a filter. It will slow water down, but it will not stop it. The real waterproofing happens beneath the tile. If you skip that, you are just waiting for a mold problem. I have torn out showers where the studs were so rotten you could crumble them with your hand because the installer thought grout was enough. It never is. You have to think about the microscopic level of the installation. Every molecule of water has to be accounted for. That is the difference between a mechanic and a handyman. One understands the physics, and the other just wants to get paid. I take pride in the physics.