Stop 2026 Shower Grout Pinholes with This Sponge Trick
Most guys skip the leveling compound. They think the underlayment will hide the dip. It won’t. I spent three days grinding concrete on a job last month just so the floor wouldn’t click like a castanet. That same lazy attitude is what leads to pinholes in your shower grout. You think it is just a cosmetic dot on the surface, but it is a structural failure waiting to rot your studs. I have been on my knees for twenty-five years, and I can tell you that a pinhole is a highway for moisture. We are going to look at why these holes happen and the one specific sponge technique that stops them before they ruin your 2026 renovation. This is not about making things look pretty. This is about engineering a waterproof vessel that lasts for decades, not months.
The microscopic war inside your shower joints
Grout pinholes are caused by air bubbles escaping from the setting bed or the grout mixture itself during the hydration process. When air is trapped under the surface and forced upward, it creates a tiny volcanic crater that compromises the integrity of the waterproof seal in your shower. These craters are not just small holes. They are evidence of poor mixing or improper application. If you have ever seen a floor where the laminate is peaking or the carpet install is pulling at the seams, you are seeing the result of a contractor who did not respect the physics of the material. In a shower, that disrespect leads to mold. The air is entrained during the high-speed mixing of the grout. If you use a drill at high RPM, you are essentially whipping a meringue. That air has to go somewhere. As the grout begins to pull moisture from the surface, the air is shoved out. If the surface is already skinned over, it pops. You are left with a hole that is exactly the size of a needle point, perfectly designed to suck water deep into the mud bed through capillary action.
Why your grout is gasping for air
The primary reason for grout gasping or bubbling is the lack of proper substrate saturation and the use of overly dry grout mixtures. When the tile edge is too thirsty, it sucks the moisture out of the grout too fast, forcing air to displace the water in a violent exit. I have seen this a thousand times. A guy walks in, throws down some tile, and starts grouting before the thin-set is even dry. The thin-set is still off-gassing. That gas rises through the grout lines. You need to wait. You need to ensure the gaps are clean. If there is a chunk of thin-set taking up half the joint, your grout is too thin in that spot. It will fail. We talk about floor leveling as a prerequisite for hardwood, but it is just as vital for shower floors. If your slope is uneven, your grout thickness varies. Variable thickness means variable drying times. Variable drying times mean tension. Tension leads to cracks and, yes, those miserable pinholes.
“A floor is only as good as the subfloor beneath it; deflection is the enemy of every joint.” – Master Flooring Axiom
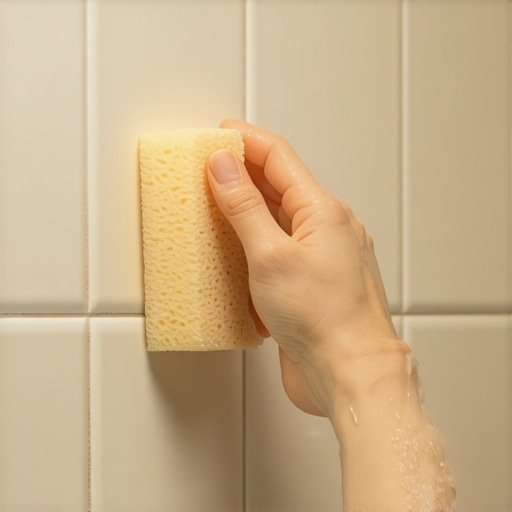
The specific sponge technique that saves the seal
The sponge trick involves using a barely damp cellulose sponge to perform a secondary strike on the grout joints after the initial set. By using a circular motion with a sponge that is ninety percent dry, you collapse the surface tension of the air bubbles before they can harden into permanent craters. Most DIYers and low-bid contractors use too much water. They drown the grout. When you drown the grout, you wash out the polymer and the pigment. You are left with a soft, sandy mess. The trick is the wait. You wait until the grout is firm to the touch, like stiff modeling clay. Then, you take a high-density cellulose sponge, not the cheap polyester ones from the big-box store. You wring it until no water can be squeezed out. You lightly pass it over the joints. This pressure compresses the grout. It forces the air out and pushes the solids back into the hole. It is a mechanical compaction of the joint. It is the difference between a floor that lasts and a floor that fails. If you are doing a carpet install, you stretch the material to find its limit. With grout, you compress it to find its strength.
How floor leveling prevents shower disasters
Proper floor leveling ensures a uniform thickness of the mortar bed, which prevents differential drying rates that cause grout to shrink and pull away from the tile. A level subfloor is the only way to guarantee that the gravity-fed drainage system in a shower works without pooling water. I have seen guys try to fix a bad subfloor with extra thin-set. It never works. The chemistry of thin-set is designed for a specific thickness, usually around three-sixteenths of an inch. If you go to half an inch to level a dip, that thin-set is going to shrink. As it shrinks, it pulls on the tile. It pulls on the grout. It creates voids. Those voids are where air hides. Later, when you are taking a hot shower, that air expands and pushes through your grout. If you had spent the time with a bag of self-leveling compound and a primer, you wouldn’t be looking at a pinhole. You would be looking at a solid, monolithic surface. Leveling is not a suggestion. It is a requirement of the TCNA for a reason.
| Material Type | Water Sensitivity | Typical Acclimation Time | Expansion Gap Required |
|---|---|---|---|
| Solid White Oak | High | 10 to 14 Days | 3/4 Inch |
| Engineered Maple | Medium | 3 to 5 Days | 1/2 Inch |
| Waterproof LVP | Low | 48 Hours | 1/4 Inch |
| Porcelain Tile | None | None | 1/8 Inch (Grout) |
The chemistry of the bond
Modern grout is a complex blend of Portland cement, graded aggregates, and chemical polymers that provide flexibility and water resistance. Understanding the hydration curve of these polymers is essential for preventing surface defects like pinholes or efflorescence. When you add water to that bag of powder, you are starting a chemical reaction. It is not just drying. It is curing. If you add too much water, you dilute the polymers. These polymers are what bridge the microscopic gaps between the sand grains. In 2026, we are seeing more high-performance grouts that use recycled glass or epoxy resins. These are even more finicky. If you use the sponge trick on epoxy grout, you have to be even more careful with your timing. If you are too early, you leave a sticky mess. If you are too late, you are grinding it off with a diamond blade. The bond between the tile and the grout is mechanical. The grout needs to bite into the microscopic pores of the tile edge. If that edge is covered in dust because you didn’t wipe the tile before installing, the grout will never stick. It will just sit there, waiting to pop out.
“Cementitious grout requires controlled hydration; rapid moisture loss is the precursor to structural friability.” – TCNA Technical Manual
The physics of laminate in damp environments
Laminate flooring fails in damp environments because the high-density fiberboard core absorbs moisture through the tongue and groove joints, causing the melamine wear layer to delaminate. Even waterproof laminate is only resistant to top-down moisture, not subfloor vapor. People think that because they have a waterproof surface, they can skip the moisture barrier. They are wrong. If you are installing laminate near a bathroom where you just fixed your grout, you need to be aware of the humidity. High humidity will cause those laminate planks to swell. Since they are a floating floor, they need space to move. If you pin them down with a heavy vanity or a transition strip that is screwed too tight, the floor will buckle. I have walked into rooms where the floor was two inches off the subfloor because it had nowhere to go. It is the same principle as the grout. You have to account for the movement of the material. Physics does not care about your aesthetic choices. It only cares about expansion, contraction, and gravity.
A checklist for a waterproof enclosure
- Check subfloor deflection to ensure it meets L/360 standards for tile.
- Apply a liquid-applied waterproofing membrane to all cement board seams.
- Mix grout by hand or at low RPM to avoid air entrainment.
- Pre-dampen tile edges with a sponge to prevent flash-drying of the grout.
- Use the dry-sponge strike method twenty minutes after application.
- Maintain a consistent temperature between 65 and 80 degrees during the cure.
- Verify that all movement joints are filled with 100 percent silicone, not grout.
The ghost in the expansion gap
Expansion gaps are the most misunderstood part of any flooring project, serving as the safety valve for the entire installation. Without a proper gap at the perimeter, the pressure of expanding materials will inevitably lead to joint failure or surface tenting. I see this most often in carpet install projects where the tack strip is placed too close to the baseboard or in laminate jobs where the installer forgot the spacers. In a shower, the expansion gap is usually at the corners and where the floor meets the wall. You cannot put grout there. Grout is rigid. It does not move. When your house shifts, or when the hot water hits the tile and causes it to expand, that grout will crack. It will turn into dust. You must use a flexible sealant in those areas. Most people want the grout to match perfectly, so they force it into the corners. This is a mistake. Within a year, those corners will be leaking water into your wall cavity. Use a color-matched silicone. It is the only way to handle the movement. It is the same reason we don’t screw down hardwood floors without leaving a gap at the wall. The wood needs to breathe. The tile needs to move. If you don’t give it space, it will make its own space by breaking.
Why your subfloor is lying to you
A subfloor may look flat to the naked eye, but a ten-foot straightedge will often reveal dips and humps that exceed the one-eighth inch tolerance required for modern flooring. These imperfections are the root cause of clicking sounds in click-lock floors and cracking in tile installations. I have spent more time with a grinder and a bag of patch than I have actually laying floors. Why? Because the prep is the work. The actual laying of the floor is just the reward. If you ignore a dip in the plywood, your carpet will develop a wear pattern there. Your laminate will bounce and eventually the locking tabs will snap. Your grout will develop pinholes because the tile is flexing under your weight, pushing air through the joints. You have to be honest with yourself about the state of your floor. If it is not flat, fix it. Do not rely on underlayment to bridge a gap. Underlayment is for sound dampening and moisture protection. It is not a structural filler. If you treat it like one, you are just building a failure on top of a lie.