The ‘Flashlight Test’ for Finding Hidden Grout Pinhole Leaks
I have spent three decades with my knees on the concrete and my hands in the mud. Most guys skip the leveling compound. They think the underlayment will hide the dip. It won’t. I spent three days grinding concrete on a job last month just so the floor wouldn’t click like a castanet. That same job had a shower that was weeping through the wall because the grout looked fine but was actually full of pinholes. I am here to tell you that a floor is a performance surface. It is a piece of structural engineering. If you treat your showers or your laminate like a decoration, you are going to be calling me in five years to rip it out when the mold starts talking back to you. We are going to look at the physics of why floors fail and how a simple light can save your home from a five figure repair bill.
The 1/8 inch that ruins everything
Floor leveling is the foundational requirement for any successful tile or laminate installation because it prevents vertical deflection. When a subfloor has a dip exceeding 1/8 inch over 10 feet, the grout joints in showers are subjected to mechanical stress. This stress creates pinhole leaks that allow water to migrate into the structural framing.
A level floor is not just about aesthetics. It is about the math of weight distribution. When you walk across a tile floor, your body weight creates a point load. If there is a void under that tile because the installer did not use a self leveling underlayment, the tile flexes. That flex is the enemy. It is the silent killer of every shower pan and kitchen floor. The grout, which is a rigid cementitious product, cannot handle that movement. It cracks. At first, the cracks are microscopic. You cannot see them with the naked eye. But water molecules are small. They find those paths. They follow the gravity. They sit in your subfloor and rot the wood. I have seen 2×10 joists that looked like wet cardboard because a guy thought he could eyeball the levelness of a room. You cannot eyeball physics. You use a straight edge and you use it right.
The ghost in the expansion gap
Laminate and hardwood floors require a specific expansion gap at the perimeter to account for changes in relative humidity and temperature. Without this 1/4 inch to 3/8 inch space, the floor will pressure lock against the wall. This leads to buckling and the snapping of the tongue and groove locking mechanisms.
Most people think a floor stays still. It does not. It is alive. It breathes. Wood and laminate respond to the moisture content of the air. In the summer, the cells expand. In the winter, they contract. If you jam a floor tight against the baseboard, it has nowhere to go but up. I have walked into houses where the laminate was humped up three inches off the subfloor like a localized earthquake. People ask me if they can just put a heavy kitchen island on top of their floating floor. The answer is no. You are pinning the floor down. You are killing its ability to move. When you lock a floor in place, the tension has to find a release point. That release point is usually your expensive locking joints. They snap. Then the floor feels soft. Then it starts to squeak. Then you are calling me to replace the whole thing. A carpet install is different because it is stretched, but even then, the subfloor must be right or the tack strips will not hold.
“A floor is only as good as the subfloor beneath it; deflection is the enemy of every joint.” – Master Flooring Axiom
The chemistry of grout failure
Grout failure often stems from improper water to powder ratios during the mixing phase or premature drying of the cementitious bond. This creates a porous internal structure within the joint. When water is introduced, the lack of density allows for capillary action, pulling moisture through the grout and into the substrate.
Grout is not a waterproof material by itself. It is a filter. If you mix your grout with too much water, you are creating a disaster. As the excess water evaporates, it leaves behind tiny air pockets. Think of it like a sponge made of stone. When you take a shower, the water does not just run off the tile. It sits on the grout. If that grout is porous, the water is sucked in by capillary pressure. This is where the flashlight test becomes your best friend. We are looking for those tiny shadows that reveal the voids in the surface. Even a pinhole the size of a needle can move a gallon of water into your wall over the course of a month of daily showers. That is why we use modified thin set and high density grouts. We are trying to win a war against a liquid that is looking for any way out.
| Material Type | Janka Hardness / Mil Wear | Acclimation Time | Moisture Resistance |
|---|---|---|---|
| Solid White Oak | 1360 Janka | 7 to 14 Days | Low |
| Engineered Oak | 1360 Janka | 3 to 5 Days | Medium |
| Luxury Vinyl Plank | 20 mil Wear Layer | 48 Hours | High |
| Laminate Wood | AC4 Rating | 48 Hours | Moderate |
How to perform the pinhole inspection
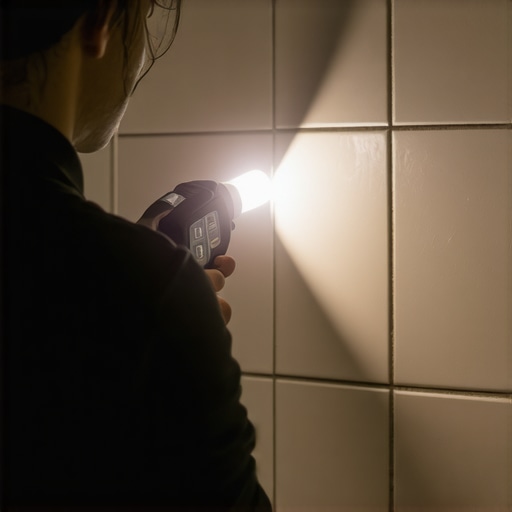
The flashlight test for finding hidden grout pinhole leaks involves placing a high lumen light source parallel to the tile surface in a darkened room. The low angle light creates long shadows when it hits a depression or a hole. This visual amplification reveals structural voids that are invisible under standard overhead lighting.
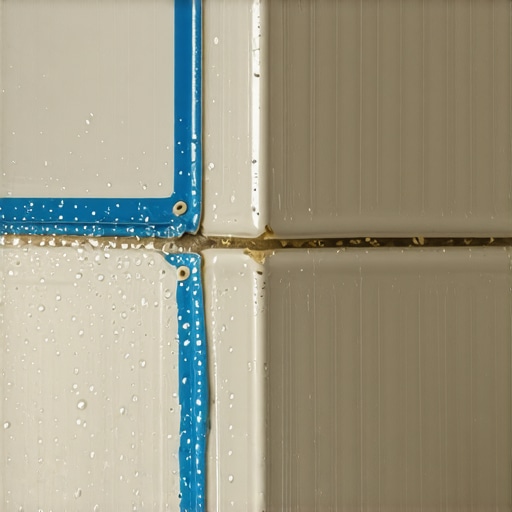
You need a dark room for this to work. Turn off the bathroom lights. Close the blinds. Take a professional grade flashlight and lay it flat against the tile. You are looking for shadows. If the grout is perfect, the light will skim across it. If there is a pinhole, you will see a black dot with a long shadow trailing away from the light. It looks like a crater on the moon. Mark these spots with a piece of blue painter tape. Do not use a marker. You do not want to stain the grout. Check every single horizontal and vertical joint. Check the corners where the plane changes. These changes in plane are where the house settles and the grout usually fails first. If you see a cluster of pinholes, your grout was mixed too dry or it was not packed into the joint deep enough. It is a sign of a lazy installer who wanted to go home early. I do not like lazy installers.
- Turn off all interior lights and block exterior windows.
- Lay a 500 lumen flashlight flat against the shower wall.
- Slowly move the beam across every grout line in a grid pattern.
- Identify any shadow casting voids or depressions in the cement.
- Inspect the transition between the floor and the wall specifically.
- Mark identified leaks with non staining tape for repair.
Why your subfloor is lying to you
Subfloors often appear flat to the naked eye while hiding significant variations that compromise flooring integrity. Using a moisture meter is the only way to verify if a concrete slab or plywood deck is ready for a carpet install or laminate application. Invisible moisture vapor will ruin an installation from the bottom up.
I have seen guys lay laminate over a slab that looked bone dry. Two months later, the edges are peaking. Why? Because the slab was still curing or there was a hydrostatic pressure issue from the soil. The subfloor lied. You have to use a moisture meter. You have to know the percentage. If you are putting down solid wood, you want that subfloor within two percent of the flooring material. If it is not, the wood will cup. It will warp. It will break your heart. In a shower, the subfloor is even more critical. If the pre slope is not right, the water sits on the liner. It never makes it to the drain. It just sits there, smelling like a swamp, waiting for a pinhole in the grout to give it a way into your floor joists. You cannot fix a bad subfloor with pretty tile. You fix the subfloor first, or you do not do the job.
“Modern waterproofing is a system, not a single layer; if one component fails, the assembly is compromised.” – TCNA Handbook Protocol
The 1/16 inch gap in the corner
The corner where two walls meet is called a change of plane. Grout should never be used here. Never. You need 100 percent silicone caulk. Why? Because houses move. They settle. They breathe. Grout is rigid. Silicone is flexible. If you have grout in your corners, I can almost guarantee you have pinholes and cracks. The flashlight test will show them clearly. You will see a jagged shadow running right down the corner. That is a leak. It is a straw for water to get behind your tile. When I do a shower, I leave that joint open and I fill it with a color matched sealant that can handle the movement. This is the difference between a pro job and a handyman special. One lasts thirty years. The other lasts until the first winter when the house shifts. Protect your investment by understanding that the materials must be allowed to move. If they cannot move, they will break.
{“@context”:”https://schema.org/”,”@type”:”HowTo”,”name”:”How to Find Hidden Grout Pinhole Leaks”,”description”:”A guide to using the flashlight test to identify structural voids in shower grout that lead to water damage.”,”step”:[{“@type”:”HowToStep”,”text”:”Turn off all bathroom lights and cover windows to create a dark environment.”,”name”:”Darken the Room”},{“@type”:”HowToStep”,”text”:”Place a high-power flashlight flat against the tile surface so the beam skims the grout.”,”name”:”Angle the Light”},{“@type”:”HowToStep”,”text”:”Look for shadows that indicate depressions or pinholes in the grout lines.”,”name”:”Identify Voids”},{“@type”:”HowToStep”,”text”:”Use blue painter’s tape to mark the location of every identified hole for repair.”,”name”:”Mark for Repair”}]}