Why Your Shower Niche Is Growing Mold Behind the Tiles
The hidden rot behind your custom shower niche
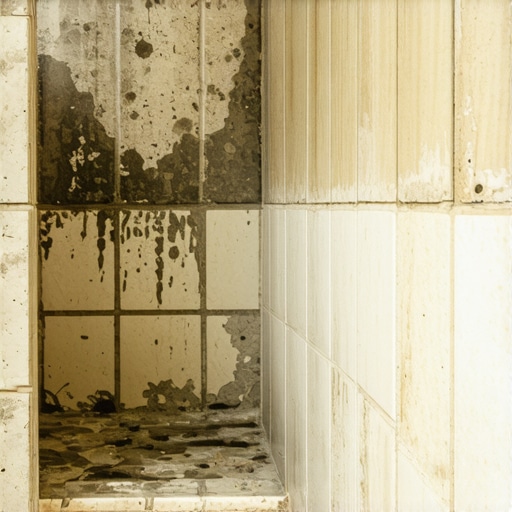
I once walked into a house where a five thousand dollar custom tile job in the master bath was literally falling off the wall. The homeowner noticed a tiny black line of mold on the bottom shelf of the niche. By the time I pulled the first tile, the smell of rotting pine hit me like a sledgehammer. The installer used regular drywall behind the niche and didn’t slope the shelf. Water had been wicking into the wall for three years. It looked like a swamp back there. Most guys skip the leveling compound and the proper waterproofing because they think the tile is the barrier. It is not. Tile and grout are just the skin. If the skeleton is soft, the skin will rot. This is why I spend three days grinding concrete or preping a mud bed before a single square of porcelain touches the floor. You cannot build a church on a swamp, and you cannot build a shower on a flat shelf. This article explains the structural engineering failures that lead to mold in your shower niche and how to fix them correctly.
The physics of the negative slope in wet areas
A shower niche grows mold when water penetrates the grout and becomes trapped behind the tile due to improper waterproofing or negative slope. This moisture reaches the wooden studs, creating a dark, damp environment where fungal spores thrive. When water hits a flat surface, it stays there. Surface tension holds it in place. If your niche shelf is perfectly level, it is actually failing. You need a positive pitch toward the drain of at least one eighth of an inch. Without that slope, the water sits in the corner, finds a pinhole in the grout, and uses capillary action to climb behind the thin-set. This is the same reason why floor leveling is vital in a walk-in shower. If the floor has a dip, the water pools. If the niche has a dip, the wall rots. It will buckle. I have seen it a hundred times. People think grout is waterproof. It is a filter. It allows moisture through. The real work happens at the membrane level.
“Waterproofing is not a suggestion; it is a system where every lap and seal must be redundant to account for structural movement.” – Master Flooring Axiom
The chemistry of modified thin-set and moisture resistance
Modified thin-set mortars use polymers to create a flexible and moisture-resistant bond between the tile and the waterproofing membrane. These polymers act as a bridge at the molecular level, preventing the adhesive from breaking down when saturated. In a shower niche, you are dealing with constant thermal expansion and contraction. Every time you turn on the hot water, the tile expands. When the water stops, it shrinks. If you use a cheap, non-modified mortar, the bond will eventually crystallize and snap. Once that bond snaps, a microscopic gap forms. That gap is a highway for mold. I prefer high-polymer mortars that can handle the vibration of the house. Houses breathe. They move. If your mortar is too rigid, it cracks. If it cracks, the water wins. We are talking about hydraulic pressure. Even a small amount of standing water exerts force. Over years, that force pushes moisture into the substrate. This is why the mil thickness of your waterproofing membrane matters. It needs to be thick enough to resist this pressure but thin enough to allow for a clean tile install.
The myth of waterproof grout in shower construction
Standard cementitious grout is naturally porous and will absorb water regardless of how many times it is sealed. Sealing grout only slows down the absorption rate; it does not turn the grout into an impermeable shield. This is a hard truth many homeowners do not want to hear. They buy the fancy sealer and think they are safe. They are not. If the niche was framed with wood and covered in standard cement board without a liquid or sheet membrane, that wood is drinking every time you shower. I have seen shower niches where the mold was so thick it was pushing the tiles out from the wall. This happens because mold growth expands as it consumes organic material like the paper backing on drywall or the wood in your wall studs. You need to use epoxy grout if you want a truly waterproof joint, but even then, the underlying structure must be sound. Epoxy is difficult to work with. It is sticky. It requires a fast hand. But it is the only way to ensure the joints do not become a breeding ground for bacteria.
| Material Type | Moisture Resistance | Installation Difficulty | Longevity Rating |
|---|---|---|---|
| Cement Board | Moderate | High | 6/10 |
| Extruded Polystyrene (Kerdi) | Extreme | Moderate | 10/10 |
| Liquid Membrane | High | Low | 8/10 |
| Standard Drywall | Zero | Low | 0/10 |
Structural zooming into the niche flange and seal
The flange of a pre-fabricated shower niche must be integrated into the wall membrane using a waterproof sealant or banding to prevent leaks. This is the most common point of failure. Installers often just screw the niche into the studs and tile over the gap. This is a disaster. You must use a fleece-lined waterproofing band to bridge the gap between the niche and the wall board. Think of it like a roof flashing. If the shingles do not overlap, the rain gets in. In a shower, the ‘shingles’ are your tiles and membranes. Every layer must overlap the one below it. I use a specific polyurethane sealant on every screw head. One missed screw can let in enough moisture to rot a 2×4 in five years. You also have to consider the corners. Inside corners are the weakest point in any tile installation. They are where the house movement concentrates. If you do not use a flexible sealant in those corners, the grout will crack. The crack will lead to mold. It is a simple chain of events. High-quality installs avoid this by using 100 percent silicone in all change of plane joints.
“A floor is only as good as the subfloor beneath it; deflection is the enemy of every joint.” – Master Flooring Axiom
The pre-tile checklist for a mold-free shower
- Verify a 1/8 inch positive pitch on the bottom niche shelf toward the drain.
- Ensure the waterproofing membrane is continuous with no visible gaps or pinholes.
- Check that all fasteners are covered with waterproof sealant or membrane patches.
- Confirm the use of polymer-modified thin-set for the specific tile type.
- Inspect the corners for proper reinforcement with waterproof banding.
- Validate that no organic materials like wood or paper-faced drywall are exposed.
The ghost in the expansion gap
Expansion gaps at the perimeter of a shower floor and within the niche allow the structure to shift without cracking the tile or grout. If you wedge a tile tight against the corner, the pressure has nowhere to go. Something has to give. Usually, the grout pops out. Once the grout pops, you have an open door for water. I always leave a sixteenth of an inch gap and fill it with color-matched silicone. This allows the shower to flex. Most builders skip this. They want it to look ‘seamless’ on day one. But ‘seamless’ leads to ‘broken’ on day three hundred. I hate that word. Nothing in a house is seamless. Everything is a series of joints. The goal of a master installer is to manage those joints, not pretend they do not exist. If you want a shower that lasts thirty years, you have to respect the physics of movement. This is the same reason we use specific underlayments for laminate or hardwood. It is all about managing the energy and the moisture. In a shower, the energy is the heat and the moisture is the water. Both are trying to destroy your house. Do not let them. Get the slope right. Use the right chemistry. Stop trusting the grout to do the job of the membrane.