I vividly remember the day I stepped into my living room, only to find a strange ripple running across my newly installed carpet. It was like a wave frozen in time, and immediately, I knew I had messed up somewhere along the way. That moment of realization was a lightbulb for me; I had overlooked crucial steps that could have prevented those pesky ripples from appearing. If you’ve ever experienced the frustration of uneven carpets, you’re not alone—and trust me, there’s a way to stop this problem before it even begins.
Why Preventing Carpet Ripples Matters More Than You Think
Carpet ripples might seem like a minor annoyance, but over time, they can lead to bigger issues such as tripping hazards and accelerated wear. The key is catching potential problems early, especially with the upcoming 2026 installations many homeowners are planning. Proper preparation and knowledge can save you a lot of headaches—and costly repairs. Early mistakes, like inadequate subfloor preparation, are common and can be easily avoided with some expert advice. Did you know that improper subfloor leveling can cause ripples to develop in as little as six months? (Source: see here)
So, how do you ensure your new carpeting remains smooth and durable, especially with 2026’s increased remodeling projects? That’s exactly what I’m here to help you with. Today, we’ll explore three straightforward strategies you can implement now—before the ripples make their unwelcome debut.
Is Proper Floor Preparation Really Worth the Hype?
Absolutely. I learned this the hard way early on when I skipped a crucial subfloor check, leading to a ripple nightmare that took months to fix. It cost me both time and money, and I wish I had known then what I know now. Proper floor leveling, as detailed in this guide, can make all the difference. Trust me, taking the time now to prepare your subfloor is a small investment that pays off big in the long run. Ready to dive into the methods that will safeguard your floor for years to come? Let’s get started.
Secure a Flat Subfloor to Halt Ripples
Begin by inspecting your subfloor for uneven spots. I remember when I first attempted this, I used a long level across the entire floor to identify dips and humps. One particular patch had a noticeable ⅛-inch slope that would have caused ripples in the future. Using a self-leveling compound or additional plywood layers can create a perfectly flat surface. Remember, just as a shower pan requires a precise slope to prevent leaks, your subfloor needs to be level to support a ripple-free carpet. For comprehensive guidance, check out this step-by-step guide.
Identify and Correct Subfloor Height Differences
Utilize a digital or laser level to pinpoint high and low spots. Filled the lows with a patch of cement or plywood, and sanded down the highs. It’s similar to adjusting a shower drain to ensure proper water flow; small adjustments here yield significant long-term results. During my project, I used a combination of these techniques, which resulted in an even surface that lasted years without ripples.
Choose Quality Underlayments for Stability and Durability
Your underlayment acts as the foundation, like a sturdy shower base that supports tiles—if it’s uneven, your carpet will follow suit. Opt for dense foam or rubber underlays designed specifically to resist compression and movement. I selected a high-density pad for my living room, noticing immediate improvements in comfort and flatness. A good underlay helps distribute weight evenly, preventing the development of ripples over time. For further tips, see this expert advice.
Start Installation with Proper Technique
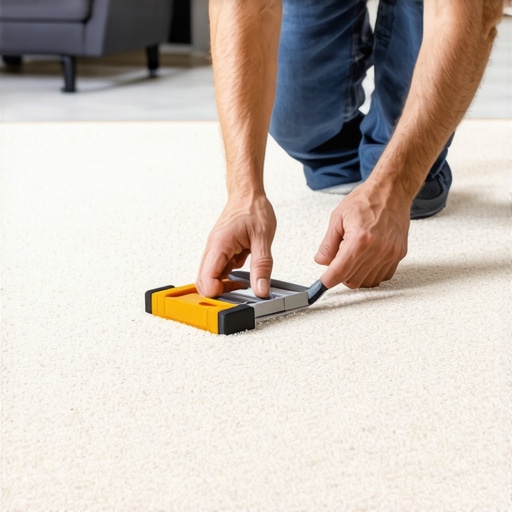
Before laying the carpet, unroll it in the room for at least 24 hours to acclimate to temperature and humidity. During installation, stretch the carpet taut using a power stretcher to prevent wrinkles—a bit like carefully pulling a shower curtain tight around a tub. I once rushed this step, and it resulted in wrinkles that took months to flatten out. Proper stretching ensures a smooth, ripple-free surface that maintains its appearance over the years.
Adopt the Right Tensioning Methods
Apply consistent tension across the entire area, especially at edges and seams. Use knee kicker and power stretcher to uniformly stretch the carpet, avoiding excessive pulling that can cause damage. I remember a DIY approach where I underestimated the tension needed—leading to curling edges and ripples. Investing time in correct tensioning techniques is crucial for a lasting professional finish.
Regular Maintenance and Inspections
Even impeccably installed carpets require periodic checks. Look out for signs of looseness or forming ripples, especially after changes in humidity. Address these issues early; a quick re-stretch can save replacing the entire carpet. Think of it as inspecting a shower’s waterproofing—early detection prevents costly repairs later.
Applying these steps with care and attention mirrors the precision needed in shower upgrades—each detail contributes to a durable, aesthetic result. Remember, the key to a ripple-free carpet lies in flat subfloor preparation, quality underlay, proper installation, and ongoing maintenance. For more expert tips, explore this detailed resource.
Many homeowners and DIY enthusiasts believe they know the basics of installing showers, leveling floors, or laying carpets and laminate flooring, but several misconceptions often lead to costly mistakes. Let’s cut through the noise and uncover some often-overlooked nuances that can make or break your project.
One widespread myth is that simply installing a shower pan without proper waterproofing guarantees a leak-proof bathroom. In reality, expert advice emphasizes that comprehensive waterproofing, including sealing behind tiles and ensuring proper slope, is crucial to prevent long-term water damage. For instance, neglecting to seal corners and joints is a common error that could result in hidden leaks, which are notoriously difficult to detect early. For detailed tips on waterproofing your shower effectively, check out our expert shower renovation guide.
When it comes to floor leveling, many assume that a self-leveling compound is a foolproof solution for uneven subfloors. However, this approach can backfire if the subfloor surface isn’t properly prepared beforehand. Moisture, debris, or loose particles can compromise the adhesion of leveling compounds, leading to future cracks or dips. In my experience, thorough cleaning and priming are essential; skipping these steps is a quick path to failure. For advanced users, understanding the limitations of self-levelers and knowing when to opt for plywood overlays can save you from future headaches. Our comprehensive floor leveling fixes can offer deeper insights.
Many believe that laminate flooring is a maintenance-free, DIY-friendly upgrade. While easy to install, ignoring the importance of proper subfloor preparation—especially moisture barriers—can cause bubbling or bounce in the floors. A common trap is assuming that existing concrete slabs are perfectly dry; however, elevated moisture levels can compromise the laminate’s stability. Advanced installers test moisture content before installation and use vapor barriers, as recommended in floor leveling strategies for 2026. Skipping these steps might not be obvious initially but leads to costly repairs down the line.
Similar myths surround carpet installation. Many believe that stretching is optional or that using basic tools can substitute for professional-grade equipment. But improper stretching techniques can cause ripples, seams fraying, or bubbles forming over time. Advanced practitioners know that correct tensioning, combined with high-quality carpeting and padding, is essential for long-lasting results. Investing in a power stretcher and learning proper techniques—like those detailed in carpet installation tips—ensures a wrinkle-free, durable surface.
So, what hidden details often trip up projects? A common oversight is neglecting to consider the effect of humidity and temperature changes during installation. Materials expand and contract; failing to account for this leads to gaps or buckles later. For example, leaving laminate in a hot car overnight increases the risk of expansion-related buckling once installed. Being aware of these subtle factors and planning ahead allows for smoother projects and more durable finishes.
To wrap up, mastering these nuanced details helps elevate your renovation game from amateur to expert level. Do you find yourself falling for any of these misconceptions? Let me know in the comments! Remember, taking the time to understand these hidden aspects can save you from costly mistakes and ensure your home upgrades last for years to come.When it comes to maintaining the quality and longevity of your flooring and shower installations, having the right tools and a solid routine is paramount. Over years of hands-on experience, I’ve refined my toolkit to include equipment that ensures precise results and minimizes future issues. For leveling concrete floors, I rely heavily on a high-grade laser level to identify uneven spots with pinpoint accuracy, replacing traditional bubble levels that can be affected by human error. This tech allows me to spot even minor dips that might not be visible to the naked eye, preventing costly repairs down the line. Additionally, for mixing and applying self-leveling compounds, a power mixer not only speeds up the process but also ensures a consistent consistency—crucial for achieving a perfectly flat surface. As for shower waterproofing, I recommend using a high-quality, professional-grade liquid membrane applicator, which provides an even, seamless coating that minimizes the risk of leaks, especially in complex corners or curved surfaces. Regularly checking your tools for calibration and wear keeps your work impeccable, saving you time and frustration in the long run.
How do I maintain my tools and techniques to keep projects running smoothly?
Adopting a routine maintenance schedule is essential. Clean tools immediately after use, especially those dealing with adhesives or sealants, to prevent buildup that can affect performance. Store leveling equipment in a dry, climate-controlled space to prevent corrosion or damage. Moreover, staying updated on the latest advancements in products and methods is vital. For example, advancements in floor leveling compounds, such as rapid-curing mixes, can significantly reduce project timelines and improve results. Regularly calibrating laser levels and replacing worn blades or bits for power tools ensures precise cuts and measurements. Investing in high-quality gear initially may seem costly but pays off through fewer errors and a more professional finish. For a comprehensive approach to long-term durability, I recommend exploring this detailed guide on expert-level prepping and maintenance strategies, which emphasizes the importance of proper equipment care and skill refinement. If you’re aiming to elevate your projects, try incorporating a laser level into your next floor leveling task—it truly makes a difference in achieving that flawless surface. Remember, the key to keeping your installations looking great and performing reliably over time lies in using the right tools and maintaining them diligently.
Lessons That Changed My Approach to Floor and Shower Perfection
One of the most valuable insights I gained was realizing that even small oversights—like neglecting to test moisture levels or skipping proper priming—can lead to long-term issues that are costly and time-consuming to fix. The toughest lesson was understanding that patience during preparation isn’t just a virtue but a necessity; rushing a subfloor or skipping steps only magnifies problems later. I’ve learned that every successful project hinges on attention to detail, especially when it comes to leveling concrete or ensuring waterproofing, because minor mistakes can cause major headaches in the future. Lastly, I discovered that investing in quality tools and understanding their optimal use profoundly impacts the durability and appearance of your finished work, making the effort more rewarding and less frustrating.
My Toolbox to Elevate Your Installation Skills
Over the years, I’ve come to rely on a handful of trusted resources that truly make a difference. First, this guide on leveling concrete floors has been my go-to for mastering subfloor prep, preventing cracks and dips. For reliable waterproofing techniques, I turn to this expert shower upgrade advice, which emphasizes thorough sealing. When it comes to installing carpets and ensuring they stay wrinkle-free, this resource provides step-by-step tips that save me from common pitfalls. Lastly, I never underestimate the value of high-quality tools like laser levels and power stretchers; they are worth every penny and significantly improve the final outcome.
Your Journey Starts with Confidence and Care
Embarking on your project with the right knowledge and mindset can be empowering. Remember, every professional was once a beginner who made mistakes—what sets them apart is their willingness to learn and adapt. Take your time, double-check your work during each phase, and don’t overlook small details—they’re often the difference between a good result and a great one. As you start or continue your upgrades, trust in the process, utilize trusted resources, and celebrate your progress along the way. Your home transformation awaits, and with patience and precision, you can achieve flawless floors and showers that last for years to come. So, what’s the first step you’re excited to tackle? Drop your plans or questions below—I’d love to hear about your project ambitions.