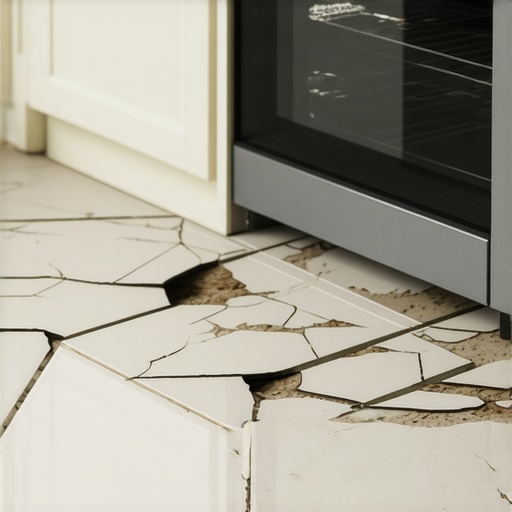
Why Your Kitchen Floor Tiles are Lifting Near the Oven
I spent three days grinding concrete on a job last month just so the floor wouldn’t click like a castanet. Most guys skip the leveling compound because they think the underlayment will hide the dip. It won’t. I walked into a kitchen in Seattle last winter where the homeowner was frantic. Their beautiful Italian porcelain was tenting right in front of their high end range. It looked like a miniature mountain range had sprouted overnight. The culprit was not the tile itself. It was the absolute lack of respect for the laws of physics and thermal expansion. You cannot fight thermodynamics with a bit of extra mortar and hope for the best. When that oven hits four hundred degrees and stays there for a Sunday roast, the energy has to go somewhere. If you have not prepared the subfloor or used the correct adhesive chemistry, your tiles will inevitably lose their grip on reality. This is not just a cosmetic issue. It is a structural failure of the bond layer caused by localized heat stress and poor installation technique.
The ghost in the expansion gap
Kitchen floor tiles lift near the oven because of thermal expansion, localized moisture migration, and insufficient expansion joints. When the oven generates intense heat, the tile and substrate expand at different rates. Without a flexible perimeter joint or the right polymer modified thin-set, the bond shears and the tile tents. This phenomenon is often the result of ignoring the EJ171 standards which dictate how and where movement joints must be placed in a tile installation. Most installers treat the kitchen as one solid block of stone. It is not. It is a living, moving assembly that responds to every temperature swing from the oven or the dishwasher. If you lock the tile against the cabinetry or the base of the range, you are creating a pressure cooker situation. The tile has nowhere to expand laterally. The only direction left for that energy is upward, leading to the dreaded hollow sound when you walk past your stove.
Why your subfloor is lying to you
The subfloor is the foundation of every flooring project and any deviation in levelness or moisture content will eventually lead to bond failure. Even if you are doing a carpet install or laying laminate, the subfloor must be pristine. For tile, the requirements are even more stringent. We talk about L over 360 for a reason. This refers to the amount of deflection allowed in a floor joist system. If your subfloor is bouncing or flexing when you walk, the rigid tile and grout will eventually crack or delaminate. Heat from the oven exacerbates this by drying out the wood subfloor unevenly. This creates a localized curl in the plywood or OSB. This micro movement is enough to break the bond of a standard unmodified mortar. I have seen guys try to use floor leveling compounds to fix this without addressing the structural bounce. It never works. You are just adding weight to a weak system. You need to ensure the subfloor is thick enough, typically a minimum of one and one eighth inch of total wood subfloor, to support the weight and the thermal stresses of a kitchen environment.
“A floor is only as good as the subfloor beneath it; deflection is the enemy of every joint.” – Master Flooring Axiom
The thermal shock of the 450 degree preheat
Thermal shock occurs when a sudden increase in temperature causes rapid expansion in the surface material while the substrate remains relatively cool. This is particularly common near ovens where the heat plume exits the appliance. The porcelain tile absorbs this heat and begins to grow at a microscopic level. If the mortar underneath is a rigid, non polymer modified variety, it cannot absorb the shear stress. The bond between the tile and the thin-set is essentially ripped apart. This is why chemistry matters more than aesthetics. You need a mortar with high shear strength and flexibility, often classified as ANSI A118.4 or A118.11 for wood substrates. Most big box retailers sell the cheap stuff to homeowners who do not know better. They think all bags of grey powder are the same. They are not. The high performance mortars contain latex and polymer additives that act like microscopic shock absorbers, allowing the tile to shift slightly without popping off the floor.
| Material Type | Expansion Coefficient | Heat Tolerance Rating | Recommended Adhesive |
|---|---|---|---|
| Porcelain Tile | Low | Excellent | Polymer Modified Thin-set |
| Ceramic Tile | Medium | Good | Modified Thin-set |
| Plywood Subfloor | High | Poor | N/A (Requires Underlayment) |
| Concrete Slab | Low | Excellent | Uncoupling Membrane |
The chemistry of the bond failure
The chemical bond between the tile and the substrate is a complex crystallization process that can be disrupted by excessive heat or moisture. When you mix thin-set, you are starting a hydration reaction. If the area near the oven is too hot during the installation or the first few days of curing, the water in the mortar evaporates too quickly. This prevents the crystals from fully forming and anchoring into the pores of the tile. You end up with a dusty, weak bond that looks fine on the surface but has no structural integrity. I have seen this happen in showers too, where the steam and heat cycles cause tiles to pop because the installer did not use a waterproof membrane or the right mortar. In the kitchen, the oven acts like a giant hair dryer, sucking the life out of your mortar bed. Always check the temperature of the floor before you start. If that concrete is hot from a nearby appliance or a radiant heat line, you are going to have a bad day.
The 1/8 inch that ruins everything
A missing expansion joint at the perimeter is the number one reason for tile tenting in modern kitchens. Every hard surface installation, whether it is tile or laminate, requires room to breathe. The TCNA Handbook is very specific about this. You need a movement joint every 20 to 25 feet in each direction for interior installations, and even more frequently if there is natural sunlight or heat sources involved. Most installers just grout the tile right up to the cabinets. This is a mistake. That joint should be filled with a high quality 100 percent silicone caulk that matches the grout color. Silicone is flexible. Grout is not. When the floor expands toward the cabinets, the silicone compresses. If you have grout in that gap, the tile hits a literal brick wall. The resulting pressure is immense. It is enough to snap the tongues off laminate planks or lift 24 inch porcelain tiles right off the thin-set bed.
- Verify subfloor deflection meets L/360 standards for ceramic and L/720 for natural stone.
- Install an uncoupling membrane to isolate the tile from subfloor movement.
- Ensure a minimum 1/4 inch expansion gap at all vertical obstructions and cabinetry.
- Use only high performance polymer modified thin-set meeting ANSI A118.4.
- Back butter every tile to ensure 95 percent coverage in heavy traffic and heat zones.
- Never grout the joint where the floor meets the wall or the cabinets.
Comparing floor leveling and structural stability
Floor leveling is a surface correction tool, not a fix for a bouncy or structurally unsound floor. I often see people pouring self leveler over a subfloor that is moving like a trampoline. They think the flat surface will protect the tile. In reality, the added weight of the leveler makes the bounce worse. If you are dealing with a kitchen that has had walls moved or heavy new appliances installed, you need to look in the crawlspace or the basement. You might need to sister the joists or add a center beam. A rigid tile floor cannot handle the flex. If you ignore the structural integrity, you are just throwing money away. The same logic applies to carpet install projects where the tack strips pull up because the wood is rotting or soft. Everything starts from the bottom up. If your subfloor is not solid, the best tile in the world will not stay down, especially when the oven starts pumping out heat and stressing those connections.
“Movement joints are not optional; they are a fundamental requirement of a functional tile system.” – TCNA Guidelines
Moisture migration from the dishwasher and shower logic
Moisture trapped under the tile can turn into vapor when heated by the oven, creating upward pressure that breaks the bond. This is a common issue when tile is laid over a concrete slab that has not properly cured or does not have a vapor barrier. The heat from the oven draws the moisture up through the slab. When it hits the bottom of the tile, it has nowhere to go. This creates a localized zone of high humidity and hydrostatic pressure. Eventually, this weakens the mortar and the tile releases. We see similar physics in showers where poor waterproofing leads to saturated mud beds. The cycle of wetting and drying, combined with heat, is the most aggressive environment a floor can face. If you are installing over concrete, always do a calcium chloride test or use an electronic moisture meter. If the levels are high, you must use a moisture mitigation system or a specialized uncoupling membrane designed to manage vapor pressure. Don’t assume the floor is dry just because it looks grey.
Final inspection of the heat zone
Fixing a lifted tile near an oven requires more than just more glue. You have to diagnose why it happened. Was it the heat? Was it the lack of an expansion gap? Was it a weak subfloor? If you just slap the tile back down with some construction adhesive, it will pop up again within months. You need to scrape the old mortar back down to the substrate, check for levelness, and reinstall using a high flex mortar and proper perimeter gaps. If the whole floor is sounding hollow, you might be looking at a total tear out. It is a hard truth to swallow, but it is better than living with a floor that is literally falling apart under your feet. Take the time to do the prep work. Use the right chemistry. Respect the heat. Your floor will thank you for it by staying where it belongs. This is the difference between a handyman and a master flooring architect. One looks at the tile; the other looks at the entire structural system.