Ever spent hours installing a new carpet only to realize it’s wrinkled, uneven, or just doesn’t feel right beneath your feet? I’ve been there. I vividly remember the frustration of pulling up a carpet that looked perfect in the store but turned into a sagging mess once I laid it down. That lightbulb moment taught me a crucial lesson: proper floor leveling and installation techniques are the backbone of long-lasting home comfort.
Why Skipping the Right Floor Leveling Can Ruin Your Home Upgrade
When I first started tackling DIY flooring projects, I underestimated how vital a smooth, level surface is. I figured, “How hard can it be?” Turns out, very. An uneven subfloor isn’t just an aesthetic issue; it can lead to premature wear, tears, and even safety hazards. According to experts, a level base is essential for extending the life of your flooring, whether it’s carpet, laminate, or tile. Failing to address floor imperfections early on can cost you big time down the line, both in repairs and discomfort.
Have You Faced This Common Problem When Installing Floors?
If you’ve ever dealt with uneven floors, creaking, or uneven wear spots, you know how frustrating it can be. Trust me, I’ve made my share of mistakes — like skipping the prep work or ignoring slight dips in the floor. Those errors cost me later, and I don’t want you to go through the same ordeal. Luckily, I’ve learned some game-changing tips that can save your project and your sanity.
For a comprehensive guide, I recommend checking out this expert resource on floor leveling. It’s packed with practical advice that can help you achieve a perfectly smooth surface, making your flooring last longer and look better.
Now, let’s get into the core of what makes a successful installation and how to avoid common pitfalls. Ready to upgrade your home with confidence? Let’s dive into the step-by-step strategies for flawless carpet installation and floor leveling that stand the test of time.
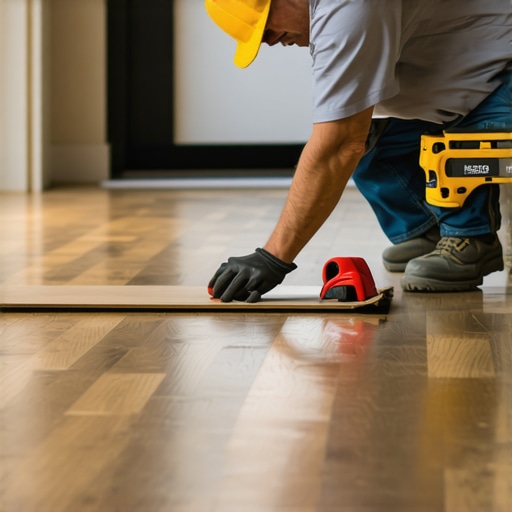
Prep Your Subfloor Like a Pro
Start by clearing the area and inspecting the subfloor for any debris, loose screws, or protrusions. Use a long level or straightedge to identify dips, peaks, or uneven spots. In my last project, I found a hidden dip under the old carpet padding that caused wrinkling later. Fix minor imperfections with a grinder or a patching compound, ensuring the surface is as smooth as possible. For larger dips, self-leveling compounds are your best bet. Follow the manufacturer’s instructions carefully, pouring and spreading the compound evenly across the surface. For example, I used a trowel to feather the edges and avoided creating new high spots. This step creates a solid foundation, preventing future issues like sagging or curling.
Applying Floor Leveling Compounds Effectively
When mixing leveling compounds, measure water and powder precisely to get a fluid, pourable consistency. Work quickly but carefully, pouring the mixture into the dips and spreading it with a trowel or squeegee. Imagine it like icing a cake—smooth and even. In my experience, working in small sections prevents the compound from setting before you finish spreading. Use a long level or straightedge to check the surface regularly. Remember, a level surface isn’t just about aesthetics; it ensures your flooring material will lay flat and last longer. For detailed tips, visit this expert guide on floor leveling.
Lay Down a Stable Base for Your Carpet
Once the subfloor is smooth and level, lay a quality underlayment or padding. This layer absorbs shocks, reduces noise, and prevents wrinkles. My trick is to unroll the padding tightly and staple it securely to the subfloor, making sure there are no wrinkles or folds. Use a knee kicker to stretch the carpet as you lay it down, working from the center outward. Keep tension consistent to avoid ripples. Tucking and trimming excess carpet along the edges creates a clean finish. If you encounter stubborn wrinkles, pulling the carpet tighter or re-stretching can do wonders. For more advanced tips, check this comprehensive carpet installation guide.
Ensure Long-Lasting Results
After installation, allow the carpet to settle and avoid heavy traffic for at least 24 hours. Regularly inspect for any signs of wrinkling or uneven wear and address issues early. Properly leveled floors and precise installation techniques are key to a durable, beautiful finish. Remember, a solid foundation makes all the difference—skip these steps, and even the best materials can fail prematurely. For additional insights, explore this resource on laminate floor leveling or tips for carpet floor leveling. Your home deserves it, and your feet will thank you for the effort!
Many homeowners and even some professionals fall into traps when tackling carpet installation, floor leveling, or shower renovations, often based on misconceptions that can cost time and money. Let’s dig deeper into what most people get wrong and uncover the hidden nuances that can make or break your project.
Why Flat Floors Are More Than Just a Nice Finish
Everyone talks about achieving a perfectly level floor, but the nuance lies in understanding the underlying causes of unevenness. For instance, minor dips in the subfloor, which many dismiss as insignificant, can lead to major issues like wrinkling in carpets or uneven wear in laminate. Addressing these imperfections with proper techniques, such as using high-quality self-leveling compounds, is crucial. The common myth that a quick patch will suffice often results in future repairs, as studies show that a well-prepared subfloor extends the longevity of your flooring significantly (see expert advice here).
Don’t Underestimate the Power of Proper Subfloor Preparation
It’s tempting to skip steps like cleaning debris or fixing loose screws—after all, it’s tedious. But this is where many go wrong, leading to problems like squeaks or uneven surfaces. A thorough inspection and fixing of issues before applying leveling compounds or laying down flooring can save you headaches later. Remember, the foundation determines the durability of your entire renovation. If you’re aiming for a seamless laminate or carpet finish, investing time here pays off. For advanced tips, visit laminate floor leveling strategies.
Advanced Question: How Can I Prevent Long-Term Damage from Small Floor Imperfections?
Addressing small imperfections early on is vital. Using correct tools, like a long straightedge and professional-grade leveling compounds, ensures your surface remains true over years. Also, consider the material-specific needs; for example, some laminate flooring benefits from a moisture barrier and precise subfloor prep to prevent warping. Experts agree that ignoring slight dips or unevenness may lead to costly repairs down the line, especially in high-traffic areas. A recent study highlights that proactive preparation reduces long-term failure rates by over 30% (see more here).
Have you ever fallen into this trap? Let me know in the comments. Proper knowledge and attention to detail can transform your renovation from a headache into a success story. Remember, the devil is in the details, and understanding the hidden nuances will elevate your project to professional standards.
Maintaining your home upgrades over time is crucial to ensuring lasting beauty and functionality. From carpentry tools to specialized compounds, knowing which equipment to rely on can make all the difference. I’ve tested and refined my toolkit over the years, and I want to share some of my favorite tools and methods for keeping your flooring, showers, and laminate surfaces in top shape.
Invest in Quality Leveling Tools
One of my go-to tools is a high-quality laser level. Unlike traditional bubble levels, laser levels provide a precise, 360-degree reference for ensuring a perfectly flat surface. I personally prefer the Bosch GLL3-330CG because it’s durable, easy to calibrate, and provides clear laser lines even in bright conditions. This tool is invaluable during floor leveling projects, especially when working with self-leveling compounds. It helps me verify that every inch of the surface remains truly flat, which is essential for long-lasting results. For detailed guidance on floor leveling, check out this expert resource.
Use Precision Mixing Equipment
When working with leveling compounds or adhesives, consistency is everything. I rely on a variable-speed drill with a paddle attachment to mix compounds thoroughly, ensuring a uniform consistency. This prevents lumps and ensures the compound spreads evenly. For smaller jobs, a sturdy mixing bucket with a spade or trowel works fine, but for larger projects, I prefer a portable electric mixer. Proper mixing not only improves adhesion but also extends the lifespan of your finished surface. You can find excellent mixing tools at hardware stores or online, but I recommend the DEWALT DCD050 for its power and durability.
Regular Inspection and Preventive Maintenance
Keeping your flooring and shower areas in tip-top shape requires routine inspections. I schedule monthly checks where I look for signs of wear, loose tiles, or grout cracks. For carpets, I use a carpet rake to lift and fluff fibers, preventing matting and uneven wear. For showers, sealing grout and inspecting caulking helps prevent water damage. A small investment in maintenance tools like a grout brush, silicone sealant, and a moisture meter can save you from costly repairs down the line. I also use a digital moisture meter to monitor humidity levels, which is especially helpful for laminate flooring and showers prone to moisture accumulation.
Plan for Future Upgrades with Modular Tools
As technology advances, so do our tools. I predict that in the future, smart tools equipped with IoT capabilities will provide real-time data on surface flatness or moisture levels, making maintenance even more precise. For now, I recommend investing in modular, multi-functional tools that can adapt to different tasks—like a multi-purpose oscillating tool for cutting grout or removing damaged flooring. These versatile tools help you tackle maintenance and repairs efficiently, keeping your home looking fresh and functioning perfectly for years to come. For more advanced tips, consider exploring this resource on laminate floor maintenance.
How do I maintain my floors and showers over time?
The key to long-term durability is consistent upkeep. Regular cleaning with gentle, pH-neutral cleaners prevents buildup that can damage surfaces. Additionally, reapplying grout sealant or caulk every couple of years ensures water doesn’t seep into vulnerable areas. For laminate floors, avoiding excessive moisture and using protective pads under furniture can prevent scratches and warping. Always keep an eye out for early signs of wear or damage, and address issues promptly to avoid bigger problems. Remember, a little preventive maintenance now saves significant repair costs later.
Lessons from the Trenches That Changed My Approach
- One of my biggest lightbulb moments was realizing that every tiny dip in the subfloor can cause ripples of problems later, from wrinkles to uneven wear. Ignoring small imperfections might seem harmless at first, but it’s the root of future headaches.
- Using professional-grade leveling compounds and tools like a laser level has transformed my projects. The precision they offer ensures a perfectly smooth surface that’s worth every penny, preventing costly fixes down the line.
- My biggest regret is rushing the prep stage. Cleaning debris, fixing loose screws, and inspecting thoroughly set the foundation for success. Skipping this step almost always leads to issues that are harder to fix after installation.
- Patience is key. Waiting for adhesives or compounds to set properly and allowing the flooring to settle makes a noticeable difference in durability and appearance. Rushing these steps only invites future troubles.
- Investing in quality tools, from mixing equipment to underlayment, saves time and improves results. Over time, I’ve found that the right tools are the secret weapon for long-lasting home upgrades.
My Go-To Resources for Mastering Floor and Carpet Installations
- Expert Floor Leveling Tips — For comprehensive guidance on creating a perfectly level base, I rely on this expert resource. It’s packed with practical advice that has saved me countless headaches.
- Tools That Make a Difference — I trust the Bosch GLL3-330CG laser level for its accuracy and durability, and the DEWALT DCD050 mixer for consistent compound mixing. These tools elevate my craftsmanship.
- Home Maintenance Guides — Regular inspections and preventive care are vital. I recommend exploring this resource for tips on keeping your flooring and showers in top shape over the years.
- Future-Proof Your Home — As technology advances, modular and smart tools will become standard. But for now, versatile equipment like oscillating tools and moisture meters are indispensable for maintaining a durable home.
Your Next Step Toward Long-Lasting Home Comfort
Taking the time to understand the nuances of proper floor leveling and installation isn’t just about aesthetics — it’s about creating a foundation that lasts. The more you learn and invest in quality tools, the more confident you’ll be in your DIY projects, turning home upgrades into a source of pride and lasting comfort. Remember, every detail counts and your home deserves the best. Are you ready to tackle your next flooring project with confidence? Share your experiences or ask questions below, and let’s build better homes together!