I remember the first time I tried to install new carpeting in my living room. What started as an exciting weekend project quickly turned into a frustrating maze of uneven patches, wrinkled edges, and the inevitable regret of not preparing properly. That moment was my lightbulb — I realized that without the right techniques, even the most beautiful carpet can turn into a nightmare, losing both its aesthetic appeal and comfort over time.
Why Proper Carpet Installation Makes All the Difference
Opting for professional installation can seem costly, but trust me, it’s an investment in your home’s longevity and your daily comfort. A poorly installed carpet not only looks shabby but also wears out faster, leading to repeated repairs or replacements. Painting a wall or choosing the right furniture is half the story; the real magic lies beneath, in a well-laid floor that stands the test of time. Did you know that improper installation can reduce a carpet’s lifespan by up to 30%, according to flooring experts? This emphasizes how crucial the installation process is for durability and long-term value.
Is Cutting Corners on Installation Actually Worth It?
Initially, I thought a quick DIY fix would save me money, but I soon learned that rushing through the steps or ignoring guidelines can backfire spectacularly. My early mistake was skipping the era of proper floor leveling, which created those uneven bumps you often find in poorly installed carpets. If you’re considering tackling this project yourself or hiring someone, it’s essential to start with a solid foundation. For detailed insights, I recommend checking out this comprehensive guide on floor leveling. It’s packed with tips to ensure your carpet stays plush and looks fresh for years to come. With the right preparation and techniques, you can turn what seems like a daunting task into a rewarding DIY success or ensure your contractor’s work is top-notch. Ready to learn the step-by-step methods that guarantee a flawless finish? Let’s dive in.
Preparing the Surface Before Installing the Carpet
First, remove existing flooring and debris, then check for uneven spots. For uneven subfloors, use a self-leveling compound, which simplifies the process, much like pouring pancake batter to create a smooth surface. Mix the compound according to instructions, then spread it evenly with a trowel, focusing on high spots, and allow curing completely—usually 24 hours. I once had a stubborn bump near the doorway; applying the leveling compound fixed the issue, resulting in a seamless surface.
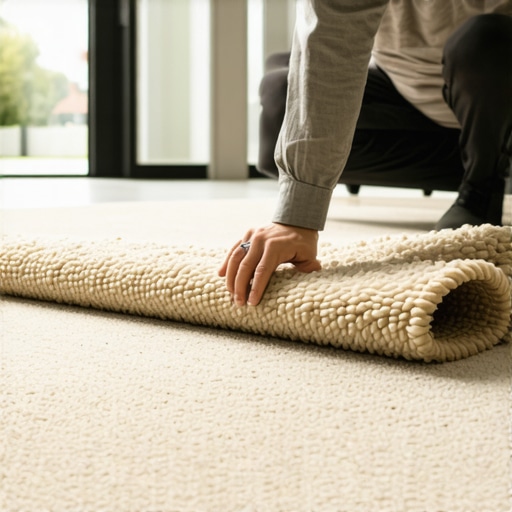
Laying the Carpet with Precision
Start by measuring the room accurately, adding an extra 3-6 inches on all sides for trimming. Cut the carpet accordingly, and lay it out in the room to prevent wrinkles. Use a knee kicker tool to stretch the carpet across the floor, anchoring it in place with a power stretcher for tightness—think of it as tuning a guitar string for perfect pitch. When I installed my own carpet, I used a seam roller to press the edges together, avoiding visible lines, which made my DIY project look professional. For expert guidance, check out this detailed carpet installation guide.Many homeowners believe that basic knowledge suffices for successful renovations, but in reality, mastering the nuances can prevent costly mistakes. One common myth is that laminate flooring installation is straightforward and forgiving, but beneath its simplicity lies the need for meticulous subfloor preparation and proper acclimation. Skipping these steps often results in warping and buckling over time, which studies have linked to improper moisture control and inadequate subfloor leveling.
Why Do Experts Remain Vigilant About Even Small Floor Imperfections?
Advanced homeowners often overlook the importance of precise measurements and consistent moisture levels. An overlooked crumb in the subfloor or a minor swell can cause significant issues down the line. According to flooring specialists, tiny discrepancies can lead to a 15-20% reduction in the lifespan of your flooring, emphasizing how critical detailed inspections are. You can find expert advice on floor leveling techniques for laminate that ensure durability.
Kneeling into the Truth About Floor Leveling Mistakes
Many assume that using quick-setting compounds is enough to fix uneven surfaces. However, rushing this process without adequate curing time or proper mixing ratios often introduces new issues, such as cracking or shrinking. A trap homeowners fall into is underestimating the importance of testing the levelness after application—an error that compromises the entire project. For comprehensive guidance, check out this detailed guide on floor leveling to avoid these pitfalls and achieve a perfectly flat surface.
Complexity in Shower Waterproofing often Gets Oversimplified
One major mistake is believing that sealing the surface alone guarantees waterproofing. Advanced experts know that behind the tiles, proper membrane installation, slope creation, and drain positioning are critical. Neglecting the slope, for instance, leads to water pooling and ultimately damages the substrate. Studies indicate that improper shower waterproofing can reduce the longevity of bathroom renovations by over 30%. To get it right, explore expert shower waterproofing tips that focus on long-term effectiveness.
How Can Carpet Installations Go Wrong Without Attention to Detail?
Many think that a simple cut and stretch are all it takes, but advanced installations require precise seam matching, proper stretching techniques, and understanding subfloor moisture content. Overlooking these can result in seams that split or buckles that create trip hazards. A common Maintaining your newly installed flooring and related features is crucial to ensure longevity and durability over time. Having the right tools at hand can make ongoing maintenance and small repairs much more manageable. For any homeowner committed to preserving their investment, understanding these tools and routines is essential. One must-have is a high-quality laminate floor cleaner, such as the ones recommended in expert laminate maintenance guides. These cleaners are specifically formulated to clean without damaging the finish, preventing buildup that can deteriorate your flooring. Additionally, a good microfiber mop is invaluable for gentle, streak-free cleaning across wood, laminate, or carpeted surfaces, reducing the risk of scratches or wear.
How do I maintain my floors and features over time? Explore routine inspections, cleaning schedules, and minor repairs
For ongoing upkeep, regular inspections can catch issues like loose seams in carpets or small cracks in laminate before they escalate. Proper cleaning schedules, for instance, sweeping or vacuuming weekly and damp mopping monthly, prevent dirt buildup that can cause scratches or abrasion. A handheld vacuum equipped with soft bristle attachments is ideal; I personally swear by my Dyson V15 Detect for its precision and versatility, especially in hard-to-reach corners. For carpeted areas, using a carpet rake periodically helps lift pile and prevent crushing, maintaining a fresh look for years. When it comes to showers, checking the waterproof membrane and grout lines every six months helps avoid water damage; a moisture meter can be a smart addition to your toolkit here. For example, a moisture meter like the Wagner Meters Moister Meter accurately detects excess moisture behind tiles, which is often unseen but damaging. Incorporating these tools and routines into your maintenance plan ensures long-lasting beauty and functionality of your floors.
Tools I recommend for longevity and ease
Invest in a multipurpose floor scraper to address stubborn debris or small repairs without damaging the surface. Personal experience has shown that a high-quality tool like the Channellock Floor Scraper makes quick work of embedded dirt or adhesive residues, saving both time and effort. Also, a good set of replacement seals for your shower and door thresholds is essential; over time, these wear out and can compromise waterproofing if not replaced. For more advanced maintenance, consider a buffer or polisher equipped with a soft pad; this can restore shine and smooth minor scratches on laminate floors, extending their lifespan. Looking toward the future, I believe the trend will increasingly favor smart maintenance tools—like IoT-enabled sensors that alert you to moisture or wear issues before they become visible—making upkeep more proactive and less reactive. I highly recommend trying out a moisture sensor if you’re serious about preserving your flooring investments.
Final thoughts
Maintaining your floors isn’t just about keeping them clean; it’s about regular inspections, timely repairs, and using the right tools to prevent small issues from becoming costly problems. Incorporating these methods and equipment can drastically improve your floor’s lifespan and appearance. For a comprehensive overview, consult resources like expert tips on maintaining your renovations. Start implementing one or two tools today—such as a moisture meter or microfiber mop—and notice how much easier your maintenance routine becomes, setting the stage for long-term satisfaction with your home upgrades.
Over the years, I’ve realized that the real secret to successful flooring and shower projects lies in the details. The most unexpected lessons often come from mistakes that initially felt minor but turned out to be game-changers, like overlooking moisture levels or rushing the curing process. Embracing these insights has transformed my approach, making every renovation not just durable but truly satisfying. If you’re passionate about creating a beautiful and lasting space, you’ll want to dig into these personal revelations—sometimes the hard-earned wisdom makes all the difference.
Lessons the Hard Way That Changed My Perspective
- Never Skip Floor Preparation: I once thought that a quick surface check was enough, but neglecting proper leveling caused long-term cracks and uneven wear. The extra time spent on surface prep saved me money and headaches later.
- Moisture Matters, Always: Ignoring subfloor moisture at the start led to bubbling and delamination. Using a reliable moisture meter before installation became my number one priority for durable results.
- Patience in Curing: Rushing the curing process for floor leveling compounds or adhesives often resulted in cracking or shrinking. My biggest lightbulb moment was realizing that patience truly pays off in craftsmanship.
- Seam Placement Counts: Poor seam alignment made my carpet look unprofessional. Careful planning on seam placement and stretching makes a noticeable difference in appearance and longevity.
- Invest in Quality Tools: Cheap tools might save money upfront but can lead to imperfect finishes. Trusted tools like professional knee kickers and moisture sensors elevate the quality of your work.
My Go-To Resources for Lasting Bathroom and Flooring Upgrades
- This comprehensive guide on floor leveling and shower waterproofing has saved me countless times, ensuring my surfaces are both durable and water-tight.
- For precise moisture detection, the Moisture Meter from Wagner is unbeatable. It gives peace of mind before and after installation.
- When it comes to cleaning and maintenance, I rely on specialized products recommended in this expert guide—they extend the lifespan of my floors and keep them looking fresh.
- The latest articles on carpet and shower upgrades provide innovative ideas and practical tips that I’ve incorporated into my projects for a sleek, professional finish.
Take Charge of Your Renovation Journey Today
Knowing these insider lessons and having reliable resources at your fingertips empowers you to tackle flooring and shower upgrades with confidence. Remember, the key isn’t just in the tools but in the patience, attention to detail, and willingness to learn from every experience. Your home deserves that extra care—every step you take toward mastering the craft will pay dividends in comfort and beauty for years to come. Are you ready to transform your space and enjoy the satisfaction of a job well done? Dive into these trusted resources and start your project today!