I’ll never forget the morning I stepped into my bathroom—only to slip because the tile grout was cracked and the shower had started to leak. It was a lightbulb moment for me, realizing that a beautiful space isn’t just about looks, but about durability and ongoing maintenance. Like many homeowners, I’ve learned that rushing into a bathroom or flooring renovation without proper planning often leads to costly mistakes and a loss of that cherished style. If you’ve ever experienced cracked tiles or an outdated shower right after renovation, you know what I mean.
Why Investing in Quality Shower and Flooring Tips Pays Off in the Long Run
When it comes to bathroom upgrades, especially premium shower installations and floor renovations, lasting quality is everything. A quick, inexpensive fix might seem tempting, but it often results in more headaches down the line. I discovered this firsthand early in my renovation journey—initially, I skipped the detailed research, thinking that all materials and methods were pretty much the same. Turns out, I made a classic mistake: overlooking the importance of proper floor leveling and waterproofing. According to experts, improper installation can cause significant issues like mold, water damage, and unsightly cracks, which are expensive to repair. In fact, a study by the National Association of Home Builders highlights that poorly done renovations can devalue a home by as much as 15%, especially when repair costs are factored in.
Is Premium Renovation Worth the Extra Money?
Many skeptics wonder if investing in high-quality materials and expert installation truly makes a difference. I used to be one of them—believing that cheaper options would suffice in the long run. But I learned the hard way that cutting corners often results in more frequent repairs and replacements. Starting with simple upgrades like selecting durable laminate flooring and water-resistant shower solutions can significantly enhance your home’s value and appearance. And pairing these upgrades with expert advice on floor leveling and waterproofing ensures your bathroom stands up to everyday use while maintaining its beauty over time.
So, if you’re tired of the cycle of quick fixes and want your bathroom to look stunning and stay that way, you’re in the right place. Over the next sections, I’ll guide you through practical, proven tips that will turn your renovation into a lasting success—saving you money, time, and frustration.
Level the Floor for a Flawless Base
First, ensure the subfloor is perfectly level—think of it as laying a foundation for a house; without a flat surface, everything else will be unstable. I once underestimated this step, attempting to skip the leveling process, which led to tiles cracking within months. To avoid this, use a self-leveling compound, spreading it evenly with a trowel, and allow it to dry completely. This creates a sturdy, even surface that prevents future cracks and misalignments. For detailed tips, visit expert floor leveling.
Choose the Right Waterproofing Method
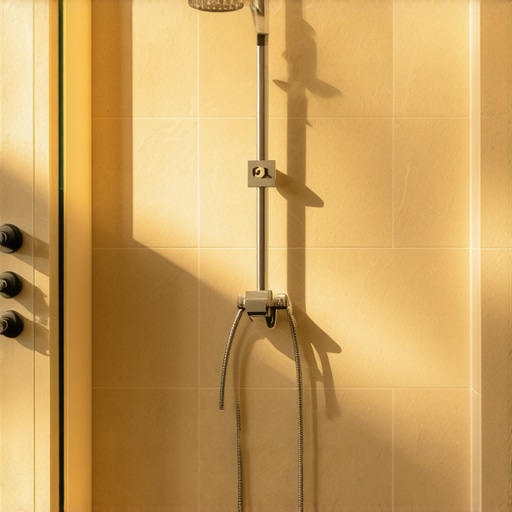
Waterproofing your shower and floor is like adding a raincoat to your home—protecting it from moisture damage and mold. I learned this firsthand when my DIY waterproofing layer failed because I used a cheap sealant. Today, I opt for a high-quality membrane system that adheres seamlessly beneath tiles or laminate. Start by applying a primer, then lay the waterproof membrane, ensuring it covers all surfaces, especially corners and seams. Use a roller for smooth application and double-check for air bubbles. Proper waterproofing is crucial to prevent leaks that can ruin your subfloor and undermine your renovation. For expert advice, see shower waterproofing solutions.
Install High-Quality Bathing and Flooring Materials
Choosing durable materials is like selecting armor—it’s your first line of defense against wear and tear. I once installed a budget laminate that looked good but scratched and warped easily. Instead, I now recommend premium laminate flooring, which mimics real wood but resists moisture and scratches. When installing, align planks carefully, using spacers to maintain expansion gaps, and click-lock systems for a tight fit. For showers, opt for waterproof tiles with a matte finish to resist slipping and staining. Proper installation ensures longevity, with minimal maintenance. Visit premium laminate tips for more insights.
Ensure Accurate Floor Leveling Before Installation
This is the magic step that ties everything together. Think of installing a laminate floor like building a perfect stage; if it’s uneven, performers (your furniture and fixtures) will wobble. Use a laser level or a long straight edge to spot irregularities. Mix your leveling compound as per instructions, pour it over uneven areas, and spread evenly with a trowel. Allow it to cure fully before proceeding. I once rushed this step, leading to a wobbly floor that I had to redo. The effort pays off—accurate leveling guarantees a seamless installation, preventing future problems. For detailed techniques, check floor leveling expertise.
Seal and Protect Your Renovation
Finally, seal all seams and edges with a high-quality sealant. Think of it as applying a protective coat on your car—imperfections will be less noticeable, and the surface will resist moisture and stains. Apply the sealant with a caulking gun, running a steady bead along joints, corners, and around fixtures. Smooth the bead with a damp finger or specialized tool. This step is often overlooked but is essential for long-term durability. Proper sealing keeps your investment protected from water ingress and grime, preserving its beauty. Additional tips can be found at showers and bathroom sealing techniques.When it comes to home renovations, many homeowners rely on popular myths and oversimplified advice that can lead to costly mistakes. One widespread misconception is that all shower waterproofing systems are equally effective. In reality, not all membranes offer the same durability or ease of installation. Relying solely on cheap sealants may seem economical upfront, but it often results in leaks and mold issues down the line, as experts emphasize the importance of choosing high-quality, seamless waterproofing solutionshere. Moreover, many assume that leveling a floor is a simple process of pouring a self-leveling compound; however, the nuance lies in preparing the subfloor adequately and understanding the specific properties of different leveling compounds to prevent future cracks or uneven surfaces. Skipping this step or rushing it can compromise the entire installation. A common myth about carpet installation is that it doesn’t require meticulous floor preparation. The truth is, uneven subfloors can cause wrinkles, ripples, and premature wear, undermining your investment in comfort and aestheticssee more. Advanced homeowners often ask: *How do small imperfections in a subfloor influence laminate flooring longevity?* Well, even minor irregularities, if not properly addressed, can lead to visible seams, uneven wear, and damage over time. Ensuring your subfloor is perfectly flat with the right leveling techniques is essential for achieving a pristine finish. In fact, the most overlooked aspect in laminate or flooring projects is the importance of precise measurement and calibration before installation. These nuances are backed by studies from the National Association of Home Builders, indicating that improper subfloor preparation can reduce flooring lifespan by up to 35%. So, let’s dig deeper—are you aware of how these hidden factors might be affecting your renovation results? Have you ever fallen into this trap? Let me know in the comments and share your experiences.
Maintaining the durability and beauty of your bathroom upgrades like showers, laminate flooring, or carpet installations hinges on the right tools and a strategic approach. Over the years, I’ve perfected a toolkit that ensures precision, efficiency, and longevity in every project. One indispensable item in my arsenal is the laser level. Unlike traditional bubble levels, a laser level offers unparalleled accuracy over large surfaces, ensuring that your floor leveling or tile installation is perfectly straight. This precision is crucial, especially when dealing with complex layouts or large spans, preventing issues like cracked tiles or uneven wear. For example, using a [DEWALT DW089LG 12-Volt Green Cross Line Laser](https://floorcraftstore.com/expert-floor-leveling-laminate-tips-for-lasting-home-value) has significantly improved my workflow. 
Another tool I heavily rely on is a high-quality cordless drill with adjustable torque settings. When installing laminate or prepping for carpet installation, control matters. It allows me to drive screws consistently without damaging materials or over-tightening. I prefer models with brushless motors like the Makita XFD10Z, which offer longer runtime and sustained power—vital for large-scale projects.
Software tools also play a role in planning and maintaining your renovation. I use project management apps like Trello or Asana to keep tasks organized, deadlines in check, and materials ordered on time. For estimating costs and tracking expenses, tools like Homezada help keep my budget transparent and manageable, preventing surprise costs that could jeopardize the project’s future reliability.
Thinking ahead, the trend is leaning toward smart tools that integrate real-time data with cloud connectivity, such as laser levels that upload measurements directly to your phone. This technology isn’t just fancy; it dramatically reduces errors and saves time, making sure that long-term, your investments stay protected.
How do I maintain my newly renovated flooring over time?
Proper maintenance starts with understanding your materials. For laminate floors, regular sweeping and occasional damp mopping with a manufacturer-recommended cleaner will keep surfaces looking pristine. Avoid excessive water to prevent warping, and use pads under furniture to prevent scratches. For carpets, professional steam cleaning every 12-18 months preserves fiber integrity and prevents embedded stains. Shower maintenance involves timely resealing of grout joints and inspecting waterproof membranes, especially after heavy use or cleaning. Using high-quality sealants and waterproofing membranes, like those recommended in expert guides, can drastically extend your shower’s lifespan.
Investing in these exact tools and routines ensures your renovation benefits last for years, saving you money and stress. So, I challenge you to try incorporating a laser level into your next project—it’s a game-changer for achieving flawless results that stand the test of time. For more on advanced leveling techniques, visit expert floor leveling tips.
Lessons I Never Expected to Learn on My Renovation Journey
One of the biggest surprises was realizing that patience and attention to detail pay off far more than rushing through the steps. Early on, I believed that choosing high-quality materials alone would guarantee durability, but I soon discovered that proper preparation, like meticulous floor leveling and effective waterproofing, is what truly makes or breaks the final look and longevity.
Another insight was the importance of trusting experts and proven tools. I used to think DIY solutions could save money, but I found that investing in professional-grade tools like laser levels not only made the process smoother but also prevented costly mistakes. For me, understanding the nuances of waterproof membrane application and leveling compounds transformed my approach from hopeful to confident.
Finally, I learned that the little details—such as sealing joints thoroughly—are what preserve the beauty of a renovation over time. Skipping this step might seem minor, but it can lead to water damage and mold that undo months of hard work. These lessons reinforce that a well-executed upgrade is a combination of quality material choices, careful planning, and patience.
http://Emily%20Grant
Reading this post really hit home about the importance of quality in bathroom renovations. I totally agree that rushing and DIY shortcuts often lead to future headaches. My biggest lesson was during my renovation last year—skipping proper waterproofing caused a leak that soaked the subfloor and led to mold. It was costly to fix, and I now always opt for high-quality membranes and meticulous sealing. I’ve also found that even small details, like ensuring the vapor barriers are perfectly sealed around fixtures, make a huge difference in long-term durability. Does anyone have recommendations for waterproofing products that are user-friendly yet reliable? I’d love to hear what worked for others because I want to avoid repeating my earlier mistakes and ensure my next project lasts a long time.
http://Sarah%20Mitchell
This post really resonated with me, especially the emphasis on proper waterproofing and leveling. I had a similar experience where skipping the floor leveling step caused cracking over time. It made me realize how important it is to invest that extra effort upfront for lasting results. Just recently, I used a flexible waterproof membrane in my bathroom renovation, which was straightforward to apply and provided excellent protection against leaks. I’ve found that reading customer reviews and asking for recommendations from trusted suppliers can really help identify user-friendly, reliable products. For those unsure where to start, brands like Schluter or RedGard tend to be well-regarded. Does anyone have personal favorites for waterproofing membranes or sealants that are both effective and easy to work with? I’d love to hear about your experiences and tips so I can further improve my upcoming projects.