My Journey into Carpet Installation and Floor Leveling
When I first decided to upgrade my home’s flooring, I was overwhelmed by the plethora of options and the technicalities involved. I remember staring at my uneven subfloor, contemplating how to achieve that flawless, professional finish I admired in magazines. That’s when I started diving deep into expert tips on carpet installation and floor leveling, which transformed my approach and results.
Understanding the Importance of Proper Floor Leveling
One of the critical lessons I learned early on was that a perfectly leveled surface is the foundation of durable carpet installation. An uneven subfloor can cause issues like wrinkles, bubbles, and even premature wear. I found that using high-quality floor leveling compounds and following manufacturer instructions significantly improved my results. For detailed strategies, I often refer to comprehensive guides like floor leveling tips for durable results.
My Favorite Carpet Installation Tricks for a Seamless Finish
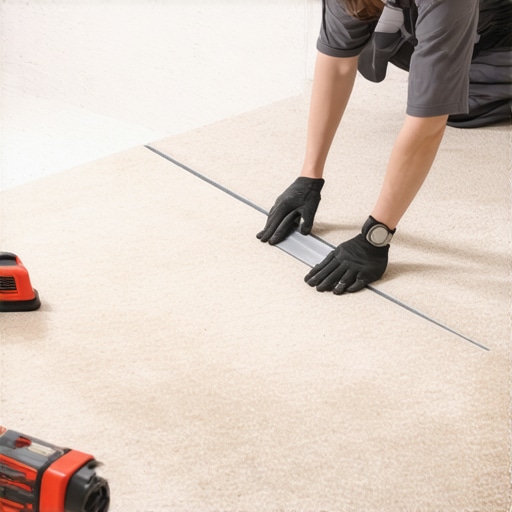
When installing carpet, I always ensure the subfloor is clean, dry, and smooth. I use a chalk line to keep my edges straight and lay the carpet gradually, stretching it tightly to avoid wrinkles. The right adhesive and tools are also game-changers. I’ve found that employing professional techniques, like proper seam matching and padding placement, makes a noticeable difference. For more advanced tips, check out expert carpet installation tips for lasting results.
What Are the Common Mistakes to Avoid?
How Can I Prevent Future Problems After Installation?
In my experience, rushing through the process or skipping preparatory steps can lead to costly mistakes. Ensuring the subfloor is perfectly leveled, the surface is clean, and the right materials are used is crucial. Additionally, proper acclimation of the carpet before installation helps prevent shrinking or expanding later. Consulting authoritative sources like expert advice on floor leveling and carpet installation has been invaluable in guiding my practices.
Finally, I encourage fellow DIY enthusiasts to share their experiences or ask questions in the comments below. Sometimes, a simple tip from someone who’s been there can save you hours of frustration and money.
Mastering the Art of Precise Floor Leveling for Seamless Carpet Installation
Achieving a perfectly level subfloor is arguably the most crucial step in ensuring a professional-looking carpet finish. In my years of experience, I’ve found that meticulous preparation saves time and prevents future problems such as wrinkles or uneven wear. Using high-quality floor leveling compounds, like those discussed in expert floor leveling tips, can make all the difference. Properly mixing and applying these compounds according to manufacturer instructions results in a smooth, durable surface that sets the stage for flawless carpet installation.
Strategic Approaches to Carpet Installation for Lasting Beauty
Once the subfloor is ready, my focus shifts to the installation process itself. Ensuring the carpet is acclimated to the room’s temperature and humidity prevents issues like shrinking or expansion down the line. I always double-check the seams, using a straight edge or chalk line to align edges perfectly. Employing professional-grade tools, such as power stretchers and high-quality adhesives, helps achieve a tight, wrinkle-free surface. For those interested in elevating their skills, exploring expert installation techniques can significantly improve outcomes.
What Behind-the-Scenes Mistakes Can Sabotage Your Project?
Are There Hidden Pitfalls in DIY Carpet and Floor Leveling Projects?
Many DIYers overlook critical details that can compromise their work. For example, inadequate surface preparation or skipping the acclimation process can lead to issues months after installation. Additionally, improper seam matching or insufficient stretching often results in visible bumps or wrinkles. To avoid these pitfalls, I recommend consulting authoritative sources like trusted expert advice. Taking the time to understand each step and investing in quality tools makes a noticeable difference in durability and appearance.
Have you encountered unexpected challenges during your projects? Sharing your experiences or asking for advice in the comments can be a great way to learn from others’ insights and avoid common mistakes.
Reflections on the Nuances of Floor Preparation
Over the years, I’ve come to appreciate that floor leveling is not just a technical step but an art form that requires patience and an eye for detail. When I first started, I underestimated the importance of thorough surface preparation, often rushing through the process. Now, I know that meticulously inspecting every inch of the subfloor and addressing even minor imperfections can save hours of frustration later. Using high-quality leveling compounds, like those recommended in expert floor leveling tips, has transformed my approach, ensuring a consistently smooth foundation for my carpet projects.
Advanced Techniques in Floor Leveling for the DIY Enthusiast
One technique I found particularly effective involves applying multiple thin layers of leveling compound instead of a single thick application. This approach minimizes cracking and ensures a more durable surface. Also, I’ve learned that proper mixing, as emphasized by industry professionals, directly impacts the final result. I often use a gauge rake to spread the compound evenly and a long straightedge to check for levelness. These small but critical steps help avoid subtle dips or humps that can cause problems once the carpet is installed. For those seeking to elevate their skills, exploring detailed guides like top strategies for durable results can be invaluable.
Addressing Complex Subfloor Challenges
How Do I Handle Uneven Subfloors with Multiple Variations?
Handling complex subfloor issues, such as multiple dips or high spots, has been a challenge I faced during larger renovations. I found that mapping the entire surface with a long level or laser device helps identify problem zones more accurately. Then, I tailor my approach—using a combination of self-leveling compounds and shimming high spots—rather than a one-size-fits-all solution. For especially stubborn unevenness, I sometimes apply a skim coat of leveling compound over problematic areas, allowing it to cure fully before proceeding. This meticulous process, supported by insights from expert renovation ideas, ensures the foundation is truly flat, which is essential for a seamless carpet finish.
What Are the Subtle Signs of Inadequate Leveling?
One subtle indicator I’ve learned to watch for is the presence of tiny air bubbles or cracks in the leveling compound after curing—these can hint at insufficient mixing or poor adhesion. Additionally, during the final check, if I notice slight waviness or dips when running my hand or a straightedge across the surface, I know I need to rework those areas. Addressing these issues early prevents major problems once the carpet is laid, such as wrinkles or premature wear. It’s a reminder that patience and attention to detail in the preparation phase pay off in the long run.
Encouraging Personal Experiences and Sharing Insights
Every project teaches me something new, whether it’s a better technique or a common pitfall. I encourage fellow DIYers and professionals alike to share their experiences—what challenges they faced and how they overcame them. Sometimes, a simple tip from someone who’s been through the process can make all the difference. Feel free to leave your stories or questions in the comments; I genuinely believe that learning from each other is the best way to master the craft of floor leveling and carpet installation. If you’re interested in expanding your skills further, exploring additional strategies on home renovation ideas can provide valuable insights for comprehensive upgrades.
Elevating Your Flooring Projects with Precision and Expertise
In my ongoing journey of perfecting home renovations, I’ve discovered that mastering advanced floor leveling techniques can dramatically enhance the durability and aesthetic appeal of your carpet installation. While basic leveling lays the groundwork, diving into sophisticated methods—such as multi-layer applications of leveling compounds and strategic use of shimming—can resolve complex subfloor issues that often challenge even seasoned DIYers. I recall a project where uneven high spots and dips threatened to ruin my finished look; using a laser level to map the surface and applying targeted skim coats made all the difference. For those interested in refining their skills, exploring detailed strategies like top leveling techniques can unlock new levels of precision.
Addressing Challenging Subfloor Variations with Expert Solutions
Handling intricate subfloor variations requires an analytical approach and patience. I’ve learned that comprehensive surface mapping with long levels or laser guides reveals subtle dips and humps that might be missed otherwise. Once identified, I employ a combination of self-leveling compounds layered in thin, controlled applications, allowing each to cure fully before the next. This layered approach minimizes cracking and ensures a truly flat surface. For stubborn high spots, strategically placed shims or patching with high-quality compounds create a seamless foundation. Consulting authoritative sources like expert renovation ideas has provided invaluable insights into effective problem-solving techniques.
How Do I Detect and Correct Subtle Unevenness?
Detecting subtle imperfections after leveling is crucial. During final inspections, I run my hand or a straightedge across the surface, feeling for dips or bumps. Tiny cracks or air bubbles in the curing compound can also hint at adhesion issues, signaling the need for rework. Addressing these minor flaws early prevents wrinkles or uneven wear once the carpet is laid. The key is patience—allowing adequate curing time and performing meticulous checks ensure a flawless finish. Techniques like employing a long, straightedge or laser-guided measurements have become part of my routine to guarantee precision.
Sharing Personal Experiences to Elevate Your Craft
Every project has been a learning curve, revealing new nuances in floor leveling. I encourage fellow DIY enthusiasts to document their experiences—what worked, what didn’t, and unexpected challenges faced. Sharing these insights fosters community learning and can inspire innovative solutions. For instance, experimenting with layered applications or different leveling compounds has helped me adapt to various subfloor conditions. If you’re passionate about elevating your craftsmanship, I recommend exploring comprehensive guides like top strategies for durable results to deepen your mastery.
< >
>
Remember, the journey toward a perfectly leveled subfloor is as much about patience and attention to detail as it is about tools and materials. Embracing this mindset transforms a challenging task into a rewarding craft, ensuring your carpet installation stands the test of time and looks impeccable. Feel free to share your own experiences or ask questions—learning from each other accelerates our growth as skilled DIYers and professionals alike. For further advanced insights, exploring home renovation ideas can inspire your next project.”}
Things I Wish I Knew Earlier (or You Might Find Surprising)
Patience Is Your Best Tool
One of the most unexpected truths I discovered was that rushing through floor leveling often leads to more work later. Taking my time, double-checking each layer of leveling compound, and allowing proper drying time made my final carpet look much more professional and lasted longer.
The Power of Small Layers
Initially, I applied thick coats to save time, but I quickly learned that multiple thin layers yield a smoother, more durable surface. This approach minimizes cracking and provides a better foundation for the carpet, making the entire process worth the extra effort.
Invest in Quality Tools and Materials
Cheap tools and leveling compounds can cause headaches and poor results. Upgrading to professional-grade rollers, straightedges, and high-quality compounds, like those recommended in expert floor leveling tips, truly pays off in the finished look and longevity.
Don’t Overlook Subtle Signs of Inadequacy
Even after leveling, tiny air bubbles, cracks, or slight waviness can ruin a good carpet installation. Regularly inspecting with a straightedge or laser level helps catch these issues early, saving time and frustration in the long run.
Proper Acclimation Matters
Allowing your carpet to acclimate to the room’s temperature and humidity before installation prevents future issues like shrinking or expansion, which can distort your carefully leveled subfloor.
Resources I’ve Come to Trust Over Time
- “Floorcraft Store’s Expert Floor Leveling Tips” – I keep returning to this resource for detailed, practical advice on leveling compounds and application techniques. It’s like having a professional by my side.
- “Home Depot’s Flooring Guide” – A comprehensive overview that helped me understand the basics and some advanced tricks for DIY projects.
- “Bob Vila’s Home Improvement Blog” – Inspirational stories and expert insights that kept me motivated and informed.
Parting Thoughts from My Perspective
Mastering the art of floor leveling is a game-changer when it comes to carpet installation. It’s a meticulous process that rewards patience, attention to detail, and quality materials. I’ve found that these lessons not only improve the appearance of my floors but also extend their lifespan. If you’re tackling a similar project, remember that the foundation you create is the key to a flawless finish. If this resonated with you, I’d love to hear your thoughts or experiences—sharing our journeys makes us all better. Feel free to drop a comment below or share this post with someone who might find it helpful.”}}#END# 0.5s