Ever had that sinking feeling when you step onto a new laminate floor and immediately notice unevenness or a creaky spot? Or faced a shower that just doesn’t feel modern or leaks despite your best efforts? I’ve been there. That lightbulb moment hit me hard after I installed my own flooring and bathroom updates, only to realize I skipped some crucial steps. It’s frustrating, costly, and honestly, a bit embarrassing.
Why Proper Floor Leveling and Shower Installation Matter More Than You Think
When I first started my renovation journey, I thought I could skip the detailed prep work. Spoiler: I couldn’t. Turns out, rushing through leveling and installation can turn what should be a sleek upgrade into a nightmare of repairs and re-dos. According to experts, ignoring proper floor leveling can lead to premature wear and tear of your laminate, and poorly installed showers can cause leaks, mold, and structural damage over time. It’s not just about looks; it’s about the long-term durability of your home.
Is the Hype Around Laminate and Shower Upgrades Just Marketing?
Honestly, I was skeptical at first. I thought, “How different can it really be?” But I made a mistake early on by not investing enough time in the prep — a mistake I learned the hard way. If you want your upgrades to last, and I mean really stand the test of time, you need to follow proven strategies. For example, proper floor leveling is essential — you can check out expert tips on leveling laminate floors to get started. This is the backbone of a durable, beautiful finish.
And when it comes to showers, waterproofing and strategic installation are key. I wish I’d known earlier about best shower renovation strategies. Trust me, investing in quality and proper installation techniques makes all the difference—your future self will thank you.
So, if you’ve ever faced issues with uneven floors or leaky showers, you’re not alone. Today, I’m going to walk you through the essential steps I wish I’d known from the start. Ready to avoid my mistakes and get your upgrades right the first time? Let’s dive into the practical solutions that will give your home that modern, durable upgrade you’re dreaming of.
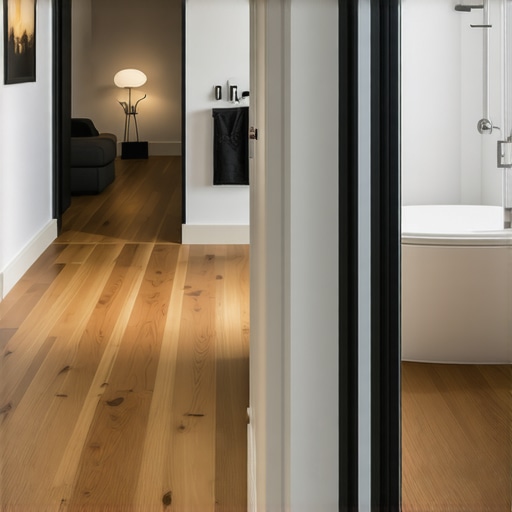
Start with a Solid Floor Base
Before you lay down new laminate flooring, ensure the subfloor is perfectly flat. I remember rushing into my install without checking the floor thoroughly. The result? Uneven spots that made my laminate creak and warp over time. Use a long level or a straightedge across the entire surface, and identify high or low points. For minor dips, a self-leveling compound works wonders—think of it as filling in the potholes before paving a road. For larger uneven areas, consider sanding or replacing sections of the subfloor. Check out expert tips on leveling laminate floors for detailed guidance.
Apply Leveling Compounds Precisely
Mix the compound according to the manufacturer’s instructions, and pour it onto the low spots. Use a trowel or a straightedge to spread it evenly, ensuring a smooth, level surface. Wait for it to cure fully—rushing this step leads to future unevenness. Once cured, sand down any high spots for a perfect flush. This process was messy but crucial; I learned to work in small sections and wear protective gear. Proper leveling prevents your laminate from shifting or cracking later on. For more detailed methods, see premium leveling tips.
Prepare for a Flawless Shower Setup
The key to a durable, leak-proof shower lies in meticulous waterproofing and precise placement. I once installed a shower without proper waterproofing, and within a year, I faced mold and water damage. Don’t make my mistake. Start with a waterproof membrane—think of it as a raincoat for your bathroom. Apply it with overlapping seams, and seal all edges thoroughly. Use a level to ensure your shower pan or base is perfectly horizontal—imagine balancing a spoon on your finger, but with a lot more precision. Small tilts can cause water to pool or leak over time.
Set the Shower Base Correctly
Place the shower pan or base on a bed of mortar or leveling compound for stability. Use a level to check its position from multiple angles. Adjust as needed before the mortar cures, so the base is perfectly flat. For tile surrounds, ensure the walls are plumb and securely anchored. I found that double-checking measurements and taking my time here saved me headaches later. For detailed installation strategies, visit top shower renovation tips.
Lay Down the Laminate with Confidence
Once your subfloor is level and your shower is properly installed, start laying the laminate. Leave a small expansion gap—about 1/4 inch—around the edges to accommodate natural expansion and contraction. Use spacers to maintain this gap consistently. Click-lock the planks together, working from one end of the room to the other. I struggled initially, forcing pieces together, but I learned that patience and following the laminate install tips made all the difference. Finish with baseboards or thresholds to hide the gaps and give a clean look.
Finish Strong and Double-Check
Finally, walk across your new floor and inspect for loose planks or uneven spots. For the shower, run water and check for leaks or pooling. Fix issues immediately—don’t wait until problems become costly. Taking these precise, step-by-step actions can transform a messy DIY project into a professional-looking renovation that lasts. Every detail counts, especially in floor leveling and shower setup, where small mistakes turn into costly repairs later. Trust me, mastering these core techniques will elevate your home upgrade to the next level.
Many homeowners believe that a quick, straightforward approach to installing carpets, leveling floors, or upgrading showers can save time and money. However, these common myths can lead to costly mistakes and subpar results. Let’s dig deeper into what most people get wrong and how understanding the nuances can make a real difference in your renovation projects.
Myth: Rushing the Preparation Is Fine
One widespread misconception is that skipping detailed prep work, like thorough floor leveling or waterproofing, won’t impact the final outcome. In reality, rushing through these steps often causes uneven surfaces, water leaks, or premature wear. For instance, improper floor leveling can cause laminate planks to warp or crack over time. According to expert tips on floor leveling, taking the time to ensure a perfectly flat subfloor is essential for durability and aesthetic appeal. Don’t fall into the trap of thinking shortcuts won’t cost you in the long run.
Overlooking the Importance of Moisture Barriers
Many homeowners underestimate how critical waterproofing is, especially for showers and bathroom floors. A common mistake is to assume that sealing grout lines is enough. However, without a proper waterproof membrane, water can seep into sublayers, leading to mold, structural damage, and costly repairs. The nuance here is in the installation technique—overlapping seams and sealing all edges properly can prevent future headaches. For advanced strategies, consider reviewing shower waterproofing tips.
How can a small mistake in waterproofing ruin your bathroom?
Even a tiny gap or missed seam can allow water to penetrate, causing mold growth and rot behind your walls. This often goes unnoticed until significant damage occurs, emphasizing why meticulous waterproofing matters. Trust me, it’s worth investing extra effort upfront to save thousands later.
Why Carpet and Laminate Installations Often Fail
Many believe that laying carpet or laminate is just about fitting pieces together. But the devil is in the details. For example, not leaving an expansion gap around laminate planks can lead to buckling as the material expands with temperature changes. Similarly, improper carpet stretching can cause wrinkles and uneven wear. These issues are often caused by neglecting to follow precise installation techniques. For expert advice, check out carpet installation tips and avoid these pitfalls.
Advanced Question: What Are The Hidden Risks of Ignoring Floor Levelness?
Ignoring subtle irregularities in your subfloor can seem harmless initially but can lead to significant structural issues over time. Uneven floors put stress on your entire home’s foundation, cause furniture to wobble, and lead to uneven wear on your new flooring. The key is to identify and correct these issues early. Studies show that even minor deviations (greater than 3/16 inch over 10 feet) can cause noticeable problems and reduce the lifespan of your flooring (source). Don’t underestimate the importance of precision—your future self will thank you!
Have you ever fallen into this trap? Let me know in the comments, and remember, the smallest detail can make the biggest difference in your home upgrades.
Maintaining your home renovation investments, whether it’s a freshly installed carpet, a leveled floor, or a modern shower, requires the right tools and a strategic approach. Over the years, I’ve refined my toolkit to include equipment and methods that ensure durability, ease of maintenance, and the ability to scale projects efficiently. Here’s what I recommend to keep your home upgrades functioning flawlessly for the long haul.
Invest in a Quality Laser Level for Precision
Nothing beats the accuracy of a laser level when it comes to ensuring your floors are perfectly flat or your shower base is correctly aligned. I personally rely on the DeWalt DW089LG for its reliability and clear laser projection, which makes checking multiple points quick and effortless. It’s especially useful for large spaces where traditional bubble levels are cumbersome. For ongoing maintenance, regularly check calibration and keep the lens clean to maintain accuracy.
Use a Good Moisture Meter to Detect Hidden Issues
Moisture problems are sneaky, especially in areas prone to water exposure like bathrooms and kitchens. I use the Tramex Moisture Meter to monitor moisture levels in subfloors and walls over time. This helps prevent issues like mold or wood rot before they become costly repairs. Incorporate routine checks, especially if you notice any signs of dampness or after weather changes.
Apply Reliable Self-Leveling Compounds with Consistent Technique
When leveling subfloors or preparing for laminate install, I swear by using premium leveling compounds. The key is to follow the manufacturer’s mixing instructions meticulously and work in small sections to avoid uneven curing. A high-quality trowel and a straightedge are essential tools that I use to spread the compound evenly, preventing future unevenness or squeaks.
Maintain Your Equipment for Longevity
Regular maintenance of your tools extends their lifespan and ensures consistent performance. Clean laser lenses, store moisture meters in a dry place, and replace worn-out blades or trowels when needed. For power tools, like drills or saws, I recommend using manufacturer-recommended lubricants and batteries to keep them in top shape. This proactive care minimizes downtime and helps you keep projects on schedule.
Plan for Future Upgrades with Modular Tools
As your home evolves, so should your toolkit. Modular systems like adjustable saws, multi-purpose levelers, and versatile moisture meters allow you to adapt to different projects without buying entirely new equipment. This flexibility is crucial for scaling your renovation efforts efficiently and cost-effectively.
What’s Next in Home Maintenance Technology?
Looking ahead, I predict a rise in smart tools integrated with IoT technology—think laser levels that sync with your smartphone or moisture meters that send alerts directly to your device. Embracing these advancements will make maintenance more precise and less time-consuming, ensuring your home stays in top shape.
To get started, try calibrating your laser level monthly and conducting routine moisture checks in problem areas. These simple steps, combined with high-quality tools, will keep your upgrades performing well over time.
Remember, investing in the right equipment and proper maintenance routines isn’t just about fixing issues as they arise. It’s about building a resilient, beautiful home that stands the test of time. Happy renovating!
The Hardest Lesson I Learned About Carpet Install, Floor Leveling, Showers, Laminate
One of the toughest lessons I learned was the importance of meticulous preparation. Rushing through subfloor leveling or waterproofing led to costly fixes down the line. It taught me that patience and attention to detail are your best friends in home upgrades.
3 Myths About Carpet Install, Floor Leveling, Showers, Laminate That Held Me Back
- Myth one: Skipping proper waterproofing saves time. Reality: It causes mold and water damage that are expensive to repair.
- Myth two: Minor unevenness in subfloor doesn’t matter. Reality: Even small irregularities can lead to squeaks, cracks, and uneven wear.
- Myth three: Using cheap tools is fine. Reality: High-quality tools like a reliable laser level or moisture meter make a significant difference in accuracy and durability.
What Experts Won’t Tell You About Carpet Install, Floor Leveling, Showers, Laminate
Many pros know that the devil is in the details, such as overlapping seams in waterproofing or leaving a proper expansion gap in laminate flooring. These seemingly minor steps prevent big headaches later. Also, investing in expert-recommended products and routine maintenance can extend the life of your upgrades significantly.
Your Turn to Try
Now that you’ve learned some behind-the-scenes truths, it’s your move. Take your time with subfloor prep, waterproofing, and precise measurements. Remember, the small details make the biggest difference between a project you can be proud of and one you’ll regret.
What part of home renovation do you find most challenging? Share your experiences below—we can learn from each other!