Ever spent hours laying down a new carpet only to find it bubbling, wrinkling, or coming loose within a few months? I’ve been there. The frustration of investing time and money into home upgrades only to watch them fall apart quickly is a real eye-opener. That was my lightbulb moment—realizing that proper installation and meticulous floor leveling are the secrets to durability. Skipping these steps might save time upfront, but it costs far more in repairs and replacements later. If you’ve faced similar issues, you’re not alone, and I promise there’s a better way.
Why Your Floor and Carpet Need Expert Attention
The truth is, many DIY projects falter because of overlooked details in leveling and installation. A poorly leveled floor can cause uneven wear, gaps, and even structural damage over time. Similarly, a carpet installed without proper preparation can develop wrinkles, creases, or wear spots that ruin its look and longevity. I learned this the hard way early on—mistakes like neglecting to check the subfloor’s flatness led to costly fixes down the line. It’s a mistake I don’t want you to repeat. Instead, I want to share the insights I’ve gathered from years of experience and research, including trusted advice from experts.
Did you know that uneven subflooring is one of the top reasons carpets and flooring fail prematurely? According to industry experts, proper floor leveling can extend the life of your flooring by years. That’s why I now prioritize expert techniques for leveling and installation—techniques I detail in this comprehensive guide. It’s a game-changer, and I believe it can be for you too.
Is Floor Leveling Really Worth the Extra Effort?
Initially, I thought floor leveling was just a hassle. But once I saw the difference it made—no more squeaks, wrinkles, or uneven wear—I knew I’d been sold short by shortcuts. Skipping this step might seem tempting to save time, but your flooring’s durability depends on it. Trust me, the peace of mind that comes with a perfectly leveled floor is worth every extra minute. If you’re skeptical, I get it. But the data backs it up. Proper leveling reduces future repairs and extends your flooring’s lifespan significantly, saving you money in the long run. For a detailed breakdown, check out this resource.
Now that I’ve shared my story, let’s get into the practical steps you need to take to achieve lasting durability in your flooring projects. Whether you’re tackling carpet installation or leveling your subfloor, these expert tips will help you avoid common pitfalls and ensure a flawless, durable finish.
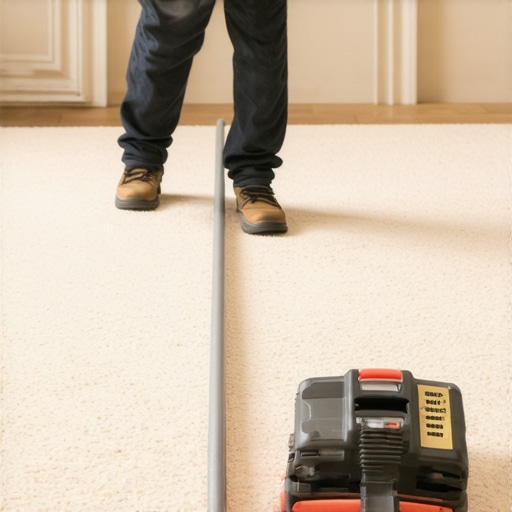
Start with a thorough assessment of your subfloor
Before you even lift a tool, inspect your subfloor for uneven spots, cracks, or moisture issues. Use a long straightedge or a level to check for high and low points. Think of your subfloor as the foundation of a house; if it’s crooked, everything built on top will suffer. I remember my first attempt where I skipped this step, and soon enough, wrinkles and squeaks appeared. Proper assessment saves you from costly corrections later. For detailed techniques, visit this guide.
Prepare your surface meticulously
Remove debris, dust, and old adhesives. A clean surface is like a smooth canvas—essential for even installation. Use a vacuum and a damp cloth to clear everything. I once rushed through cleaning, and it resulted in uneven adhesion and bubbles in my carpet. Don’t make that mistake. Proper cleaning ensures the adhesive bonds well and the floor remains flat.
Apply floor leveling compounds correctly
Mix the compound according to manufacturer instructions. Think of it as baking—precision matters. Pour the mixture over low spots and use a trowel or a squeegee to spread it evenly. For larger areas, consider a self-leveling compound that works like a liquid magic wand, smoothing out irregularities effortlessly. I learned this when I poured a leveling compound and watched it flow into every crevice, creating a perfectly flat surface. For advanced tips, see this resource.
Use proper tools for installation
Invest in quality tools—trowels, rollers, or seam cutters. They’re your best friends for a sleek finish. When installing carpet, stretch it tight and secure it with proper adhesive or tack strips. I once tried to save money on tools and ended up with wrinkles and loose edges. Quality tools make the difference between a professional look and a DIY disaster. For detailed strategies, check this guide.
Double-check your work before finalizing
Step back and examine your work from different angles. Use a level to verify flatness and tension. Fix any imperfections immediately—don’t wait for the next day. I recall noticing a slight bump after completing my first project; fixing it at that moment prevented future issues. This step ensures your flooring will last and look great for years.
Seal and protect your flooring properly
If applicable, apply sealants or protective coatings to extend longevity. For carpets, regular vacuuming and occasional deep cleaning preserve color and texture. Remember, lasting durability isn’t a one-time effort—it’s about ongoing maintenance. For additional insights, see this resource.
Many homeowners and even some DIY enthusiasts believe they understand the nuances of proper flooring installation, but there are often hidden pitfalls that can sabotage your efforts. Let’s dig deeper into what most people get wrong about floor leveling and installation, and how these mistakes can lead to costly repairs down the line.
Why Skipping Detailed Subfloor Assessment Is a Costly Mistake
One of the biggest myths is that a quick visual inspection suffices. In reality, subtle irregularities—like small dips, high spots, or moisture issues—can be invisible to the naked eye but have a huge impact on your flooring’s longevity. Relying solely on a level or straightedge without comprehensive testing can result in uneven wear and bubbling in carpets or squeaks in hardwood floors. Experts emphasize the importance of thorough assessments, including moisture testing and long-term stability analysis, to prevent future problems. For more advanced tips, visit this guide.
Common Misconception About Leveling Compounds
Many assume that applying a leveling compound is a simple matter of pouring and smoothing. However, improper mixing, uneven application, or choosing the wrong type of compound can cause future cracks or uneven surfaces. Self-leveling compounds are often touted as magic solutions, but they require precise preparation and understanding of your subfloor’s condition. Skipping the manufacturer’s instructions or rushing the curing process can undermine the entire project. Trust me, following detailed application techniques is essential—see this resource for expert strategies.
Why Overconfidence in DIY Tools Is a Hidden Trap
Many assume that expensive tools or basic hand tools are enough for perfect installation. But the truth is, specialized tools—like high-quality tensioners, seam rollers, and precision trowels—make or break the finish. Using subpar or incorrect tools can lead to wrinkles, bubbles, or uneven seams, which compromise durability and aesthetics. Remember, investing in the right tools and learning their proper use can save you from frustrating rework. For advanced insights, check this guide.
How to Prevent These Mistakes from Ruining Your Project
To avoid these common traps, always start with a detailed assessment of your subfloor, use the correct materials in the right sequence, and don’t rush the curing or drying process. Double-check your work from multiple angles before proceeding to the next step. Regularly consult trusted resources and expert advice—like those found at this site—to ensure your project remains on track. Have you ever fallen into this trap? Let me know in the comments.
Keeping your flooring in top shape over the years requires more than just proper installation—it demands the right tools and a consistent maintenance routine. In my experience, investing in quality equipment and understanding specific upkeep methods can dramatically extend the lifespan of your floors, saving you money and stress in the long run. Let’s explore the key tools I rely on and the best practices to keep your floors working perfectly for years to come.
Why Quality Tools Make All the Difference
When it comes to maintenance, I always emphasize the importance of using professional-grade tools. For example, a high-quality carpet stretcher ensures your carpet stays taut and wrinkle-free, preventing premature wear. Similarly, a good seam roller helps maintain seamless joints in laminate flooring, preventing gaps that could collect dust and moisture. I personally prefer brands like Roberts and Quick, which offer tools designed for durability and precision. These tools not only improve the quality of your work but also reduce the risk of accidental damage during routine checkups or repairs.
Another essential piece of equipment is a moisture meter. Floors are sensitive to humidity changes, which can cause warping or buckling over time. Regularly testing moisture levels in your subfloor and flooring materials helps you catch issues early, especially in areas prone to dampness. I recommend models like Tramex or Protimeter, which provide accurate readings and are easy to use for DIYers and professionals alike. Properly maintaining your tools ensures consistent performance, so I always clean and calibrate my equipment after each use.
Staying Ahead with Routine Checks
Once your floors are installed and leveled correctly, ongoing maintenance becomes crucial. I suggest setting a schedule to inspect your flooring every few months. Look for signs of wear, loose seams, or moisture intrusion. Use your moisture meter to verify that humidity levels stay within recommended ranges—generally between 35% and 55%. Addressing minor issues promptly can prevent major repairs later on. For example, if you notice a slight wrinkle, don’t wait—re-stretch or re-glue the affected area to maintain a smooth surface.
In addition, investing in cleaning tools like a vacuum with a HEPA filter and microfiber mops helps you keep debris and dust from damaging the surface. Regular cleaning not only preserves appearance but also prevents particles from scratching or wearing down your flooring over time. Remember, the best maintenance is proactive rather than reactive.
Predicting Future Trends in Floor Maintenance
Looking ahead, I believe technology will further streamline floor upkeep. Smart sensors embedded in flooring materials might alert homeowners to moisture or structural issues before they become visible. Automated cleaning devices equipped with UV sterilization and advanced filtration could become standard, making routine maintenance more efficient. Staying updated on these innovations will help you leverage new tools to keep your floors pristine and durable.
How do I maintain my floors over time?
The key is consistent inspections, using the right tools like moisture meters and professional-grade cleaning equipment, and addressing issues promptly. Remember, a well-maintained floor not only looks better but also lasts significantly longer. Try integrating a moisture check into your quarterly routine using a reliable meter—I’ve found that catching humidity problems early can save you from costly repairs. For more detailed advice on maintenance routines, visit this guide.
The Hardest Lesson I Learned About Floor Leveling
One of my biggest realizations came when I ignored a thorough subfloor assessment early in my DIY journey. I thought a quick look was enough, but hidden dips and moisture lurking beneath almost ruined my project. Now, I always spend extra time testing and preparing—it’s the difference between a lasting floor and one that needs repairs within months. Trust me, investing in proper evaluation upfront saves headaches later.
3 Myths About Floor Leveling That Held Me Back
For years, I believed self-leveling compounds could fix any unevenness without much effort. I was wrong. Improper mixing or rushing the curing process led to cracks and uneven surfaces. The truth is, understanding your subfloor’s condition and following manufacturer instructions are crucial. These myths cost me time and money, but learning the right techniques made all the difference.
What Experts Won’t Tell You About Flooring Installation
Many overlook the importance of high-quality tools. Using cheap trowels or seam rollers might save money initially, but they compromise the finish and longevity. I learned that investing in tools like professional tensioners and moisture meters ensures a professional look and durable results. Do your research—your floors will thank you for it.
My Essential Toolkit for Flooring Success
Some tools I swear by include a reliable moisture meter like Tramex, a sturdy carpet stretcher, and a precision trowel. These help me catch issues early and ensure a flawless finish. Quality tools are investments that pay off by making installation smoother and more durable. For trusted tools and tips, check out this guide.
Don’t Just Read—Take Action Today
Now that I’ve shared these insights, I encourage you to start your flooring project with confidence. Proper leveling and careful installation aren’t just steps—they’re the foundation of long-lasting, beautiful floors. Remember, a little extra effort upfront saves you from costly repairs down the road. Are you ready to transform your space with expert techniques? Share your plans below and let’s build something lasting together!