The secret to mixing floor leveler without getting dry clumps
The subfloor secret that prevents floor failure
Floor leveling requires a perfect slurry to ensure that laminate or tile installations do not fail under pressure. Most guys skip the leveling compound. They think the underlayment will hide the dip. It won’t. I spent three days grinding concrete on a job last month just so the floor wouldn’t click like a castanet. That client had paid for a high-end carpet install in the bedrooms but wanted laminate in the hallways. The transition was a nightmare because the slab looked like the rolling hills of Kentucky. If you don’t get the mix right, you end up with ‘islands’ of dry powder that create weak points. These weak points eventually crumble. Then your floor starts to crunch. You can hear it every time you walk to the kitchen. It sounds like breaking glass. It is the sound of a failed installation. Success starts in the mixing bucket. It ends with a flat surface that meets the 1/8 inch over 10 feet industry standard.
The physics of the mixing vortex
Self leveling underlayment relies on a precise chemical reaction known as hydration where water molecules bind with calcium aluminate cement. To achieve this without dry clumps, you must create a consistent vortex that draws the powder into the liquid. It is not about speed. It is about torque. Use a heavy duty 1/2 inch drill. A standard cordless drill will burn out before the second bag. The floor leveling process demands a constant 650 RPM. If you go faster, you pull air into the mix. Air creates pinholes. Pinholes weaken the structural integrity of the pour. You are looking for a pancake batter consistency. It should be viscous but pourable. If it looks like mud, you have failed. If it looks like water, you have over-watered it. Over-watering is a cardinal sin in floor leveling. It causes the polymers to separate from the aggregate. The result is a chalky surface that will never bond to your adhesive or thin-set.
“A floor is only as good as the subfloor beneath it; deflection is the enemy of every joint.” – Master Flooring Axiom
The water first rule for clump prevention
Dry clumps usually form because the installer pours the powder into the bucket before the water. This traps dry pockets at the bottom. The paddle cannot reach them. When you pour that bucket out, those clumps hit the floor. Now you are chasing them with a pin roller while the clock is ticking. Always measure your water first. Use a dedicated measuring bucket. Do not eyeball it. If the bag calls for 5.7 quarts, use exactly 5.7 quarts. The chemistry of floor leveling is unforgiving. Even an extra cup of water can lower the compressive strength of the cured product by hundreds of PSI. This is especially vital when prepping for showers where slope and stability are the difference between a dry house and a mold factory. You need a stable base that won’t shift when the house settles.
Selecting the right paddle for high torque mixing
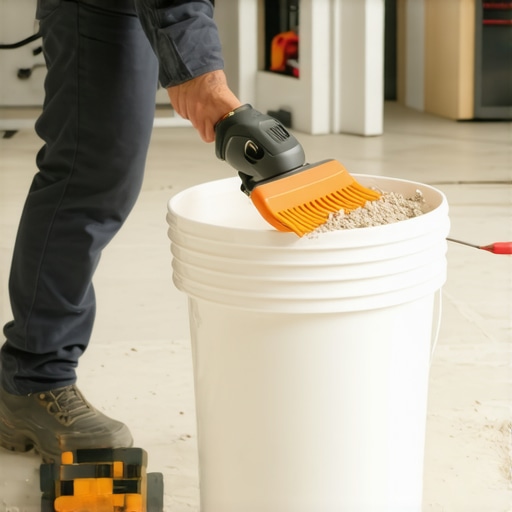
Mixing paddles come in various shapes but the birdcage style is the gold standard for subfloor prep. The geometry of the blades is designed to shear the powder. This shearing action breaks down the surface tension of the water. It allows the moisture to penetrate the center of every granule of cement. If you use a drywall mud paddle, you are asking for trouble. Drywall paddles are meant for aerating light compounds. They are not built for the density of cementitious leveler. A heavy mix will snap a cheap paddle or put too much strain on the drill motor. I have seen guys try to use a stick. That is a joke. You cannot achieve the necessary shear force by hand. The material will start to set before you even get the lumps out. Leveler has a working time of about 15 to 20 minutes. Every second you spend fighting clumps is a second you lose for the pour.
| Leveler Type | Working Time | Walk-on Time | Full Cure |
|---|---|---|---|
| Standard Cementitious | 20 Minutes | 4 Hours | 24 Hours |
| Rapid Setting | 10 Minutes | 90 Minutes | 4 Hours |
| High Flow SLU | 30 Minutes | 6 Hours | 48 Hours |
Environmental variables that dictate your success
Ambient temperature and slab moisture levels change how the leveler behaves during the mix. If you are working in a hot room, the water evaporates faster. This creates a skin on top of the bucket. That skin becomes clumps. You must keep the room cool. Turn off the HVAC so you don’t have air blowing directly on the wet pour. Air movement causes uneven drying. Uneven drying leads to spiderweb cracks. I always check the slab with a calcium chloride test or a pinless moisture meter. If the slab is too dry, it will suck the moisture out of the leveler before it can flatten. You end up with a rough surface that looks like orange peel. This ruins the substrate for laminate flooring. Laminate needs a smooth plane. Any bump will telegraph through the planks. You will feel it under your feet every day.
The two person bucket brigade strategy
Floor leveling is not a solo sport if you want it done right. You need one person dedicated to mixing and one person dedicated to pouring and spreading. This is the only way to maintain a wet edge. A wet edge is where the new pour meets the previous one. If the first pour starts to set, they won’t meld. You get a cold joint. A cold joint is a ridge. That ridge will cause your carpet install to show a line or your laminate to bounce. The mixer should be prepping the next bag while the spreader is working the current one. It is a dance. It requires rhythm. If the mixer gets clumps in the bucket, the whole rhythm breaks. The spreader has to stop. The material starts to get stiff. This is how bad floors happen. Coordination is the secret weapon of the professional installer.
- Use cold water to extend the working time of the chemical reaction.
- Prime the subfloor with a high quality latex primer to prevent air bubbles.
- Clean your mixing paddle in a separate water bucket immediately after every bag.
- Check for levelness using a laser level before you even open a bag of product.
- Wear spiked shoes so you can walk through the wet material without leaving footprints.
The molecular reality of polymer modification
Polymer modified levelers contain plastic resins that improve flexibility and bond strength. These resins are the reason modern levelers can be poured so thin. In the old days, you needed an inch of mud. Now we can go down to a feather edge. But those polymers are picky. They need to be fully hydrated to work. If you have clumps, those polymers are trapped and useless. You are essentially throwing money away. A bag of high quality leveler isn’t cheap. It costs thirty or forty dollars. If you waste three bags because of poor mixing, you just ate your profit for the day. I see it all the time with new guys. They rush. They think they can beat the chemical clock. You can’t beat the clock. You have to work with it. Respect the chemistry. Respect the tool. That is how you get a floor that stays flat for fifty years.
“A floor is only as good as the subfloor beneath it; deflection is the enemy of every joint.” – Master Flooring Axiom
The 1/8 inch that ruins everything
Precision measurement is what separates a craftsman from a handyman. When you are prepping for a carpet install, you might think you can be sloppy. Carpet is thick. It hides things. But a dip in the subfloor will eventually cause the carpet to stretch and ripple. Then you have to come back and power stretch it again. It is a waste of time. For laminate, the tolerances are even tighter. If the floor deviates more than the thickness of a nickel over a few feet, the locking tabs on the planks will snap. Once they snap, the floor is junk. You have to tear it all out. All because you didn’t want to spend the extra time mixing your leveler properly. Avoid the headache. Measure the water. Create the vortex. Pour it smooth. Your knees and your wallet will thank you later. The floor is the foundation of the home. Do not build on a bad foundation. It is a choice you will regret every time the house gets quiet and you hear that floor start to creak. Mix it right or don’t mix it at all.