I remember the first time I installed a carpet in my home. I thought I had everything under control—until I stepped back and watched a tiny ripple form across the surface. That moment taught me a hard lesson: skipping proper floor leveling and not choosing the right installation techniques can turn a beautiful upgrade into a headache.
Why Floor Leveling and Proper Installation Matter More Than Ever in 2024
In 2024, durability is king. With so many options for premium carpets and innovative flooring materials, the only thing that truly guarantees long-lasting results is meticulous preparation and expert installation. I’ve seen firsthand how a poorly leveled subfloor causes uneven wear and tear, leading to costly repairs down the line. According to a recent study by the National Association of Home Builders, improper subfloor preparation is a leading cause of flooring failures, accounting for nearly 60% of post-installation issues. That statistic hit home for me, pushing me to learn all I could about the best strategies for durable carpet installation and floor leveling.
If you’re tired of dealing with uneven floors, loose carpet edges, or premature wear, you’re in the right place. Today, I promise to share practical, proven tips that will help you achieve a flawless, long-lasting finish. Whether you’re a DIY enthusiast or hiring professionals, understanding these fundamentals can save you time, money, and frustration.
Have You Faced This Problem Before
Maybe you’ve already invested in a premium carpet only to find it bunching or wearing unevenly within months. Or perhaps you’ve struggled with uneven subfloors that make your space look off-balance and uncomfortable. I’ve been there, and I know how discouraging it can be. But here’s the good news: with the right techniques and attention to detail, you can avoid these pitfalls. Want to learn how? Keep reading, as I walk you through the most effective strategies for ensuring a durable, beautiful finish that lasts for years to come.
Ready to transform your space? Let’s dive into the essential tips for flawless carpet installation and floor leveling in 2024.
Prepare Your Subfloor Like a Pro
Start by thoroughly inspecting your subfloor. Remove any debris, loose particles, and old adhesives. Use a level to identify uneven spots—think of it as your blueprint for a flawless finish. If you notice dips or humps, mark them clearly.
Apply a self-leveling compound to fill in dips. Mix according to manufacturer instructions, then pour and spread evenly with a trowel or squeegee. Let it cure completely before proceeding—rushing this step is like building on a shaky foundation.
Ensure a Smooth Surface for Carpet Installation
Once the subfloor is flat, sand down any high spots. Use a power sander or hand scraper to achieve a smooth, even surface. Think of this step as sanding a rough piece of wood before staining—smoothness is key for durability.
Check the surface again with your level. A perfectly flat and smooth subfloor is essential to prevent future issues like bunching or uneven wear in your carpet.
Choose the Right Installation Techniques
Opt for a high-quality adhesive suited for your flooring type. Applying adhesive evenly with a notched trowel ensures good bonding. Imagine spreading peanut butter evenly on bread—uniform coverage prevents future lifting or bubbles.
When laying the carpet, start from the center and work outward. Use a knee kicker to stretch the carpet tightly, avoiding slack that causes wrinkles over time. Tight installation is like tuning a guitar—precise tension leads to better sound, or in this case, longer-lasting flooring.
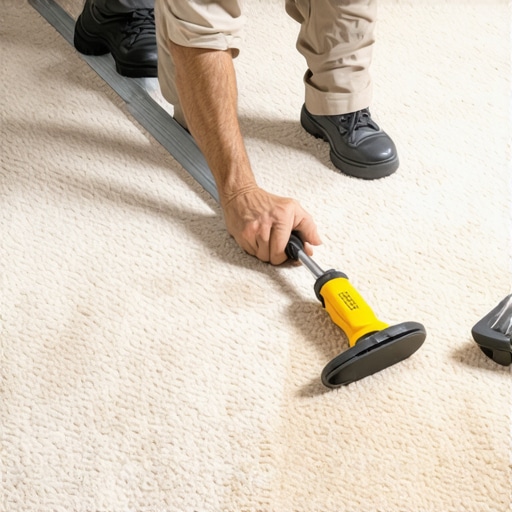
Finish with Proper Seaming and Edging
Use seam tape and a seaming iron for clean, durable joints. Overlap edges slightly and press firmly to prevent separation. Think of it like sewing a seam—proper technique ensures strength and longevity.
Trim excess material neatly and secure edges with transition strips or tack strips. This not only improves appearance but also adds to the durability by preventing edge fraying.
Regular Maintenance and Inspection
Once installed, maintain your carpet by vacuuming regularly and addressing spills immediately. Schedule inspections annually to catch any early signs of unevenness or wear. Think of it as routine health check-ups—preventative care extends the lifespan of your investment.
Many homeowners and even some professionals believe that floor leveling is a straightforward step that can be easily overlooked or rushed. However, this assumption often leads to costly mistakes and subpar results. In my experience, one of the most persistent myths is that a quick skim coat or simple sanding can fix all unevenness without proper subfloor assessment. The reality is that subtle dips and humps can have complex causes, such as underlying moisture issues or structural shifts, which require nuanced solutions. Rushing this step can trap you into a cycle of repairs, especially if the initial problem isn’t fully addressed. For example, a study by the National Association of Home Builders highlights that nearly 60% of flooring failures stem from improper subfloor preparation, illustrating how critical this phase truly is.
Why Do Many Get Floor Leveling Wrong, and What Can You Do About It?
One common mistake is relying solely on self-leveling compounds without thorough inspection. While these compounds are effective for minor dips, they can fail if applied to unstable or contaminated surfaces. Be cautious of applying leveling compounds over old adhesives or moisture-damaged wood, as this can cause bubbling and cracking down the line. Also, many underestimate the importance of proper substrate assessment—using a high-quality moisture meter and detailed surface analysis can save you from future headaches. When dealing with complex issues, consulting with experts or referring to trusted resources like floor leveling tips for durable upgrades can make all the difference.
Another nuance often overlooked is the importance of subfloor material compatibility. For example, concrete slabs require different preparation compared to plywood subfloors. Failing to account for these differences can lead to uneven surfaces and premature wear. Advanced techniques, such as injecting leveling solutions into low spots or reinforcing weak areas, are sometimes necessary for long-term stability. These methods are best executed by professional installers who understand the intricacies of each material type.
Have you ever fallen into this trap? Let me know in the comments. Remember, meticulous preparation and understanding the nuanced causes behind uneven floors are the keys to achieving a flawless, durable finish. If you want to ensure your project’s success, investing in proper assessment and advanced leveling techniques is well worth the effort. For more insights, explore expert floor leveling tips for lasting durability or check out how professional strategies can elevate your flooring project.
Maintaining your newly installed or leveled floor is crucial to ensuring its longevity and appearance. The right tools and a systematic approach can make all the difference in keeping your flooring in top condition over time. In my experience, investing in high-quality equipment not only simplifies the process but also guarantees more consistent results, especially when dealing with complex subfloor issues or large areas.
Why I Trust Professional-Grade Tools for Floor Maintenance
For routine inspections and minor touch-ups, I rely on a digital moisture meter. This device helps me monitor moisture levels in subfloors, which is essential because excess moisture can lead to structural problems or mold growth. I personally prefer the Protimeter Surveymaster because of its accuracy and ease of use. Regularly checking moisture levels prevents costly repairs and helps me catch problems early before they escalate.
When it comes to cleaning and upkeep, a high-quality vacuum cleaner with HEPA filtration is indispensable. It removes dirt, dust, and allergens effectively, which is vital for maintaining a healthy indoor environment and preventing debris from settling into seams or uneven surfaces. I use a commercial-grade vacuum like the Dyson Ball Animal 2, which offers powerful suction and versatile attachments for tight corners and edges.
For minor surface repairs or smoothing out imperfections, I recommend a professional-grade hand sander or an orbital sander. These tools are crucial when you need to re-sand high spots or rough patches after leveling. My favorite is the Bosch ROS20VSC, thanks to its lightweight design and variable speed control, which provides precision without fatigue.
Tools to Consider for Long-Term Results
Investing in a good-quality seam roller and a carpet stretcher is essential for maintaining a flawless appearance. A seam roller ensures that seams stay tight and secure, preventing bunching or separation over time. For larger projects, a power stretcher like the Roberts 10-94 is a game-changer, offering consistent tension and making stretching easier and safer.
To protect your investment from future damage, I suggest applying a sealant or underlayment designed for your specific flooring type. For instance, a vapor barrier helps prevent moisture migration, which is especially important in basements or concrete slabs. Brands like FloorMuffler or 3M offer reliable solutions that are easy to install and durable.
Looking Ahead: Future Trends in Floor Maintenance
As technology advances, I predict that smart sensors capable of monitoring moisture, temperature, and structural shifts will become standard in flooring systems. These devices will alert homeowners to potential problems before they manifest visibly, saving time and money. Additionally, automation and robotics might play a significant role in cleaning and minor repairs, making maintenance more efficient and less labor-intensive.
How do I maintain my floors over time?
Maintaining your floors involves regular inspections, timely cleaning, and addressing issues as soon as they arise. Using tools like moisture meters and professional cleaning equipment ensures your flooring remains in excellent condition. Remember, a proactive approach is the best way to extend the lifespan of your investment. For more detailed tips on ensuring durability, check out expert strategies for long-lasting flooring. Don’t hesitate to try out advanced maintenance techniques like sealing vulnerable seams or using underlayments to prevent moisture ingress – these small steps can make a big difference.
The Hardest Lesson I Learned About Floor Leveling
One of my biggest surprises in flooring projects was realizing how overlooked subfloor prep can sabotage years of effort. I once rushed through leveling, thinking a quick skim coat would do the trick, only to see my carpet develop wrinkles within months. That taught me that thorough inspection, proper assessment, and patience are the real game changers. I discovered that subtle dips and humps often hide deeper structural issues, and ignoring them can lead to costly repairs later on.
Tools and Resources That Changed My Approach
Over time, I found that investing in a quality moisture meter like the Protimeter Surveymaster helps me catch moisture problems early, preventing future buckling. A professional-grade sander, such as the Bosch ROS20VSC, makes smoothing high spots effortless. For seamless seams, I rely on a trusted seam roller, and for big stretches, a power stretcher like the Roberts 10-94 ensures tight, wrinkle-free results. These tools, combined with expert advice from trusted resources, have made all the difference in my projects.
Your Next Step in Floor Excellence
Now, it’s your turn to elevate your flooring game. Whether you’re DIY-ing or hiring pros, understanding the nuances of floor leveling and installation techniques will save you time, money, and stress. Remember, meticulous preparation today leads to beautiful, durable carpets tomorrow. Don’t hesitate to dive into more detailed guides or consult with experts—your perfect floor is within reach. Ready to transform your space? Share your biggest flooring challenge below, and let’s tackle it together!