The Hidden Weep Hole Clog That Turns Shower Pans Into Stagnant Ponds
The drainage failure no one sees until it smells
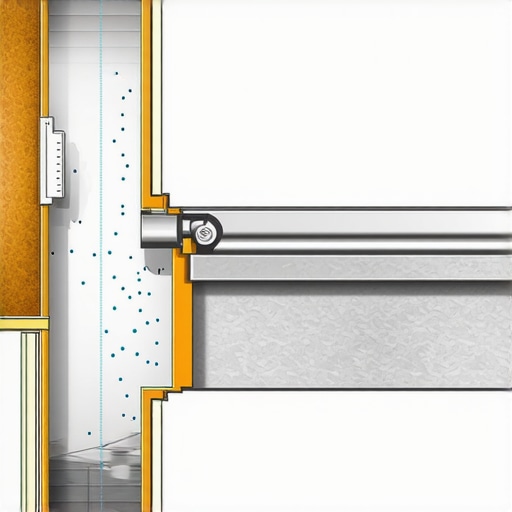
A clogged weep hole in a three piece shower drain prevents residual moisture from escaping the mortar bed. This leads to stagnant water trapped between the waterproof liner and the tile surface, causing mold growth, efflorescence, and structural rot in the subfloor system. Most guys skip the leveling compound. They think the underlayment will hide the dip. It will not. I spent three days grinding concrete on a job last month just so the floor would not click like a castanet. That job taught me that even a minor deviation in the subfloor level can cascade into a complete assembly failure. When we are talking about a shower, that deviation means water pools in places it was never meant to sit. I have seen fifteen thousand dollar bathroom remodels destroyed by a handful of sand blocking a plastic hole. It is a structural engineering disaster masked by pretty ceramic. Weep holes are the secondary defense system. They sit at the base of the drain assembly, right at the level of the waterproof membrane. Their job is to take any water that gets past the grout and tile and funnel it into the waste pipe. When these holes are blocked by thinset or mortar, the water stays in the mud bed. It rots. It stinks. It eventually breaches the perimeter.
The physics of capillary action in mortar beds
The capillary action of a cementitious mortar bed allows liquid water to travel upward and outward if it cannot drain through the weep holes. This hydrostatic pressure can saturate the bottom plate of studs and lead to wicking in the drywall. You have to understand the chemistry of the mix. A traditional mud bed is a dry pack. It is porous by design. It is not meant to be a waterproof barrier. It is a stable substrate. When water enters that substrate, it needs a clear path out. If you clog those holes with a glob of unmodified thinset, you have created a swimming pool under your feet. The water becomes anaerobic. Bacteria thrive in that dark, warm space. This is why some showers smell like a swamp even if the surface is scrubbed clean. The smell is coming from the structural layers. It is the scent of a failing system. I have pulled up tiles where the mortar was the consistency of wet oatmeal because it had been submerged for three years. That is not just a leak. That is a total failure of the drainage architecture. One small gap in the crushed stone around the drain base is all it takes to prevent this.
“A floor is only as good as the subfloor beneath it; deflection is the enemy of every joint.” – Master Flooring Axiom
Why your subfloor is lying to you
A subfloor must be level to within 1/8 inch over a ten foot radius to support large format tile or laminate flooring. Failure to achieve this flatness leads to locking mechanism failure and grout cracking. I have walked onto jobs where the contractor thought a thick carpet pad would hide a half inch dip in the plywood. It does not work that way. The floor is a machine. If the base is not flat, the machine breaks. In a shower, the subfloor must be pre-pitched even before the liner goes down. This is the step most people miss. They put a flat liner on a flat floor and then build a slope on top of it. What happens? The water that reaches the liner just sits there because there is no slope to pull it toward the weep holes. Gravity is not a suggestion. It is the law. You need a 1/4 inch per foot slope toward the drain at every single layer of the assembly. Anything less is a gamble with the structural integrity of the home. I have seen joists rotted through because someone was too lazy to use a level on the first day of the job.
| Material Type | Moisture Tolerance | Expansion Gap Needed | Subfloor Requirement |
|---|---|---|---|
| Solid White Oak | Low | 3/4 inch | Plywood/OSB |
| Engineered Hardwood | Medium | 1/2 inch | Concrete or Wood |
| Waterproof LVP | High | 1/4 inch | Flat within 3/16″ |
| Ceramic Tile | High | None (Perimeter only) | Rigid/Non-deflecting |
The ghost in the expansion gap
An expansion gap is a perimeter space required for floating floors and hardwood to accommodate seasonal humidity changes. Without this gap, the floor will buckle or peak at the joints when the wood fibers expand. People think LVP is plastic so it does not move. They are wrong. It moves. It expands and contracts with temperature. If you pin it down with a heavy kitchen island or tight baseboards, it has nowhere to go. It will lift. I have seen floors rise three inches off the subfloor because they were installed tight to the drywall. It looks like a bubble. You can walk on it and feel the air underneath. In high humidity regions like the Gulf Coast, this is even more critical. The air is thick with water. Your floor is a living thing. It breathes. You have to give it room to exist. If you do not leave that 1/8 inch gap at every vertical obstruction, you are asking for a callback in six months. I tell my apprentices that the gap is the most important part of the floor. It is the part you do not see that makes the part you do see work. We use spacers. We check them twice. We do not trust our eyes. We trust the tool.
- Clear all mortar debris from the drain base before installing the clamping ring.
- Place a layer of crushed stone or ceramic spacers around the weep holes.
- Ensure the pre-slope is a minimum of 1/4 inch per foot.
- Test the drain with a flood test for 24 hours before tiling.
- Verify subfloor deflection meets L/360 standards for ceramic tile.
The chemistry of a failed bond
The bond strength of polymer modified thinset depends on the evaporation rate of the water and the cleanliness of the substrate. Dust acts as a bond breaker, preventing the adhesive from penetrating the pores of the concrete slab. I have seen guys throw down tile on a dusty floor and wonder why it sounds like a hollow drum a week later. The mortar stuck to the dust, not the floor. You have to vacuum. You have to damp mop. You have to treat the subfloor like a surgical site. When we talk about laminate or carpet install, the same rules apply. You cannot put a high end carpet over a crumbling concrete floor. The grit will act like sandpaper on the backing of the carpet. It will shred it from the bottom up. Every step you take grinds those fibers. It is a slow death for the material. I always tell clients that the finish material is only ten percent of the job. The other ninety percent is the prep work. The grinding. The leveling. The cleaning. If you get the prep right, the floor lasts fifty years. If you rush it, you are doing it again in five. It is that simple. There are no shortcuts in flooring. Only delayed failures.
“Water follows the path of least resistance; if you do not provide a path, it will create one.” – TCNA Handbook Principle
The regional moisture trap
In the humid climates of the Pacific Northwest or coastal Florida, vapor barriers are essential to prevent subfloor saturation. A concrete slab can look dry but still be transmitting pounds of moisture per thousand square feet every day. You have to use a calcium chloride test. You have to know the numbers. You cannot guess. In dry climates like Arizona, the problem is the opposite. The wood shrinks. The gaps open up. You need to acclimate the material to the space for at least 72 hours. Not in the garage. In the room where it is being installed. I have seen installers take wood from a cold truck and nail it down immediately. A month later, there are gaps big enough to lose a coin in. That is not a material defect. That is installer negligence. The wood is searching for equilibrium with the air. It will find it. Whether you like the result or not is up to your preparation. The regional climate dictates the installation method. There is no one size fits all approach. You adapt or you fail. That is the reality of the trade. I have spent twenty five years watching people ignore the environment only to be surprised when the environment wins. The environment always wins.
{“@context”:”https://schema.org”,”@type”:”Article”,”headline”:”The Hidden Weep Hole Clog That Turns Shower Pans Into Stagnant Ponds”,”author”:{“@type”:”Person”,”name”:”Master Floor Installer”},”description”:”A deep dive into the technical failures of shower drainage systems, subfloor leveling, and the importance of weep holes in preventing structural rot.”,”articleSection”:”Flooring and Drainage Engineering”}