Most guys skip the leveling compound. They think the underlayment will hide the dip. It won’t. I spent three days grinding concrete on a job last month just so the floor wouldn’t click like a castanet. That job was a wake up call for the homeowner who had spent five figures on a custom marble entry only to have the adjacent carpet look like a shredded mess within six months. The problem was not the carpet quality. The problem was the transition. Most installers use a cheap tack strip and a prayer. I use the Z-bar tactic. It is the only way to ensure the transition survives the friction of a heavy vacuum or the constant scuff of work boots. When you understand the physics of how a carpet edge interacts with a rigid tile surface, you stop making mistakes. You start building floors that last twenty years instead of two.
The structural failure of the standard transition
A standard transition fails because it lacks a mechanical lock for the carpet backing. Most installers rely on the pins of a tack strip to hold the tension. Over time, the latex adhesive in the carpet backing breaks down, the fibers pull away, and the edge begins to fray. This breakdown occurs at the molecular level where the secondary backing meets the primary weave. When a transition is not tucked properly, the raw edge of the carpet is exposed to lateral forces. Every time you walk over that edge, you are effectively sanding the fibers against the sharp grout line of the tile. This is why the Z-bar is the superior choice for high traffic zones. It provides a protective metal lip that redirects those forces. It creates a physical barrier that the carpet is tucked into, shielding the weave from direct impact.
The physics of the Z-bar tuck
The Z-bar works by creating a recessed channel that sits lower than the tile surface. This allows the carpet to be stretched over a specialized metal edge and then tucked back underneath itself. This creates a tension loop that is nearly impossible to pull out. To understand why this works, you have to look at the tension applied by a power stretcher. A carpet is essentially a massive spring. If that spring is only held by the tiny pins of a tack strip, the tension is concentrated on a few points of the polypropylene backing. The Z-bar distributes that tension across the entire length of the metal strip. This prevents the carpet from bowing or cupping at the edge. It is the same logic used in structural engineering for anchoring cables. You want the load distributed, not concentrated.
“A floor is only as good as the subfloor beneath it; deflection is the enemy of every joint.” – Master Flooring Axiom
The chemistry of the carpet backing
The carpet backing is usually a sandwich of primary and secondary layers held together by styrene-butadiene rubber latex. This latex is sensitive to both moisture and mechanical stress. If you leave a carpet edge exposed at a tile transition, the latex begins to oxidize. It becomes brittle. Once it becomes brittle, the fibers lose their anchor and start to pop out. This is what we call fraying. By using a Z-bar, you are effectively sealing that edge away from the air and the light. You are also keeping it away from the cleaning chemicals used on the tile. Many homeowners mop their tile with harsh acidic cleaners that eat away at the carpet latex if they touch it. The Z-bar creates a dam that keeps the tile cleaning chemicals on the tile and the carpet dry.
Subfloor heights and the 1/8 inch rule
Subfloor leveling is the most overlooked part of any flooring project. If your tile and your subfloor are not on a perfectly calibrated plane, no transition strip in the world will save you. You must achieve a levelness of 1/8 inch over a 10 foot radius. I always use a 10 foot straightedge to find the dips. If I find a low spot near the transition, I fill it with a high strength, fiber reinforced self leveling compound. I prefer compounds with a high calcium aluminate content because they shrink less during the hydration process. If the subfloor is concrete, I also check the moisture vapor emission rate. A slab that is too wet will blow the Z-bar right off the floor as the adhesive fails. I never install until the internal relative humidity of the slab is below 75 percent. It is about the science, not the schedule.
The geometry of the tucking process
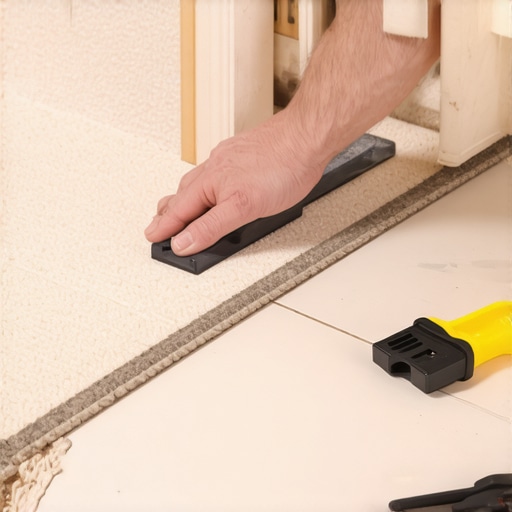
When you prepare the Z-bar, you are setting the stage for a permanent lock. The metal strip is shaped like a flattened Z. One flange goes under the tile or is nailed to the subfloor, while the other flange creates the tucking lip. You must leave a gap between the tile edge and the Z-bar that is exactly two thirds the thickness of the carpet. If the gap is too wide, the carpet will pop out. If it is too narrow, you will crush the fibers and create a visible line. I use a specialized stair tool to drive the carpet into that gap. The goal is to create a wedge effect. The more people walk on it, the tighter the carpet should seat itself into the metal channel. It is a self-reinforcing system that mocks the standard transition methods.
| Transition Type | Load Capacity | Life Expectancy | Complexity |
|---|---|---|---|
| Standard Tack Strip | Low | 3-5 Years | Minimal |
| T-Molding | Medium | 7-10 Years | Moderate |
| Z-Bar Tactic | High | 20+ Years | High |
| Schluter Reno-U | High | 15-20 Years | Advanced |
Tools for a professional grade edge
Achieving a professional edge requires more than a utility knife. You need a power stretcher, a top cutter, and a heavy duty stair tool. Without a power stretcher, you cannot put enough tension on the carpet to lock it into the Z-bar. Knee kickers are for closets. If you use a knee kicker on a transition, the carpet will be loose within a year. You need the mechanical advantage of a long pole stretcher that braces against the opposite wall. This ensures the carpet is drum tight. Once it is tight, the top cutter allows you to trim the carpet at the perfect angle. I always cut the carpet about 3/8 of an inch longer than the transition line. This extra material is what gets tucked into the Z-bar to create that clean, rolled edge look.
- Inspect the subfloor for any cracks or high spots that could telegraph through the carpet.
- Measure the height of the tile including the thin-set mortar bed to select the correct Z-bar size.
- Fasten the Z-bar using ring-shank nails or high-bond construction adhesive if working on concrete.
- Apply a bead of seam sealer to the cut edge of the carpet to prevent any initial fiber loss.
- Use a power stretcher to pull the carpet over the Z-bar teeth before tucking.
- Finish the edge by using a rubber mallet and a wood block to gently seat the metal lip over the tucked carpet.
The ghost in the expansion gap
Every floor needs room to breathe. For tile, this means leaving an expansion gap at the perimeter where it meets the carpet transition. If you butt the tile tight against the metal, the grout will crack as the house shifts. I always fill the final gap between the tile and the Z-bar with a color matched 100 percent silicone sealant rather than hard grout. Silicone has the elongation properties needed to handle the micro-movements of the subfloor. This is especially vital in regions with high seasonal humidity. In places like Houston or New Orleans, the wood subfloor will expand and contract significantly. If your transition is too rigid, something has to break. Usually, it is the bond between the tile and the thin-set. The Z-bar allows for that movement while keeping the carpet edge secure.
“Deflection in the subfloor is the primary cause of transition failure; ensure your joist spacing meets L/360 standards.” – TCNA Handbook for Ceramic Tile
Regional moisture and the Z-bar
The climate in your region dictates your installation strategy. In the dry heat of Phoenix, the carpet backing will shrink and become brittle faster. You might need to use a specialized primer on the subfloor to prevent the wood from sucking all the moisture out of your adhesives. In the swampy humidity of Florida, the risk is mold and mildew under the transition. I always use a synthetic, antimicrobial tack strip in high humidity zones. The Z-bar itself should be made of anodized aluminum to prevent corrosion. If you use a cheap steel strip in a humid basement, it will rust and stain the carpet from the bottom up. You have to think about the chemistry of the environment. A floor is a living system that reacts to the air around it.
The 1/8 inch that ruins everything
Precision is not optional. If your Z-bar is 1/8 of an inch too high, it becomes a trip hazard. If it is 1/8 of an inch too low, the carpet will not tuck properly. This is why I use a digital caliper to measure the thickness of my materials. I want the finished carpet edge to sit exactly flush with the top of the tile. This creates the zero-threshold look that architects love. It is a clean line that doesn’t scream for attention. To get this right, you often have to shim the Z-bar. I use strips of roofing felt or thin birch plywood to build up the height of the transition strip. It is a tedious process, but it is the difference between a floor that looks like a DIY project and a floor that looks like a piece of art.
Refining the final tuck
The final tuck is a test of patience. You are forcing a thick material into a narrow space. I use a heat gun to slightly soften the carpet backing before the final tuck. This makes the latex more pliable and allows it to fold without cracking. I then use a wide-head stair tool to drive the carpet home. You should hear a satisfying thud as the carpet seats into the channel. Once it is in, I go over the metal lip with a heavy roller. This ensures the teeth of the Z-bar are fully engaged with the carpet backing. This is the mechanical lock that prevents the fraying. It is a system built on tension and friction. When done correctly, you could hook a truck to that carpet and it wouldn’t pull out of the transition.