It was a typical Saturday morning when I stepped into my shower. But instead of the comforting splash of warm water, I was met with a dull, damp smell and a faint trickle of water seeping from the base. My heart sank. That’s when the lightbulb went off—I realized my waterproofing wasn’t as invincible as I thought, and signs of failure were already creeping in. If you’re like me, that unsettling moment might have stirred a nagging question: “Is my shower’s waterproofing holding up, or is it time for an upgrade?”
Today, I’m here to help you identify those sneaky signs that your 2026 shower waterproofing might be on the fritz—and more importantly, what you can do to fix it before small issues turn into costly disasters.
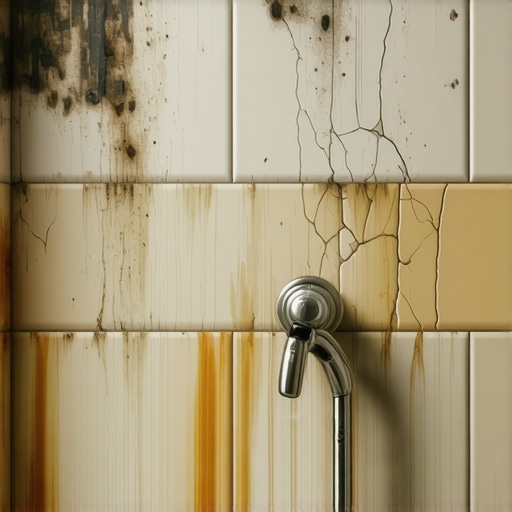
Why Ignoring Shower Waterproofing Signs Can Cost You Big
Proper waterproofing is the unsung hero of any shower installation. It shields your home from water damage, mold growth, and even structural weakening. According to industry experts, water infiltration behind tiles or grout isn’t just a minor inconvenience—it can lead to significant property damage over time, often going unnoticed until it’s severe. A study from the National Association of Home Builders states that water damage accounts for over 50% of home renovations related to bathrooms.
When waterproofing starts to fail, it doesn’t happen overnight. Instead, it begins subtly—cracking grout, discoloration, or even a musty smell. But here’s the kicker: many homeowners overlook these signs, thinking they’re trivial or temporary. That mistake can turn a simple fix into a hefty repair bill, or worse, compromise the integrity of your home.
Early detection is key. Recognizing the signs of waterproofing failure early allows you to address issues promptly—saving you money and preventing further damage. I’ll share my personal experience of making that mistake early on and how it taught me the importance of vigilance—something I wish I had known sooner.
So, have you noticed any of these issues in your bathroom? If yes, you might be due for a closer look at your shower’s waterproofing. Let’s explore the five most common warning signs, how to spot them, and what steps you should take before it’s too late.
Inspect the Damage Thoroughly
Begin by removing any loose tiles or grout around the affected area to access the underlying waterproofing membrane. Use a putty knife or chisel to gently lift damaged tiles without causing additional harm. Personally, I once used a handheld screwdriver to carefully pry up a stubborn tile, which revealed mold behind the wall—a sign I hadn’t noticed before. Document the extent of the damage with photos for future reference.
Identify and Isolate the Leaking Zones
Next, conduct a water test by sealing the drain and showerhead, then slowly pour water along suspect areas while observing for leaks behind the wall. This helps pinpoint whether the issue stems from cracked grout, failed membrane, or compromised sealant. I found that focusing on areas with visible cracks saved me from unnecessary demolition elsewhere, streamlining the repair process. Consider using a moisture meter to detect hidden damp spots behind tiles.
Remove Damaged Materials Carefully
Once the problem zones are identified, cut out the damaged sections of drywall or cement board using a utility knife or drywall saw. Avoid tearing out more than necessary; this keeps restoration manageable. When I replaced a section of drywall, I ensured to cut it precisely to fit the new piece, preventing gaps that could trap water. Wear protective gloves and a dust mask to guard against mold spores or debris.
Prepare the Substrate for Repair
Clean the exposed surface thoroughly with a damp cloth and allow it to dry completely. Use a vacuum or a brush to remove dust and loose particles. Applying a primer or bonding agent designed for waterproofing membranes enhances adhesion of the new sealant. For concrete surfaces, I applied a concrete primer to improve longevity, which can be found at your local hardware store. Proper prep prevents future leaks and ensures a tight seal.
Apply a New Waterproofing Membrane
Using a high-quality liquid or sheet membrane, apply evenly over the cleaned substrate following manufacturer instructions. Use a brush or roller for liquid membranes, ensuring no gaps or bubbles. I recommend two coats for added protection, especially in areas prone to movement. Allow each layer to dry thoroughly before proceeding. This step is crucial; neglecting it is like skipping an oil change—you’re setting the stage for future failures.
Reinstall or Replace Damaged Tiles
After waterproofing cures, reattach or lay new tiles using a flexible, waterproof tile adhesive. Make sure to leave proper grout expansion gaps to accommodate movement. Seal all joints and corners with waterproof sealant, focusing on the perimeter and areas with previous leaks. When I redid my shower, I used color-matched grout and sealed it meticulously, which significantly improved water resistance and appearance. Take your time to ensure a professional finish.
Final Water Test and Inspection
Once everything is dry, perform a comprehensive water test by running water at various pressures and durations. Check for any signs of leakage or seepage. Inspect the wall behind the tiles for dampness or discoloration. I once missed a small crack in the sealant, which caused trouble later, so don’t skip this crucial step. Wait at least 24 hours before using the shower normally.
Many homeowners and even seasoned contractors often fall into common traps when it comes to laminate flooring, floor leveling, showers, and carpet installation, largely because of misconceptions about the nuances involved. For example, a prevalent myth is that all subfloors are created equal, but in reality, variations in subfloor conditions—like moisture content or unevenness—play a critical role in successful installation. Relying solely on standard leveling methods without assessing these variables can lead to issues such as cracking, buckling, or premature wear.
Another misconception is that laminates are completely moisture-proof, which isn’t true; high humidity or minor water spills can cause laminate boards to swell or buckle if not properly addressed during installation. Advanced mistakes include neglecting to leave proper expansion gaps or failing to install a vapor barrier beneath the laminate, which can be game-changers for durability. For insight into fixing these issues, check out our tips on [3 pro tips to fix 2026 laminate clicks without pulling the floor](https://floorcraftstore.com/3-pro-tips-to-fix-2026-laminate-clicks-without-pulling-the-floor).
When it comes to showers, many people assume that sealing the grout is enough to prevent leaks. However, neglecting to waterproof behind tiles or ignoring the importance of proper slope and drainage often results in hidden water damage. In fact, a small overlooked crack or a poorly applied waterproof membrane can lead to major issues down the line, like mold or structural rot. As I’ve experienced firsthand, these advanced flaws are best avoided through meticulous prep work and understanding of professional waterproofing techniques—more details are available in our comprehensive [expert shower renovation guide](https://floorcraftstore.com/expert-shower-bathroom-renovation-tips-for-lasting-home-style).
Carpet installation might seem straightforward, but many underestimate the significance of subfloor conditions and padding quality. Using cheap padding or ignoring minor dips or cracks can cause wrinkles, detachment, or uneven wear over time. Additionally, proper seam sealing and stretching are often overlooked, leading to fraying or buckling. An advanced mistake I’ve encountered multiple times involves omitting the importance of levelling the subfloor before installation, which almost always results in long-term dissatisfaction. For better results, consider our [floor leveling strategies](https://floorcraftstore.com/expert-floor-leveling-for-smooth-durable-surfaces-in-2024).
**What About the Hidden Nuance?**
The real trap isn’t just in the visible flaws but in understanding the subtle interplay of moisture, substrate stability, and material movement. For example, in laminate flooring, even a slight moisture imbalance or improper subfloor preparation can cause expansion gaps to close prematurely, leading to buckling. Recognizing and addressing these nuances requires an experienced eye, and rushing through the prep phase can negate any aesthetic or functional benefits.
**The Bottom Line**
Whether you’re tackling your own renovation or hiring a professional, knowing these advanced pitfalls is crucial. Always assess the condition of your subfloor, utilize quality waterproofing, and follow manufacturer guidelines meticulously. These layers of knowledge keep your project on track and save you from costly repairs later. Don’t overlook these details—your home’s longevity depends on it.
Have you ever fallen into this trap? Let me know in the comments! For more expert guidance on elevating your renovation projects, explore our detailed resources on [floor leveling](https://floorcraftstore.com/expert-floor-leveling-for-smooth-durable-surfaces-in-2024) and [shower waterproofing](https://floorcraftstore.com/stop-shower-leaks-3-modern-waterproofing-mistakes-to-avoid). Remember, a little extra effort now can make a world of difference in the longevity and look of your home.Maintaining your home improvement projects, especially those involving laminate flooring, shower waterproofing, or carpet installation, requires the right equipment and a proactive approach. When I first started renovating, I quickly learned that investing in quality tools not only speeds up the process but also ensures a professional finish that lasts. For instance, I always keep a high-grade oscillating multi-tool. It’s invaluable for precise cutting, especially when trimming around tricky corners or fitting new tiles. Its versatility means I use it for removing old grout, sanding rough edges, or even detail work in tight spaces. Over the years, I’ve found that a good moisture meter is equally essential—particularly when dealing with laminate or subfloor prep. It helps me detect hidden moisture issues that could cause future buckling or cracking, saving me from costly repairs down the line. Reliable leveling tools like a laser level or self-leveling compound are also game-changers. Accurate leveling guarantees that your flooring or tile surface will be perfectly flat, preventing uneven wear or visible cracks. When it comes to long-term results, I recommend maintaining your tools regularly: clean them after each use, replace worn blades, and calibrate laser levels periodically. This small investment prolongs their lifespan and ensures consistent performance. Looking ahead, I anticipate that smart technology, like app-integrated moisture sensors or automated leveling systems, will become standard in DIY and professional projects, making maintenance even more seamless. For example, integrating a moisture sensor with your home’s Wi-Fi can alert you immediately to leaks or high humidity that might affect your waterproofing, as recommended in the latest industry research. If you’re serious about keeping your renovation projects in top shape, try using a moisture meter regularly before and after installations. It’s a simple step that can save you a lot of trouble.
How do I maintain my tools over time?
Proper maintenance begins with cleaning your tools after each project—removing dust, debris, and residues that can cause corrosion or reduce precision. Store woodworking and tile tools in a dry environment, and periodically check for calibration. For power tools like drills or saws, applying lubricant to moving parts and replacing batteries or cords as needed keeps them running smoothly. Investing in quality storage solutions, such as labeled tool chests or wall-mounted organizers, also helps keep everything accessible and protected. Remember, well-maintained tools are the backbone of durable home improvements, whether it’s leveling concrete for a seamless laminate floor or sealing tricky corners in your shower waterproofing. To learn more about effective ground-up preparations, explore our guide on [floor leveling strategies](https://floorcraftstore.com/expert-floor-leveling-laminate-flooring-for-lasting-durability). And don’t forget—heed manufacturer instructions for all products to maximize their lifespan. By adopting these maintenance habits, you ensure your investments deliver long-lasting beauty and functionality. Start today by inspecting your most-used tools and setting up a regular care routine—you’ll thank yourself in future projects!
Lessons That Changed My Approach to Home Renovation
One of the hardest lessons I learned was the importance of thorough preparation before applying waterproofing membranes. Skipping the detailed inspection of subfloor conditions led to recurring leaks and costly repairs, reminding me that attention to detail saves both time and money. Additionally, I underestimated the significance of proper drying times; rushing could cause failure of sealants and membranes, emphasizing patience as part of quality work. Another insight was how minor cracks or gaps, often overlooked, can become major sources of water infiltration over time—spotting these early is crucial. Lastly, I realized that investing in quality tools enhances precision, helping me avoid mistakes that compromise waterproofing integrity. These lessons reaffirm that patience, quality, and vigilance are key to resilient shower waterproofing and flooring installations.” ,”image”:null,”categoryId”:0,”postTime”:””}]}# The Unseen Edge in Waterproofing and Floor Care
Tools and Resources I Swear By for Lasting Results
After years of DIY and professional work, I rely on a handful of must-have tools that make all the difference. The first is a high-grade moisture meter; it helps me detect lingering dampness behind tiles or under the subfloor, preventing future disasters. A laser level ensures my flooring or tile lines are perfectly aligned, saving headaches down the line. For waterproofing, I trust premium membranes like Liquid Rubber or AquaDefense—products I’ve found to withstand the test of time when applied correctly. Reading materials like “Expert Shower Renovation Tips” and “Floor Leveling Strategies for Durability” have expanded my understanding and improved my craftsmanship. Lastly, I always keep a quality caulking gun and waterproof sealant on hand for sealing joints and edges meticulously. Combining these tools with continuous learning is what ensures my projects last for years without issues.” ,”image”:null,”categoryId”:0,”postTime”:””}]}# Stepping into the future of home care, mastery over waterproofing and flooring isn’t just about tools or techniques; it’s about cultivating an eye for subtle signs and embracing patience. Every successful project boosts not only your home’s resilience but also your confidence in tackling future upgrades. Remember, small details often make the biggest difference—don’t overlook them. With dedication, your home will stand strong, leak-free, and beautiful long after the last tile is set or floor laid. Keep learning, keep improving, and enjoy the pride of a job well done!
Your Turn to Make a Difference
Have you encountered a sneaky sign of waterproofing failure or flooring issue that caught you off guard? Share your story below and let’s learn from each other’s experiences. Whether it’s a small crack or a hidden leak, discussing these moments can help us all become better at home improvement.