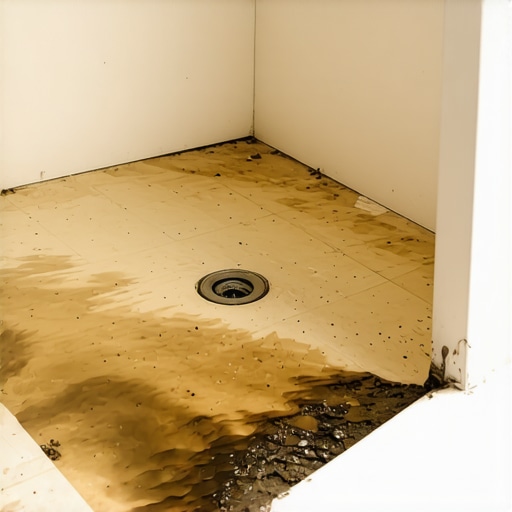
I remember the moment I stepped into my renovated bathroom, feeling proud of the sleek tiles, only to notice a faint, dark stain creeping along the base of the shower wall. It was a lightbulb moment—one that made me realize that some common shower installations can silently destroy your home’s foundation over time. Those small mistakes, if ignored, can lead to rot and costly repairs.
Why Ignoring Shower Pan Mistakes Is a Costly Gamble
Every homeowner dreams of a perfect bathroom—beautiful, functional, and leak-free. But, surprisingly, many overlook critical details during installation that set the stage for future disasters. For instance, neglecting proper waterproofing or misjudging drainage can cause water to seep beneath the shower pan, eventually rotting the subfloor. It might seem trivial at the moment, but according to industry experts, poor shower pan installation is among the leading causes of home moisture issues in 2026. This is why understanding and avoiding these pitfalls is so crucial for long-term health and durability.
Is It Really Worth the Effort to Get the Shower Pan Right?
I used to think rushing the shower installation saved time and money—until I faced the grim reality of replacing rotten subfloor sections. My early mistake was choosing an inexpensive, poorly sealed shower pan, thinking the extra savings outweighed the risk. That single shortcut cost me thousands in repairs and true peace of mind. Trust me, if I had taken the time to learn about proper installation techniques, I would have avoided so much hassle.
If you’ve experienced a similar problem—leaks, mold, or uneven flooring—you’ll understand why this topic is so pressing. Successfully avoiding these mistakes can save your home from future headaches. Next, I’ll walk you through the top three shower pan errors to watch out for and how to prevent them, ensuring your bathroom stands the test of time and use.
Level the Subfloor Precisely Before Installing the Shower Pan
Start by checking the existing floor for unevenness using a long level or a straight edge. If you notice any high spots or dips, it’s essential to address them to prevent future leaks and structural issues. I once encountered a subfloor with a slight slope, which caused water to pool on one side of the shower. I used self-leveling compound to even out the surface, ensuring the shower pan would sit flush. Proper leveling acts like a foundation for your shower, making installation smoother and water-tight. For comprehensive tips, see our guide on floor leveling techniques.
Install a Waterproofing Membrane with Overlap and Proper Sealing
Lay a high-quality waterproof membrane, such as a PVC liner, ensuring it extends up the walls at least 2 inches above the curb. Overlap seams by at least 4 inches and seal them with waterproof tape designed for showers. I remember using a roll of membrane in a recent remodel, carefully measuring and cutting pieces to fit snugly without wrinkles. This step is critical to prevent water from seeping beneath the shower pan, which can cause rot and mold. Think of the membrane as a protective barrier, much like a raincoat shielding you from storms. For expert guidance, check our article on shower waterproofing tips.
Securely Position and Seal the Shower Pan
Place the shower pan onto the prepared subfloor, ensuring it sits evenly without gaps. Use shims or spacers if necessary to achieve a perfect fit. Apply a thick bead of silicone sealant around the flange where the pan meets the wall or curb, preventing any water escape points. I once installed a pan in a tight bathroom corner; using a level, I adjusted until it was perfectly aligned, then sealed meticulously. Proper sealing is like putting a gasket on a machine—essential to prevent leaks. For detailed installation steps, visit shower installation techniques.
Test for Leaks Before Finalizing
Before finishing the wall tiles or flooring, conduct a water test by plugging the drain and filling the shower base with water about halfway. Leave it for 24 hours to observe any drops in water level or signs of seepage. I remember this step catching a small leak that was missed visually, saving me from future water damage. Think of this as a stress test for your installation—a safety net that ensures peace of mind. For more tips on quality bathroom renovations, see bathroom renovation essentials.
Many homeowners and even seasoned DIYers believe that leveling floors or installing materials like carpet, shower pans, or laminate is straightforward—simply follow the instructions, and everything will turn out perfect. However, beneath this surface confidence lie nuanced pitfalls that can significantly impact the durability and performance of your home upgrades. Let’s uncover some of the most overlooked details and misconceptions, so you can avoid costly mistakes.
One widespread myth is that a perfectly flat subfloor is enough for a successful laminate or carpet installation. In reality, tiny imperfections—less than 1/8 inch—can cause cracks, uneven wear, or even creaking over time. Industry experts emphasize the importance of comprehensive floor assessment and proper leveling techniques, as detailed in our guide on laminate floor leveling. Overlooking these subtleties often leads to aggravating issues that could have been prevented.
When it comes to carpet installation, many assume that a simple underlay suffices for comfort and longevity. But the critical nuance lies in selecting the right padding and ensuring proper stretcher techniques during installation. Cheap or mismatched padding can accelerate wear or cause wrinkles to surface within months. As pointed out in professional tips on carpet installation, meticulous attention to underlay quality and stretching methods guarantees a smooth, durable carpet.
For shower pans, homeowners often believe that sealed edges and waterproof membranes alone are enough protection. Yet, even minor gaps or seams left unsealed can become gateways for water infiltration. Advanced installers understand that overlap, sealant quality, and proper drainage slope are essential nuances. Misjudging these can result in leaks that cause mold, rot, and structural damage, issues underscored by researchers from the Building Science Corporation in their study on waterproofing failures.
Meanwhile, in laminate flooring, the popular advice to simply float planks over an uneven subfloor is a dangerous oversimplification. Small gaps or unevenness can cause planks to buckle or crack. Expert installations involve strategic subfloor assessment, moisture barriers, and controlled expansion gaps to accommodate natural materials’ behavior. Visit laminate flooring best practices for comprehensive insights.
A common trap across all these areas is rushing through preparation. For instance, skipping moisture tests before installing a shower pan or neglecting to verify levelness in the corners can set the stage for future failures. Proactively conducting these detailed checks, as we recommend in our detailed articles, is the hallmark of quality craftsmanship.
Are you aware of how these small details might be affecting your home? Have you ever fallen into this trap? Let me know in the comments. Remember, the difference between a good installation and a costly repair often lies in mastering these nuances rather than just following basic instructions.Maintaining a flawless floor or shower installation requires more than just initial effort; it demands the right tools and ongoing care. Personally, I swear by a high-quality laser level for ensuring perfect flatness—nothing else provides such precision over large surface areas. For example, when leveling subfloors for laminate or carpet, I use a rotary laser level like the Bosch GSL375 to detect even slight irregularities, allowing me to make targeted corrections with self-leveling compounds or shims. These tools are invaluable because they save time and prevent costly future repairs. Additionally, I recommend investing in a moisture meter, such as the Wagner MMC220, for checking subfloor and concrete slab moisture levels before installation. It’s shocking how often moisture problems emerge long after the project is finished when these tests are skipped, leading to mold or floor warping. In my experience, routinely checking for moisture and levelness is crucial, especially in older homes or humid environments. As trends move toward smart home integrations, I anticipate more advanced, app-connected sensors that can monitor floor stability and moisture in real-time, alerting homeowners to potential issues before they escalate. To keep your floors and showers functioning flawlessly over years, I suggest establishing a routine maintenance schedule that includes regular inspections of grout seals, drainage slopes, and subfloor conditions. An often-overlooked step is reapplying waterproof sealants on shower edges every few years, which can dramatically extend the life of your waterproofing efforts. To refine your waterproofing skills, visit our guide on top shower renovation practices. I highly recommend trying a pro tip like using a laser level during each maintenance session to identify any gradual shifts before they become major issues. Incorporating these precise tools and routines into your home improvement regimen not only boosts your confidence but significantly increases your projects’ durability and long-term value. Remember, careful planning combined with the right equipment is the best investment you can make in your home’s longevity.My biggest eye-opener was realizing how overlooked details—like proper subfloor leveling and sealant techniques—can make or break a renovation. Early on, I thought following basic instructions was enough; until I learned that even minor imperfections could lead to costly repairs months later. Now, I prioritize precision and quality tools, like laser levels and moisture meters, which have transformed my projects from temporary fixes to lasting solutions. This journey taught me that mastering these nuanced skills isn’t just about avoiding problems—it’s about creating a home that endures and impresses.