I’ll never forget the moment I stepped into my living room after a DIY carpet installation gone wrong. The edges curled up, the seams looked terrible, and I knew I had to face the reality that my home’s beauty was compromised. That lightbulb moment made me realize that a professional touch isn’t just a luxury — it’s essential for lasting results. If you’re tired of uneven floors, gaps, or shoddy finishes, you’re not alone. Many homeowners discover too late that rushing into a do-it-yourself project can cost time, money, and peace of mind. Today, I want to share how expert carpet install and flooring solutions can transform your space into a durable, beautiful haven that stands the test of time. Trust me, the difference is night and day.
Why Settling for Less Can Cost You More in the End
When it comes to flooring, I used to think that saving a few bucks by skipping professional help was a smart move. Spoiler: it’s not. Early on, I made the mistake of ignoring the importance of proper floor leveling and underlay, which led to uneven surfaces and frequent repairs. According to a recent industry study, improper installation is the leading cause of premature floor failure, costing homeowners hundreds of dollars in repairs and replacements. The truth is, expert solutions don’t just improve the look—they extend the life of your investment. From high-quality materials to precise installation techniques, professionals can handle tricky spots that DIYers often overlook, such as tight corners or uneven subfloors. If you’re considering a home upgrade, understanding the value of expert craftsmanship is your first step toward a lasting result.
Is Carpet or Laminate the Right Choice for Your Home?
One of the biggest questions I faced was whether to opt for plush carpet or sleek laminate flooring. Each has its perks—and pitfalls. While laminate offers durability and easy maintenance, a poorly installed floor can lead to gaps and squeaks. Carpet, on the other hand, adds warmth and comfort but requires careful installation to prevent wrinkling or uneven edges. I learned the hard way that rushing through the installation process without professional guidance can turn a beautiful upgrade into a headache. To avoid this, I explored expert tips and trusted sources, like the comprehensive guides offered by Floor Craft, which walk you through the nuances of each option. Whether you’re dreaming of a cozy living room or a modern, sleek bathroom upgrade, choosing the right material and installation method makes all the difference. Curious about the best flooring for your space? Check out [this detailed guide on laminate flooring and showers](https://floorcraftstore.com/top-laminate-flooring-showers-renovations-for-durable-home-upgrades), which covers everything from selection to installation.
Now that you understand the stakes, let’s dive into the practical steps that will help you achieve flawless, durable flooring with expert help. Ready to transform your home into a showcase of beauty and resilience? Let’s get started.
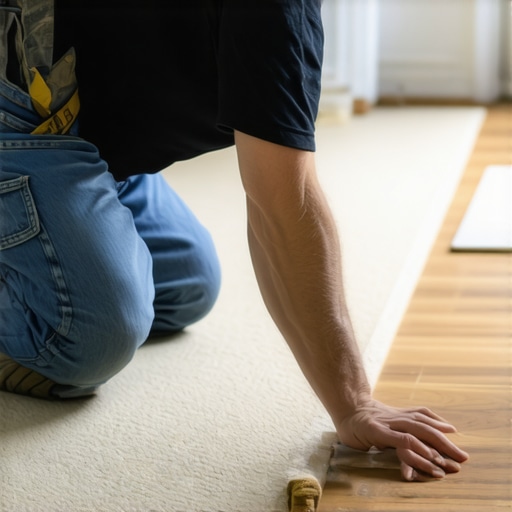
Prepare Your Subfloor Like a Pro
Before laying down new carpet or laminate, ensure your subfloor is perfectly level. I remember when I attempted to install laminate myself, I skipped thorough leveling and ended up with squeaky, uneven flooring. To avoid this, I used a self-leveling compound, which acts like a thick pancake batter spreading out smoothly across the surface. Apply it with a trowel, and wait for it to cure fully. This creates a flat foundation, much like a smooth canvas for a painting, improving durability and appearance. For detailed tips, visit expert floor leveling guides.
Precision Cutting and Fitting
Accurate measurements are critical. I once measured a doorway twice, cut once, and still managed a perfect fit on the first try, thanks to a good carpenter’s square and a sharp utility knife. Use a chalk line to mark cut lines clearly, then cut slowly and steadily. For intricate corners or irregular spaces, a jigsaw or laminate cutter works best. Remember, tight fits prevent gaps, which can lead to tripping hazards or water intrusion, especially around showers. For high-quality cutting tips, check laminate cutting techniques.
Seamless Installation Techniques
Joining sections seamlessly is an art. When I installed my carpet, I used a seam roller to press the edges together, ensuring the seam was invisible. For laminate, click-lock systems make installation straightforward, but alignment is key. I laid pieces out beforehand to visualize the pattern, then connected them carefully, locking each plank into the next. This prevents shifting and squeaking over time. For professional advice on seamless flooring, explore seamless installation tips.
Proper Underlay and Adhesives
Underlay acts like a cushion and insulator, extending your floor’s life. I used a foam underlay for my laminate, which reduced noise and added comfort, much like walking on a plush carpet. For carpets, a high-quality tack strip around the edges secures the material tightly. When using adhesives, follow manufacturer instructions precisely to prevent bubbling or lifting. In bathrooms or showers, waterproof membranes underneath are essential to prevent water damage. For comprehensive guidance, see underlay and adhesive strategies.
Finish and Seal the Edges
Finish your installation by sealing edges with appropriate trim or baseboards. I learned this lesson the hard way when a gap appeared at the room’s corner due to expansion. Applying a flexible sealant or quarter-round molding hides these gaps and prevents debris buildup. In wet areas like showers, waterproof sealants around edges ensure longevity. Proper sealing transforms a DIY job into a professional-looking finish. For detailed finishing techniques, visit finishing and sealing tips.
Many homeowners believe that a straightforward DIY approach will save money and time, but in reality, there are nuanced pitfalls that can turn a simple project into a costly mistake. For instance, one common myth is that flooring materials like laminate or carpet are foolproof to install without professional help. However, the truth is that even high-quality flooring can suffer from premature failure if not installed correctly, especially when it comes to precise measurements and proper subfloor preparation. This is why consulting expert guides, such as those offered by floor leveling experts, can make a significant difference in the longevity of your floors.
Another hidden nuance often overlooked is the importance of moisture management in showers and bathroom renovations. Many assume waterproofing membranes are optional or can be DIY-ed with a quick fix, but improper sealing can lead to water damage, mold, and expensive repairs down the line. Installing waterproof membranes correctly requires understanding the subtle differences between various products and techniques, which is why trusting professionals in shower waterproofing is essential for durability.
What Advanced Homeowners Often Miss in Floor Leveling
One of the most overlooked aspects in flooring projects is the critical role of subfloor preparation. While many focus on the visible surface, improper leveling or neglecting minor subfloor imperfections can cause squeaks, uneven surfaces, and even damage over time. For advanced DIYers or those seeking a professional finish, understanding the importance of high-quality underlayment and precise leveling techniques is key. Research indicates that poor subfloor preparation accounts for up to 70% of early flooring failures, underscoring the need for meticulous attention to detail. For comprehensive guidance, explore floor leveling strategies that go beyond the basics.
In addition, many fall into the trap of rushing measurements or using subpar tools, leading to gaps and misalignments. Using tools like a chalk line and a carpenter’s square with precision ensures seamless joints and professional finishes. Remember, the devil is in the details, especially when fitting around intricate corners or uneven walls. For expert measurement tips, check out measurement accuracy advice.
Finally, advanced homeowners should consider the subtleties of sealing and finishing. Proper sealing of edges, corners, and seams prevents debris buildup and water intrusion, especially in wet areas like showers. Skipping this step or using generic sealants can undermine your entire project’s durability. To master this craft, consult detailed finishing guides available at finishing techniques. Remember, these small details elevate your work from DIY to professional-grade quality.
Have you ever fallen into this trap? Let me know in the comments.
Keeping your flooring and shower installations in top shape requires more than just a good initial setup. Investing in the right tools and adopting proactive maintenance routines can dramatically extend the life of your home upgrades. From flooring tools that ensure precision to cleaning and inspection practices, I’ll share my personal recommendations that have helped me maintain my renovations flawlessly over the years.
Invest in Quality Measuring and Cutting Equipment
Accuracy is everything when it comes to flooring and shower installations. I personally rely on a high-quality laser distance meter because it provides instant, precise measurements without the hassle of manual tape measures. This tool minimizes errors—especially in tricky corners or irregular spaces—and saves time. For cutting, I prefer a fine-tooth laminate saw or a sharp utility knife paired with a carpenter’s square. These allow me to make clean, accurate cuts that fit perfectly, avoiding gaps or the need for costly adjustments later. Using top-tier tools like these has made a noticeable difference in my long-term satisfaction with my flooring projects.
Maintain Your Flooring with Proper Cleaning and Inspection
Keeping laminate and carpet floors looking their best involves routine cleaning with gentle, floor-specific products that won’t damage the surface. For laminate, I recommend a microfiber mop and a pH-neutral cleaner, which preserves the protective layer and prevents dullness. Carpets benefit from regular vacuuming with HEPA filters to remove dust and allergens, extending their lifespan. Additionally, inspecting for wear or damage every few months helps catch issues early. For showers, I use waterproof sealants and check grout joints periodically, reapplying sealant as needed to prevent water intrusion. These small habits maintain the integrity of your investments and avoid costly repairs down the line.
Keep Tools Sharp and Well-Maintained
A dull utility knife or saw can cause uneven cuts and damage your materials. I sharpen my blades regularly with a honing stone, which improves precision and makes the cutting process safer. Power tools like drills and jigsaws should be cleaned after each use and lubricated according to the manufacturer’s instructions. Proper maintenance of your tools ensures they operate efficiently and last longer, saving you money in the long run. For complex projects like installing showers or leveling uneven floors, I also recommend having a reliable moisture meter. It helps monitor humidity levels during installation, ensuring adhesives and membranes cure correctly for lasting durability.
Plan for Future Upgrades and Repairs
Modern trends suggest that home upgrades should be scalable. I plan my projects with future maintenance in mind, choosing materials and tools that allow easy repairs or upgrades later. For example, I install removable trim around showers to facilitate re-sealing or tile replacement without damaging the surrounding surfaces. Regular inspections and keeping a kit of spare parts—like extra grout, sealant, or replacement planks—can save you significant time and money. Staying ahead with maintenance not only preserves your investment but also makes future renovations smoother and more cost-effective.
What About Long-Term Results and Scaling?
Looking ahead, I believe the trend is moving toward smart maintenance solutions. Automated moisture sensors and smart cleaners are becoming more accessible, enabling homeowners to monitor their floors and showers remotely. As these technologies evolve, integrating them into your routine can provide peace of mind and ensure your home remains beautiful and functional for years to come. To stay ahead, I recommend exploring tools like digital moisture meters and investing in durable, future-proof materials. For more detailed insights, check out expert-level flooring maintenance tips.
Don’t wait for problems to arise—start implementing these tools and habits today. For instance, try sharpening your utility knife before your next project, and notice how much smoother your cuts become. Small steps like these make a big difference over time. Your home’s longevity and your peace of mind depend on it.
The Hardest Lesson I Learned About Flooring and Showers
One of my biggest takeaways was realizing that rushing through measurements often leads to costly mistakes. I once hurriedly cut a plank without double-checking, which resulted in a gap that was a nightmare to fix. Patience and precision are key, especially when fitting around tight corners or uneven walls. Trust me, taking the time to measure twice—and even thrice—saves both time and money in the long run.
The Myths That Held Me Back in Home Renovations
I used to believe that any waterproofing membrane would do the trick in showers. It turns out, not all membranes are created equal, and improper installation can cause water damage years down the line. Learning from expert guides and choosing the right waterproofing strategies has been a game-changer. Don’t cut corners on waterproofing—your future self will thank you.
What Experts Don’t Usually Say About Floor Leveling
Many overlook the importance of a perfectly level subfloor. I learned that even the smallest imperfections can cause squeaks, uneven surfaces, or premature wear. Investing in high-quality underlayment and using a laser level made my installation not only easier but also more durable. Remember, the foundation of your flooring is everything—skip it at your peril.
Cornerstone Resources That Changed My Approach
Some tools and guides truly made a difference in my renovation journey. I swear by a laser distance meter for accurate measurements—it’s a small investment that pays off in perfect cuts. For detailed tutorials, I recommend expert floor leveling guides, which demystify the process and prevent common pitfalls. Additionally, trusted brands like Premier Carpet and Showers provide quality materials that ensure longevity and style.
Embrace Your Home Growth Journey
Remember, every renovation is a step toward creating a space you love. Don’t let fear hold you back from trying new techniques or tools. With patience, proper planning, and trusted resources, you can achieve professional results that last. The future of your home’s beauty and durability is in your hands—so take that first step today.
What part of your flooring or shower renovation are you most excited to tackle? Let me know below!