I’ll never forget the moment I realized my bathroom upgrade was heading south. I had grand plans for a sleek, modern look—new laminate flooring, a stunning shower, the works. But after weeks of frustration, I was left with uneven floors and a shower that dripped constantly. It was a wake-up call. Turns out, rushing the renovation without proper planning or understanding can turn your dream space into a maintenance nightmare.
Why Upgrading Your Bathroom and Flooring Matters Now More Than Ever
In 2024, home upgrades aren’t just about aesthetics—they’re about durability, functionality, and adding lasting value. The pandemic shifted priorities, making us all more aware of the spaces we live in and how they serve us daily. Investing in quality laminate flooring and showers isn’t just a luxury; it’s a smart move for homeowners who want to enjoy their spaces for years to come. When done right, these upgrades can transform your home into a sanctuary of comfort and style, all while boosting property value.
Have you ever faced the frustration of a renovation gone wrong?
Trust me, I’ve been there. My initial mistake was ignoring the importance of proper subfloor preparation, which caused my laminate flooring to warp over time. It’s a common pitfall. If you’re considering a bathroom renovation, understanding the critical steps—like waterproofing and precise leveling—is key. You don’t want to repeat my error and find yourself tearing things out again.
Luckily, there are proven strategies and expert tips that can help you avoid these pitfalls. From choosing the right waterproofing solutions to selecting durable, easy-to-install laminate flooring, this guide will set you up for success. If you’re ready to create a stylish, long-lasting upgrade that truly enhances your home, keep reading. We’ll walk through the essential steps to ensure your project is a success, not a costly mistake.
How to Ensure Your Renovation Lasts and Looks Stunning
Start with a Solid Foundation
Before you even think about choosing fancy fixtures or stylish laminate, focus on the subfloor. A common mistake is skipping proper leveling, which leads to uneven floors that warp over time. I once rushed this step and ended up with a laminate floor that creaked and warped within months. To avoid this, use a high-quality self-leveling compound and follow the expert tips available at this guide. Proper leveling not only ensures durability but also provides a smooth surface that enhances the overall aesthetic.
Choose Waterproofing Solutions That Last
Waterproofing is the backbone of a long-lasting bathroom upgrade. For 2024, the top waterproofing solutions involve liquid membranes and advanced membrane sheets. I recommend inspecting the latest products and techniques at this resource. When I renovated my bathroom, I applied a liquid waterproofing membrane along the shower walls and floor, ensuring no leaks or mold growth in the future. Remember, meticulous waterproofing is your best defense against water damage and costly repairs.
Select the Right Laminate Flooring for Durability
Not all laminate is created equal. In 2024, look for products with high AC ratings (at least AC3 or higher) and water-resistant features. I tested several samples and found that thicker, textured laminates mimic real wood better and resist scratches more effectively. For expert advice, visit this article. During my project, I installed a durable laminate with a click-lock system that made the process straightforward and ensured a tight seal, preventing water intrusion.
Level Floors Precisely for a Seamless Look
Floor leveling isn’t just an optional step; it’s essential. I learned this the hard way when unevenness caused gaps and an unstable feel. Use a laser level and follow expert tips from this guide. Proper leveling guarantees that your laminate and tiles sit flush, creating a sleek, professional finish that lasts years.
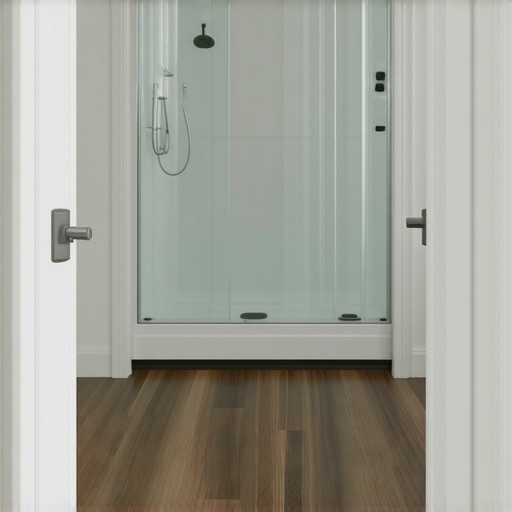
Install Showers with Precision
Shower installation has evolved with innovative designs and waterproofing techniques. I opted for a modern, low-profile shower pan combined with a waterproof barrier behind the tiles, as recommended in this resource. The key is sealing all joints and edges meticulously. During my install, I used a quality sealant and checked for leaks with water tests, saving me from future headaches.
Attention to Detail Ensures Longevity
Every step, from subfloor prep to finishing touches, impacts the final outcome. Don’t cut corners on critical phases like sealing corners and edges or choosing quality fixtures. When I took my time and followed these core techniques, my renovation resulted in a stunning, durable space that still impresses years later. For comprehensive ideas and product options, explore this collection.
Many homeowners believe that selecting high-quality materials is the sole key to a successful bathroom upgrade. While quality is important, the real nuance lies in understanding the often overlooked details that make or break long-term durability and aesthetic appeal. One of the most common myths is that applying waterproofing as a final step is enough to prevent water damage. In reality, waterproofing must be integrated carefully throughout the entire installation process, including behind tiles and around fixtures, to ensure comprehensive protection.
Another frequent mistake is underestimating the importance of proper subfloor preparation. Skipping precise leveling or ignoring moisture testing can lead to uneven floors and premature warping of laminate or cracking of tiles. Experts suggest using a laser level and moisture meters before starting any installation, which can save you from costly repairs later. For detailed guidance, check out this expert-level flooring tips.
Advanced homeowners often fall into the trap of choosing trendy materials without considering their compatibility with existing plumbing or structural elements. For example, opting for ultra-thin laminate flooring in a wet area without proper waterproofing can result in damage within months. Instead, prioritize materials with high AC ratings and water-resistant features, and always consult professional advice. To explore suitable options, visit this resource on durable laminate choices.
Thinking ahead, many underestimate the importance of proper drainage and slope in shower installations. A slight miscalculation can cause water pooling, mold growth, and structural issues. Advanced installers use a combination of level guides and slope calculations to ensure water flows directly into the drain. For a comprehensive approach, see this expert advice on shower installation.
Have you ever fallen into this trap? Let me know in the comments. Remember, the devil is in the details—taking time to understand these nuances will save you headaches and money in the long run. Whether it’s meticulous waterproofing, precise leveling, or thoughtful material selection, mastering these advanced aspects elevates your renovation from good to exceptional.
Keep It Running: Tools I Recommend for Effective Maintenance
Maintaining your bathroom renovation results over time requires the right tools and a proactive approach. One of my go-to tools is a digital moisture meter, which I use regularly to monitor moisture levels behind tiles and in subfloor areas. This helps prevent hidden water damage that can compromise your investment. I personally prefer models like the Protimeter Surveymaster because of its accuracy and ease of use, allowing me to detect issues early before they escalate into costly repairs.
Another essential is a high-quality caulking gun paired with silicone sealant suitable for bathrooms. I rely on a professional-grade gun to ensure smooth, even application, which is critical around shower edges and fixtures. Using a reputable sealant like GE Silicone II, I can seal gaps effectively, preventing water ingress and mold growth.
For routine cleaning and upkeep, I recommend a microfiber cloth and pH-balanced cleaners designed specifically for laminate and tile surfaces. They help preserve the finish and prevent scratches or discoloration over time. Regularly inspecting grout lines and reapplying sealant as needed can extend the life of your waterproofing efforts.
Investing in a handheld grout removal tool makes maintenance easier by allowing you to refresh grout lines without damaging surrounding tiles. This simple step can significantly improve the longevity of your bathroom’s aesthetic.
Looking ahead, the trend is moving toward smart maintenance solutions. Devices that can sync with your smartphone to alert you about moisture levels or sealant degradation are becoming more affordable and accessible. These innovations will help homeowners catch problems early, saving money and preserving their renovations longer.
How do I maintain my bathroom upgrades over time?
To keep your bathroom looking and functioning like new, schedule regular inspections of waterproof seals, grout integrity, and subfloor moisture levels. Use your moisture meter periodically, especially after heavy use or water exposure, to catch leaks early. Replace worn-out sealant promptly and avoid harsh chemical cleaners that can degrade surfaces or seals. Consistent maintenance not only prolongs the lifespan of your upgrades but also keeps your home safer and more beautiful for years to come. For comprehensive tips and recommended products, visit this detailed guide. Don’t forget, investing in quality tools now makes routine maintenance easier and more effective, ensuring your renovation’s success endures.
The Hardest Lesson I Learned About Bathroom Renovations
One key insight I wish I had known earlier is the importance of thorough preparation. Rushing into installing laminate flooring without ensuring the subfloor is perfectly level can lead to warping and cracking down the line. That lightbulb moment taught me that patience in the prep stage saves time and money later. It’s tempting to skip steps, but meticulous leveling and moisture testing are your best friends for long-lasting results.
How I Built My Essential Toolkit for Bathroom Upgrades
Over time, I curated a set of tools that make renovation smoother and maintenance easier. My favorite is the digital moisture meter, like the Protimeter Surveymaster, which helps catch hidden water issues early. A high-quality caulking gun and silicone sealant, such as GE Silicone II, are indispensable for sealing joints and edges. For routine cleaning, a microfiber cloth and pH-balanced cleaners keep surfaces looking fresh. These tools have become my trusted allies in maintaining the beauty and durability of my bathroom upgrades.
Embracing the Future of Bathroom Renovations
If you’re ready to elevate your home with a bathroom upgrade that lasts, remember that attention to detail makes all the difference. From selecting high AC-rated laminate flooring to precise waterproofing and leveling, every step counts. Don’t be discouraged by initial setbacks—each challenge is a learning opportunity that brings you closer to your dream space. Your home’s transformation starts today; take that first step confidently.
What’s the biggest lesson you’ve learned from your renovation projects? Share your experiences below—I’d love to hear your stories!