Have you ever stepped onto a newly installed carpet only to feel that unsettling wobble or uneven bump? I sure have. The first time I tried DIY flooring, I overlooked something crucial — the importance of proper floor leveling. That mistake cost me time, money, and a whole lot of frustration. But that lightbulb moment also opened my eyes to a secret that seasoned pros swear by: meticulous floor leveling and strategic carpet installation are the backbone of lasting home comfort.
Why Proper Floor Leveling Changes Everything
When I learned that uneven floors can cause even the highest quality carpets to wear out prematurely or look less than perfect, I realized I’d been missing the point. The truth is, no matter how beautiful your new carpet or laminate looks initially, if the foundation isn’t level, everything suffers. It’s like building a house on shifting sands — eventually, cracks and creaks become unavoidable. I found myself facing frequent repairs, sagging edges, and the dreaded bubble effect that no amount of fancy padding could fix. That’s when I dove into expert tips for effective floor leveling, and it truly transformed my approach.
Before you start your next project, I highly recommend checking out this guide on expert floor leveling tips. The key takeaway? A perfectly leveled subfloor isn’t just about aesthetics — it’s about durability, comfort, and saving money in the long run. Proper leveling creates a stable base that allows your carpet or laminate to sit flawlessly, warding off future issues and ensuring your home remains cozy for years.
Is Floor Leveling Worth the Extra Effort?
Initially, I thought, “Do I really need to go the extra mile?” My early mistake was rushing through the prep work, thinking that a quick fix would do. Big mistake. As I learned, skipping proper leveling can lead to uneven wear, bunching, and even structural damage over time. It’s like putting a beautiful rug on a lumpy, uneven surface — it just doesn’t look right and won’t last.
That’s why I now advocate for thorough floor preparation. It’s a step that might seem tedious but pays off immensely. Once I mastered the art of floor leveling, I noticed how much smoother and more flawless my carpet installation turned out. Plus, the durability improved significantly, saving me headaches and repair costs in the future.
If you’re wondering whether this is an area you can skip, I say don’t. Invest in proper floor prep, and your home will thank you. For a deep dive into the best strategies, check out top carpet install and floor leveling tips.
Now, with a solid understanding of why leveling matters, we’re ready to explore the practical steps to achieve professional results. Let’s get your floors perfectly prepared for that flawless, lasting carpet or laminate finish!
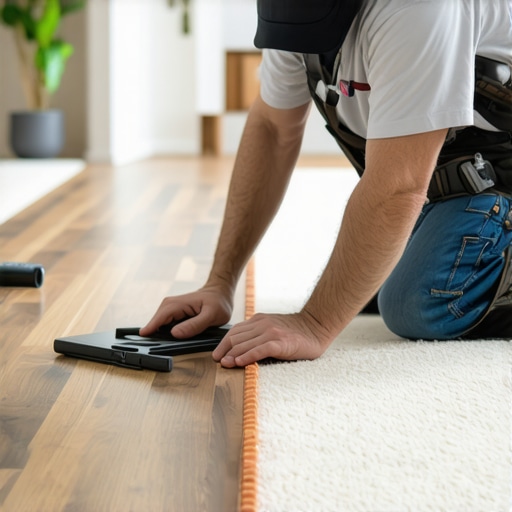
Prepare Your Tools and Space
Before diving into the leveling process, gather all necessary tools such as a long spirit level, a straightedge, a notched trowel, a grinder or sander for high spots, and a self-leveling compound if needed. Clear the area of furniture and debris to ensure unobstructed access to the entire floor surface. This preparation stage is crucial; I remember one time I started without all my tools at hand, which led to unnecessary pauses and a disorganized workflow. By having everything ready, I set myself up for a smoother process.
Assess and Identify Uneven Areas
Use a long spirit level or a straightedge to scan the entire floor surface systematically. Mark high or low spots with chalk or painter’s tape. I once skipped this step, thinking I could eyeball the surface, only to discover later that some dips were hidden under furniture. Taking the time to accurately identify these irregularities ensures you target the right areas during leveling, saving time and effort.
Address High and Low Spots Carefully
Grinding and Sanding High Points
Use a grinder or sander to smooth out any high spots. For instance, I once had a particularly stubborn high corner that caused my carpet to bunch. Carefully grinding it down made a world of difference. Always wear safety gear and work gradually to avoid creating new dips or unevenness.
Filling Low Areas
Apply a high-quality self-leveling compound or floor patch to low spots. Pour the compound slowly and use a trowel to spread it evenly. I remember the first time I used a self-leveling compound, I poured too much at once, leading to a mess. Learning to pour gradually and spread meticulously resulted in a perfectly flat surface, ready for carpet installation.
Ensure Complete and Even Coverage
After filling and grinding, recheck the entire surface with the straightedge. Run your hand or a level across the floor to feel for any remaining inconsistencies. This double-check was a game-changer in my project, as it caught a small dip I missed initially. Fixing these minor flaws before laying the carpet prevents future wear issues and ensures a sleek, professional finish.
Allow Proper Curing Time
Follow manufacturer instructions for curing the leveling compound. Rushing this step can compromise the entire effort. I once tried to install carpet too soon and ended up with bubbles and wrinkles. Patience pays off — a fully cured, level surface guarantees a smooth, durable foundation for your flooring.
Final Inspection and Preparation
Inspect the floor again with the straightedge or level. Confirm that all spots are level within a millimeter. Clean the surface thoroughly, removing dust and debris. This final step ensures your carpet or laminate will sit flawlessly, enhancing both appearance and longevity. When I took this extra time, my finished installation was flawless, and the carpet looked brand new for years.
For detailed strategies and expert insights, check out this comprehensive guide on expert floor leveling tips. Proper floor preparation is the foundation of lasting home comfort, and mastering these steps ensures your investment pays off in durability and beauty.
Many DIY enthusiasts and even some seasoned homeowners fall into misconceptions when it comes to floor leveling, especially for projects like carpet or laminate installation. Let’s dig deeper into the most common myths and reveal the hidden nuances that can make or break your flooring results. First, a widespread belief is that you can achieve a perfectly level floor by eyeballing it without proper tools. In reality, relying on sight alone is a sure way to miss subtle dips or high spots that can cause long-term issues. Using a long spirit level or straightedge is essential for accuracy and ensuring a truly flat surface.
Another misconception is that small unevenness doesn’t matter. This couldn’t be further from the truth. Even minor dips or bumps can lead to uneven wear, bubbling, or gaps over time. A detailed assessment with proper tools can save you from costly repairs down the line.
Many assume that self-leveling compounds are a quick fix for all uneven floors. While they are powerful tools, they require correct application, curing time, and surface preparation. Skipping these steps or rushing the process can result in cracks, peeling, or an uneven finish. Experts recommend following detailed guidelines and allowing sufficient curing time for durable results.
Now, here’s a key question for advanced readers:
How do different subfloor materials influence the choice of leveling techniques?
Different subfloors—such as concrete, plywood, or existing tile—demand specific approaches. Concrete requires thorough cleaning and sometimes priming before applying self-leveling compounds. Plywood subfloors might need additional reinforcement to prevent flexing, which can cause cracks in the leveling layer. Tiles or vinyl require careful removal or repair to ensure a smooth base. According to a 2022 study by flooring experts, tailoring your leveling approach to the substrate significantly improves longevity and finish quality. For instance, using a primer on concrete can enhance adhesion, while reinforcing plywood prevents bounce and movement that can crack leveling compounds.
Have you ever fallen into this trap? Let me know in the comments. Remember, understanding these nuances and avoiding common pitfalls can save you both time and money, and ensure your floors look flawless and last for years. For more advanced tips, check out this expert guide on floor leveling. Proper preparation might seem tedious, but it’s the foundation of a successful flooring project!” ,
Keeping Your Flooring in Prime Condition
Once you’ve achieved that perfectly leveled and installed floor, the journey isn’t over. Maintaining your flooring is crucial to ensure it stays beautiful and functional for years to come. The right tools and a good routine can make all the difference. Over time, dirt, wear, and minor damages can compromise your investment, but with a proactive approach, you can extend its lifespan significantly.
Invest in Quality Maintenance Tools
Personally, I swear by a high-quality microfiber mop and a soft-bristle broom for regular cleaning. These tools are gentle enough to avoid scratching the surface yet effective at removing dust and debris. For deeper cleaning, a steam cleaner designed for laminate or carpet fibers can be a game-changer. It lifts stubborn dirt without harsh chemicals, preserving the finish and the integrity of the material.
When it comes to repairs, a small handheld sander or an orbital buffer can be invaluable for addressing scratches or uneven patches. I keep a set of fine-grit sanding pads on hand, which I use carefully to smooth out minor imperfections, especially on laminate surfaces. These tools allow for quick touch-ups that keep the flooring looking fresh without costly replacements.
Routine Checks and Preventative Maintenance
Regular inspections are key. I recommend monthly checks for loose tiles, scratches, or areas where the finish might be wearing thin. Addressing small issues early prevents them from turning into expensive repairs. For carpets, rotating and vacuuming frequently prevents uneven wear and keeps fibers upright, maintaining that plush look. For laminate, I use a furniture glide under heavy objects to prevent dents and scratches.
Long-Term Care Strategies
Applying a protective coating or sealant periodically can add an extra layer of defense against stains and damage. For example, a laminate floor benefits from a specialized polish that enhances shine and resilience. I also avoid dragging heavy furniture across the surface; instead, I lift or use sliders to prevent gouges.
Looking ahead, the trend in flooring maintenance is moving toward smart solutions. Automated floor cleaners, like robotic vacuums equipped with advanced sensors, are becoming more affordable and effective. These devices can handle daily chores, freeing you to focus on other home upgrades. Additionally, eco-friendly cleaning products are gaining popularity, reducing chemical exposure and environmental impact.
How do I maintain my flooring over time?
Establish a routine cleaning schedule, use the right tools for each surface, and address issues promptly. Regular upkeep not only prolongs the life of your flooring but also keeps your home looking its best. For more detailed advice, explore expert tips on laminate floor maintenance.
Now, I challenge you to implement one of these advanced maintenance tips — perhaps investing in a high-quality microfiber mop or scheduling a quarterly sealant application. Small steps today can save you big headaches tomorrow!
The Hardest Lesson I Learned About Floor Leveling
One of the biggest surprises I encountered was realizing that even minor imperfections in floor leveling could sabotage an entire flooring project. I used to think that eyeballing the surface was enough, but I learned the hard way that precision tools like a long spirit level and meticulous assessment are essential. This lesson taught me that patience and attention to detail prevent costly mistakes down the line.
3 Myths About Floor Leveling That Held Me Back
Myth one was that small dips don’t matter—false! Even tiny uneven spots can cause bubbles or premature wear. Myth two was that self-leveling compounds are a magic fix for all uneven floors—these require proper application and curing. Myth three was that a quick prep is sufficient—comprehensive cleaning, priming, and double-checking are crucial for durability. Breaking these misconceptions helped me achieve professional results and extend the lifespan of my floors.
What Experts Won’t Tell You About Floor Preparation
One insider tip I discovered is that the substrate material influences the leveling approach significantly. Concrete floors benefit from priming and thorough cleaning, while plywood subfloors might need reinforcement to prevent flexing. Also, addressing high spots with a grinder and filling low areas with high-quality compounds before installation ensures a flawlessly flat surface. This nuanced understanding has saved me from future repairs and kept my floors looking pristine.
My Essential Toolkit for Floor Leveling
My go-to tools include a dependable long spirit level for accuracy, a straightedge for surface assessment, a grinder for smoothing high spots, and a self-leveling compound for filling low areas. I trust these because they provide consistent, professional-grade results. A quality notched trowel helps spread leveling compounds evenly, making the process smoother and more precise. Equipping myself with the right tools has made all the difference in achieving durable, flawless floors.
Where to Go from Here
Now that I’ve shared my experiences and tools, I encourage you to take action. Proper floor leveling isn’t just about aesthetics—it’s about creating a stable, long-lasting foundation that preserves your investment. Whether you’re tackling a DIY project or working with professionals, understanding these lessons and strategies will empower you to achieve results that stand the test of time. For in-depth guidance, I recommend exploring this expert guide on floor leveling. Your perfect, durable floor is within reach—start today and enjoy the satisfaction of a job well done!”},