Have you ever stepped into a room and felt that unsettling wobble under your feet or noticed a corner of your laminate floor lifting just enough to catch your eye? That was me a few months ago. I remember the realization hitting me like a ton of bricks — my home’s charm was slipping away with every uneven board and creaky step. It’s frustrating because a beautiful floor isn’t just about looks; it’s about lasting quality and the comfort it provides every day.
Why Your Floor’s Level Matters More Than You Think
When I first faced uneven floors, I underestimated how much it could impact my home’s overall value. Not only does a wobbly or uneven surface diminish aesthetic appeal, but it also affects the durability of your flooring over time. Small imperfections can turn into costly repairs if ignored. Luckily, I discovered that proper floor leveling techniques and laminate tips can make a huge difference, saving money and ensuring your home remains inviting for years to come. Whether you’re planning a renovation or just want to prevent future headaches, understanding these essentials is key.
Is Floor Leveling Really Worth the Hype?
Early on, I made the mistake of skipping the detailed prep work, thinking a quick fix would suffice. That was a costly lesson. Proper leveling isn’t just about aesthetics — it directly influences the lifespan of your flooring. According to experts, uneven subfloors can cause laminate to warp or crack prematurely, reducing your investment’s value. If you’re skeptical, I get it. But trust me, taking the time to learn about the right leveling strategies will pay off in the long run. Want to see how I tackled this? Check out top strategies for flawless home upgrades for comprehensive guidance.
If you’re tired of uneven patches or dealing with creaky floors, you’re in the right place. Over the next sections, I’ll share practical, proven tips for leveling your floors effectively and choosing the best laminate options for durability. Let’s turn that wobbly, worn-out space into a sleek, lasting foundation for your home’s future.
}**image**: null,
Prep Your Subfloor with Precision
Start by thoroughly inspecting your subfloor for high spots, low spots, and cracks. Use a long level or a laser level to identify uneven areas. When I tackled my living room, I rented a rotary laser level to get a precise read on the entire surface. This helped me visualize the problem areas clearly and plan my approach, ensuring a smooth foundation for your laminate.
Apply Self-Leveling Compound Correctly
Once you’ve pinpointed uneven spots, mix a self-leveling compound according to the manufacturer’s instructions. Pour it over the low areas, spreading evenly with a trowel or squeegee. I learned that working in small sections prevents the compound from drying too quickly, which can lead to uneven patches. After drying, sand down any excess to create a perfectly flat surface. This step is critical; a level subfloor can be the difference between a durable finish and future buckling.
Secure and Reinforce Your Subfloor
Check for loose panels or squeaky spots and reinforce them with screws or nails. For my project, I used a drill to secure loose plywood sheets, aiming for screws every 6 inches along the edges and every 12 inches in the center. This prevents future movement that can cause unevenness or creaking. Think of your subfloor like a sturdy base for a sculpture—if it’s shaky, the whole structure suffers.
Seal and Protect the Surface
Add a vapor barrier or moisture-resistant membrane if your space is prone to humidity. This extra layer guards against moisture that can warp your laminate over time. I installed a polyethylene sheet beneath my laminate, following the steps outlined in the laminate tips for durability. Proper sealing preserves your investment for the long haul.
Select the Right Laminate Flooring
Pick a laminate with a high AC rating—aim for AC3 or higher for living rooms and high-traffic areas. When I selected my flooring, I checked reviews and the manufacturer’s specifications, opting for a product rated for commercial use. This choice paid off, as the floor has resisted scratches and dents despite heavy foot traffic.
Prepare for Installation
Leave a ¼-inch gap around the perimeter for expansion. Use spacers during installation to maintain this gap. I used a simple set of plastic spacers, which made it easy to keep consistent spacing. This prevents buckling as the room temperature fluctuates.
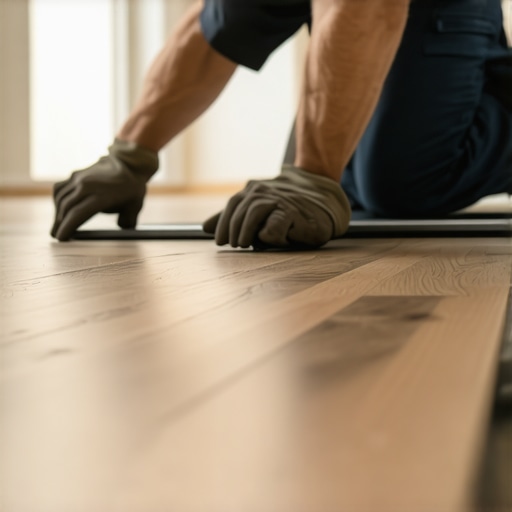
Lay Down the Laminate with Care
Start in a corner and work your way across, locking planks tightly together. Use a tapping block and a hammer to snug each board into place without damaging the edges. I found that taking my time and checking each row for tightness ensured a seamless look. Remember, patience here saves you from costly fixes later.
Finish with Proper Trimming and Sealing
Install baseboards or shoe molding to cover expansion gaps. Use a saw to cut molding precisely and nail it securely. This final step not only improves aesthetics but also keeps the floor stable and protected from dirt and moisture ingress.
By following these detailed steps, I managed to transform my uneven, creaky floor into a sleek, durable surface that enhances my home’s value. For more advanced techniques, explore the top strategies for a flawless upgrade or dive into expert advice on laminate flooring tips for lasting durability.
While many DIY enthusiasts and even some professionals share a basic understanding of floor leveling, there are several misconceptions that can lead to costly mistakes. One prevalent myth is that all uneven floors can be fixed with a quick application of self-leveling compound. In reality, this approach is only suitable for minor imperfections and requires a well-prepared subfloor to ensure durability. Ignoring deeper structural issues, such as warped joists or unstable subflooring, can result in future cracks or buckling, despite initial leveling efforts. To avoid this trap, it’s crucial to thoroughly inspect the subfloor for underlying problems before applying any leveling solutions. For comprehensive guidance on identifying and addressing these issues, check out the top strategies for a flawless upgrade.
Another common misconception is that flooring underlayment isn’t necessary when leveling. Some believe that applying a leveling compound directly on an uneven surface will suffice. However, this can lead to problems such as moisture buildup or inadequate support, which compromise the longevity of your laminate or carpet. Proper preparation often involves installing a vapor barrier or moisture-resistant membrane, especially in high-humidity areas, to protect your flooring investment. For expert advice on preparing your subfloor, explore the laminate tips for lasting durability.
Why Skipping the Details Can Be Costly Let’s Dig Deeper
Many underestimate the importance of meticulous measurement and proper tool use during the leveling process. Using an inadequate level or rushing through measurements can result in uneven surfaces that look fine at first glance but cause long-term issues like creaking or cracking. Advanced techniques, such as laser leveling, provide greater accuracy but are often overlooked by beginners. A study by the National Association of Home Builders emphasizes that precision during initial inspections significantly reduces future repair costs. Therefore, investing time and effort upfront in proper subfloor assessment and preparation is crucial for durable, high-quality results. Want to master these advanced techniques? Dive into the expert tips for long-lasting upgrades.
By understanding these hidden nuances and avoiding common myths, you can save money and ensure your flooring stands the test of time. Remember, a well-leveled floor isn’t just about aesthetics — it’s the foundation of your entire home’s comfort and value. Have you ever fallen into this trap? Let me know in the comments!
Maintaining your floor leveling efforts over time requires more than just initial work; it involves using the right tools consistently and adopting a strategic maintenance routine. In my experience, investing in quality equipment and understanding proper upkeep can dramatically extend the lifespan of your perfectly leveled floors. One of my go-to tools is a laser level, specifically the Bosch GLL 55. I personally prefer this model because it offers high accuracy and self-leveling features that make ongoing inspections quick and reliable, ensuring I catch any shifting or uneven spots early on.
Another essential tool I recommend is a sturdy rubber mallet. It’s perfect for gently adjusting laminate planks during installation and periodic checkups without damaging the material. For long-term care, I keep a vacuum with soft brushes handy to remove debris that can settle into cracks or gaps, preventing dirt buildup that might compromise the integrity of your surface.
Beyond tools, regular inspections are critical. Use your laser level monthly to verify the surface remains even, especially in high-traffic or humid areas where movement is more likely. Applying a protective sealant annually helps guard against moisture damage that can warp or lift your flooring over time. This simple step can save you from costly repairs down the line.
Looking ahead, I believe the trend of smart maintenance tools will grow. Imagine integrating IoT-enabled sensors that continuously monitor your floor’s levelness and notify you via smartphone app when adjustments are needed. This proactive approach will make keeping your floors in top condition more effortless and precise.
How do I maintain floor leveling over time?
Consistent inspection is key. Use your laser level or a high-quality spirit level to check for uneven spots every few months, especially after extreme weather changes. Address minor issues immediately with spot repairs, such as reapplying self-leveling compound or tightening loose fasteners. Additionally, keep your subfloor dry and clean, and consider installing a moisture barrier if humidity fluctuates significantly in your space. These simple yet effective practices will help preserve your investment and prevent small problems from becoming major repairs. For expert advice on long-lasting results, visit this guide. Don’t forget to try out a laser level for your routine inspections; it’s a game-changer in maintaining perfect floor levelness over the years.
The Hardest Lesson I Learned About Floor Leveling
- Initially, I thought a quick application of self-leveling compound would fix everything, but I ignored deeper structural issues like warped joists. This mistake taught me that thorough subfloor inspection is essential for long-lasting results.
- Overconfidence in DIY tools led me to underestimate the importance of precision. Investing in a laser level and quality fasteners saved me from future headaches and costly repairs.
- Skipping moisture barriers seemed harmless at first, but I learned that in humid areas, sealing your subfloor is crucial to prevent warping and buckling over time.
- My biggest lightbulb moment was understanding that proper preparation and attention to detail in every step can turn a wobbly, creaky floor into a sleek, durable surface that boosts my home’s value.
My Essential Toolkit for Floor Leveling and Durability
- Bosch GLL 55 Laser Level: I trust this for its high accuracy and ease of use during inspections and installation, ensuring my floors stay perfectly level over time.
- Sturdy Rubber Mallet: Perfect for gently adjusting laminate planks without damage, making the installation process smoother and more precise.
- Vacuum with Soft Brushes: Keeps debris out of cracks and gaps, preventing dirt buildup that can compromise the integrity of your flooring.
- Moisture Barrier Sheets: Essential for areas prone to humidity; I always include them to safeguard my investment and extend my floors’ lifespan.
Your Turn to Try
Achieving a perfectly leveled, durable floor is within your reach if you pay attention to detail, invest in the right tools, and understand the importance of thorough preparation. Remember, a solid foundation is the key to a beautiful and lasting home. Are you ready to turn your uneven floors into a showcase of craftsmanship? Share your thoughts or questions below and let’s build something great together!
,