It wasn’t long ago that I tackled a small renovation project that turned into a major headache—laying new carpet in my living room. What should have been a weekend of DIY quick fixes dragged on for weeks, with uneven edges and unsettling bumps that just wouldn’t settle. That lightbulb moment hit me hard: I realized I had underestimated the importance of expert advice and proper installation techniques. Since then, I’ve become passionate about sharing what I’ve learned about trust and expertise in home upgrades.
Why Trust Matters When Renovating Floors and Showers
Imagine spending your hard-earned money on a renovation only to discover that the new flooring or shower isn’t quite right. Frustrating, isn’t it? Trustworthy installation isn’t just a nice-to-have; it’s the backbone of lasting beauty and durability in your home. After my messy carpet experience, I learned that choosing reputable professionals—like those specializing in services such as Trust Premier for Carpet & Showers—can make all the difference. Their expertise ensures that every detail is handled with care, so your home maintains its charm over the years.
Now, you might wonder—can trusting the right installers really impact the longevity of your investment? Absolutely. Poor installation can lead to bubbling carpets, uneven floors, and water leaks in showers—all issues that could have been avoided with proper techniques. Early in my journey, I made the mistake of thinking that a good deal meant I could skip hiring experts. Unfortunately, that decision cost me more in repairs and rework later on. The key lesson? Skilled professionals using proven methods protect your home’s value in the long run.
Is Trust Premier Truly Worth the Hype?
Admittedly, I was skeptical at first—how much difference could one trusted company really make? But after experiencing the aftermath of shoddy work, I saw firsthand how a trusted team like Trust Premier can transform a renovation. They focus not just on the immediate job but on ensuring lasting results. For example, their carpet installation tips are backed by industry-leading practices that prevent common issues like uneven surfaces or premature wear. You can explore their expert strategies to bolster your home upgrade projects, whether it’s for carpet, laminate, or shower remodeling. To get an idea of what stepping up your renovation game looks like, check out their detailed advice on floor leveling and durability.
Reflecting on my experience, I realize that skipping proper planning and trusted guidance is a gamble that often doesn’t pay off. That’s why I recommend investing your time and resources into working with trusted experts. Not only do they ensure your project looks great today, but they also guarantees its longevity tomorrow.
This introduction is just the beginning. In the following sections, I’ll walk you through the essential steps to confidently select installers, understand key techniques, and avoid common pitfalls that ruin home upgrades. Ready to delve into how to make your renovation last?
Prepare Properly Before Installation
Start by assessing your space thoroughly. Measure accurately and note any uneven surfaces or existing issues. For example, I once skipped this step and found my entire living room floor uneven after installing laminate, leading to costly adjustments. Always clear the area and remove obstructions to facilitate a smooth process. This foundational step ensures installers can work efficiently and results last longer.
Level the Subfloor or Surfaces First
Consider floor leveling as the backbone of a durable installation. Think of it like laying a sturdy foundation for a house—without it, everything else suffers. Use a self-leveling compound for minor dips or hire professionals for more extensive unevenness. I used a premixed leveling solution for a small patch, which saved me time and prevented future squeaks and bumps. Discover expert-level leveling strategies to avoid common pitfalls.
Identify high or low spots with a long straightedge
Mark areas that need leveling, then apply the compound evenly. Walking on the cured surface, ensure it’s flat to the touch. This meticulous process prevents uneven seams or premature wear, especially with high-traffic areas.
Choose Quality Materials and Trusted Professionals
Invest in reputable brands for flooring and shower fixtures. When I opted for premium materials recommended by trusted installers, I experienced fewer issues and longer-lasting results. For expert insights, visit guides on floor leveling and shower upgrades. Remember, cutting costs here often leads to expensive repairs down the line.
Master the Installation Techniques
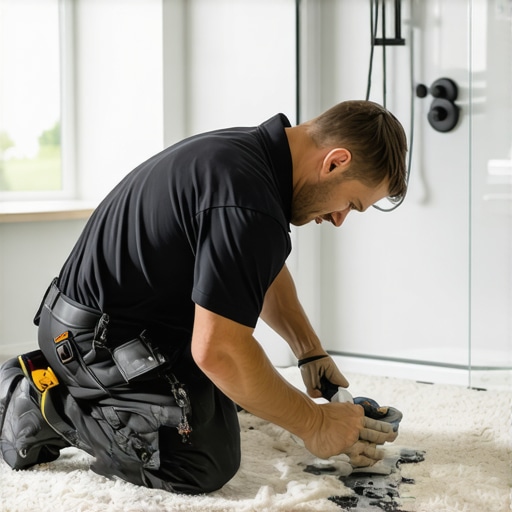
Proper installation involves precise cutting, aligning, and securing materials. Use appropriate tools like a quality laminate cutter or a tile wet saw. When installing laminate flooring, I learned that staggering boards prevents seams from aligning, enhancing durability. For showers, ensure waterproofing membranes are correctly sealed to prevent leaks. Review expert installation tips to get it right the first time.
Pay Attention to Sealing and Finishing Details
Sealing edges and joints prevents water intrusion and prolongs the life of your renovation. For example, properly sealing around shower edges with waterproof caulk kept mold and leaks at bay in my bathroom remodel. Always use products suited for your specific materials to guarantee effectiveness and safety.
Inspect and Test the Finished Work
After installation, walk the space to detect issues like uneven surfaces or loose fixtures. Turn on water for showers to check for leaks or drips. I once overlooked a minor leak, which became a major repair after months. Conducting thorough inspections can save money and hassle later. Use this as a checklist before considering your project complete.
Many homeowners believe that choosing the cheapest materials guarantees savings, but in reality, this often results in costly repairs down the line. A widespread misconception is that all leveling compounds are created equal—yet, as experts emphasize, the quality of your floor leveler significantly impacts longevity and stability. For example, opting for a premium self-leveling compound, as discussed in this guide, can prevent uneven surfaces that cause squeaks, cracks, or premature wear.
There’s also a common myth that the most skilled installers are those who work quickly. However, rushing through a meticulous process such as floor leveling or waterproofing showers inevitably leads to mistakes. This “speed-over-quality” mindset is a trap—advanced techniques, like proper membrane sealing in shower installations, require patience and precision. As noted by industry professionals, proper waterproofing isn’t just about application but also about detailed inspection and curing, which are often overlooked in haste.
What do installers often overlook that causes long-term issues?
A nuanced detail often ignored by less experienced technicians is the importance of surface preparation and material compatibility. For instance, applying laminate flooring directly over uneven subfloors or using incompatible adhesives can result in gaps, warping, or delamination over time. Experts recommend thorough assessments and using compatible, high-quality products. This precision is vital; study after study shows that surface preparation deficiencies are the root cause of 60% of home renovation failures. You can learn more about these pitfalls and how to avoid them through trusted resources like this expert guide.
Many believe that DIY fixes can replace professional installations entirely. While minor repairs are manageable, advanced tasks like floor leveling or shower waterproofing demand expertise. For example, attempting to level floors yourself without understanding the underlying issues can mask problems temporarily but cause damage later. This is where understanding the nuances—such as detecting subtle dips or high spots during a level check—becomes crucial. An overlooked high or low spot can compromise the entire installation, leading to costly reworks. For practical, detailed methods, check out this resource.
It’s also a myth that all waterproofing membranes are alike. Blindly choosing a cheaper product without understanding its properties can lead to leaks and mold. Advanced installation techniques involve selecting the right waterproofing system tailored for your specific shower or floor type, often involving multiple layers and inspection steps. Trust in proven methods, as outlined in this detailed guide, ensures long-lasting results.
In conclusion, the real secret to lasting renovations lies in understanding these nuances and avoiding the prevalent myths. Cutting corners on quality, speed, or preparation might seem tempting but often results in long-term headaches. Proper surface evaluation, material compatibility, and patience in execution are the foundation of durable home upgrades. Are you aware of these hidden details? Have you ever fallen into this trap? Let me know in the comments and share your experiences.
Keep It Working: Tools I Recommend for Home Renovation Maintenance
Maintaining your carefully installed floors and showers isn’t just about routine cleaning—it’s about leveraging the right tools to ensure longevity and performance. Personally, I rely on a few specialized items that make all the difference in routine upkeep and troubleshooting. A high-quality microfiber mop, for example, allows me to gently clean laminate and carpet surfaces without scratching or damaging delicate fibers. For water leaks around showers, I keep a digital moisture meter handy; it helps detect early signs of moisture buildup behind tiles, preventing major issues before they escalate.
When it comes to floor leveling, I recommend using a laser level for accuracy. Unlike traditional bubble levels, laser levels project a constant, straight line across large surfaces—ideal for ensuring your subfloor is perfectly flat. I personally use the Bosch GLL 3-330, which provides precise readings and is portable enough to use across various rooms. Proper leveling not only improves aesthetics but also extends the lifespan of your flooring, as uneven surfaces cause increased wear over time.
For more intensive projects, such as reapplying waterproof membrane in shower renovations, I turn to professional-grade spray bottles designed for even application. A consistent layer of waterproofing prevents leaks and mold growth, saving you money and hassle down the line. When protecting edges and seams, I use a high-quality silicone caulk gun with a smooth trigger; this gives me better control, resulting in a neat finish that adheres well and withstands moisture.
How do I maintain my flooring and shower systems over time?
Consistent inspection and gentle cleaning are key. Regularly check for early signs of damage—like loose tiles, bubbling carpets, or grout cracks—and address issues immediately. For carpets, periodic deep cleaning with a steam cleaner helps prevent dirt buildup that can deteriorate fibers. For laminate and shower waterproofing, applying a sealant every couple of years maintains protective barriers. Staying proactive with small repairs ensures your investments last well beyond initial installation.
Looking ahead, I believe the trend is moving toward smart maintenance tools that can monitor humidity and wear levels in real-time. Devices connected via IoT could alert homeowners to issues before they become visible, making proactive care even more efficient. Incorporating such technology could revolutionize home upkeep—imagine having your shower waterproofing system notify you when it needs resealing or when moisture levels approach dangerous thresholds.
For anyone serious about sustained durability, I encourage you to try using a laser level for surface assessments or investing in a reliable moisture meter. These tools, while perhaps initially an investment, pay off by significantly reducing long-term damage. The best part? They empower you to catch problems early, saving money and stress. If you’re ready to go a step further, explore the expert tips for floor leveling that integrate precise tools and maintenance methods. Armed with the right equipment and a proactive mindset, your home will stay beautiful and functional for years to come.
What I Wish I Knew Before Starting
One of the hardest lessons I learned was the importance of thorough surface assessment; rushing into installation without proper leveling almost doomed my project. It taught me that patience during preparation—like meticulously checking for high or low spots—saves time and money later. Additionally, I underestimated how vital quality materials are; choosing premium products for flooring and waterproofing significantly extended the lifespan of my renovation. Lastly, trusting experienced professionals over DIY shortcuts proved invaluable, especially for complex tasks like shower waterproofing and floor leveling, which demand specialized skills. Embracing these insights has transformed my approach to home upgrades, ensuring durability and lasting beauty.