The ‘Trowel Notch’ Mistake That Leads to Hollow Shower Tiles
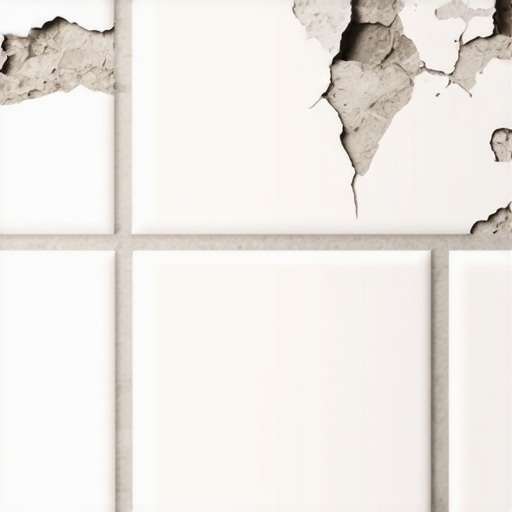
I spent three days grinding concrete on a job last month just so the floor wouldn’t click like a castanet. Most guys skip the leveling compound. They think the underlayment will hide the dip. It won’t. I have seen the same laziness destroy high-end shower builds. I once walked into a luxury bathroom remodel where the marble wall tiles were literally falling off the substrate. The homeowner could hear a hollow thud every time they bumped the wall. When I popped a loose tile off, the back of it was nearly clean. The installer had used the spot bonding method, just five little circles of mortar in the corners and the center. It is a shortcut that kills careers. In a wet environment, those voids are not just structural weaknesses. They are reservoirs for mold and bacteria. We are going to examine the physics of the notched trowel and why your mortar ridges must collapse to ensure your shower does not become a costly demolition project.
The physics of the notched trowel and ridge collapse
Proper trowel notch technique involves creating parallel ridges of mortar that collapse into a solid bed when the tile is embedded. This mechanical bond relies on the displacement of air and the chemical adhesion of the thin-set mortar to both the substrate and the tile back. If ridges do not collapse, the tile remains suspended on thin lines, leading to hollow sounds and cracked grout.
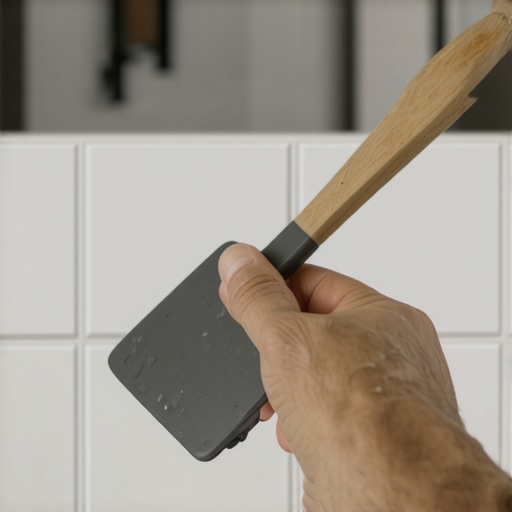
When you drag a notched trowel across a backer board, you are not just spreading glue. You are engineering a vacuum. Those ridges are designed to be squashed. If you use a circular motion or the dreaded spot bond, you trap air. Air does not support weight. Air does not conduct heat. Most importantly, air provides a home for moisture in a shower. Every time you step on a floor or lean against a shower wall, you are applying pressure. If there is a void behind that tile, the ceramic or stone will eventually flex. It might only be a fraction of a millimeter, but that is enough to snap the bond. I tell my apprentices that the trowel is a precision instrument. The depth of the notch determines the final thickness of the mortar bed. Use a notch that is too small and you have no room for error. Use one too large and the tile will swim in the mud, making it impossible to keep the surface level. We aim for 95 percent coverage in wet areas. Anything less is a failure. You achieve this by combing the mortar in straight lines. When you push the tile into place, move it perpendicular to those lines. This action collapses the ridges and pushes the air out of the sides. It is the only way to ensure the entire back of the tile is wet with mortar.
“A floor is only as good as the subfloor beneath it; deflection is the enemy of every joint.” – Master Flooring Axiom
Why spot bonding is a death sentence for wet areas
Spot bonding tile in a shower creates unsupported voids where moisture accumulates behind the surface. This leads to efflorescence, mold growth, and structural rot of the wall studs or subfloor. Total mortar coverage is required by ANSI standards to prevent hydrostatic pressure from popping tiles off the wall or floor. It is a practice that must be abolished.
You see it in cheap flips all the time. An installer wants to save five minutes, so they put a dollop of mortar on the back of the tile and slap it on the wall. It looks fine for a month. Then the grout starts to crack. Then the white crusty stuff, known as efflorescence, starts leaking out of the joints. That is minerals being carried out by water that is trapped in the hollow spots. In a shower, water is everywhere. Even with a waterproof membrane like Kerdi or Wedi, water can still migrate through the grout. If it finds a hollow spot, it sits there. It gets stagnant. It breeds. I have pulled up floors where the smell of the trapped water was enough to make a man quit the trade. Beyond the hygiene issue, spot bonding offers zero impact resistance. If you drop a shampoo bottle on a hollow floor tile, it will shatter. If the mortar was properly combed and collapsed, that tile would be as solid as the slab beneath it. There is no shortcut for coverage. You get down on your knees and you comb the mud. That is the job.
The hidden chemistry of modified thin set mortar
Modified thin set mortar contains polymers and latex additives that increase flexural strength and bond tenacity. These chemical enhancers allow the mortar to stick to non-porous surfaces like porcelain tile and waterproofing membranes. Understanding the hydration process is vital for preventing premature drying and bond failure during the installation process.
Mortar is not just sand and cement. It is a complex chemical soup. The polymers in modern thin-set act like tiny rubber bands. They allow the floor to breathe and move slightly without snapping the bond. This is especially important when you are transitioning from different materials. If you have a room with a carpet install right next to a tiled bathroom, the subfloor leveling must be perfect. The house will settle. The wood will expand. The mortar has to handle that stress. I always use a high-grade modified mortar for showers. It has better water resistance and better grab. However, the chemistry only works if you mix it right. If you add too much water, you weaken the crystalline structure. If you let it sit in the bucket too long, it begins to skin over. Once it skins over, it will not transfer to the back of the tile. I have seen guys try to use old mud by just stirring it up. Do not do it. Throw it out and mix a fresh batch. Your reputation is worth more than a twenty dollar bag of cement.
| Tile Type | Trowel Notch Size | Required Coverage | Environment |
|---|---|---|---|
| Mosaic Tile | 3/16 inch V-Notch | 95 Percent | Wet/Shower |
| Standard Subway | 1/4 inch x 1/4 inch | 95 Percent | Wet/Shower |
| Large Format | 1/2 inch x 1/2 inch | 95 Percent | Wet/Shower |
| Laminate Wood | None (Floating) | 0 Percent | Dry Only |
Managing subfloor deflection before the first tile drops
Subfloor deflection refers to the vertical movement of the floor under a load, measured as L/360 for ceramic and L/720 for stone. Excessive bouncing or flexing will crack grout lines and shear the mortar bond. Strengthening the joist system or adding plywood layers is often necessary to provide a rigid substrate for tile longevity.
If your subfloor moves, your tile dies. It is that simple. Many installers think they can fix a bouncy floor with more mortar. They are wrong. Mortar has high compressive strength but very low tensile strength. It does not like to be bent. If you are coming off a laminate floor or a carpet install, you are used to a bit of give. Tile does not give. It cracks. I always check the joist span before I even bid a job. If the floor feels like a trampoline, I tell the client we need to pull up the subfloor and stiffen it. We might sister the joists or add a layer of 3/4 inch exterior grade plywood. We also look at the floor leveling. A dip of more than 1/8 inch over ten feet is a recipe for disaster with large format tiles. You will get lippage, which is when the edge of one tile sits higher than the next. It is a trip hazard and it looks like amateur work. We use self-leveling underlayment to get that surface glass-smooth. It is an extra step, but it is the difference between a floor that lasts five years and one that lasts fifty.
“Mortar coverage of at least 95 percent is required for tile in wet areas to prevent water accumulation and structural rot.” – TCNA Handbook Summary
The geometry of 95 percent coverage in showers
Achieving 95 percent coverage in a shower installation requires back-buttering every tile and using a directional troweling technique. This ensures that the mortar ridges are fully compressed into a homogeneous layer. Total encapsulation of the tile back prevents water channels from forming behind the finished surface and maintains structural integrity.
Back-buttering is not optional in a shower. You take the flat side of your trowel and you skin a thin layer of mortar onto the back of the tile before you set it. This ensures that the mortar ridges on the wall have something to grab onto. It is like welding. You want both surfaces to be primed for the bond. I see guys skip this on subway tile because it is small. That is a mistake. Even small tiles need that 95 percent coverage. The geometry is simple. If you have straight ridges and you move the tile back and forth, those ridges fall over and fill the valleys. If you have swirled ridges, you trap pockets of air. In a kitchen backsplash, you might get away with 80 percent coverage. In a shower, that 5 percent deficiency is where the water will find a home. It will sit against the floor leveling compound or the backer board and eventually soften the substrate. I have seen entire shower floors delaminate because the installer didn’t back-butter the corners. The corners are the most vulnerable. They are where the stress is highest. Spend the extra ten seconds on each tile. It is cheaper than a lawsuit.
Shower Installation Success Checklist
- Verify subfloor deflection meets L/360 minimum requirements.
- Check floor leveling with a 10-foot straight edge for any dips.
- Select a modified thin-set mortar rated for wet environments.
- Use directional troweling with parallel ridges to avoid air pockets.
- Back-butter every tile to ensure a 100 percent transfer of mortar.
- Check coverage periodically by pulling up a set tile.
- Maintain a minimum 1/8 inch expansion gap at all perimeters.
The ghost in the expansion gap
Every tile installation needs expansion gaps at the perimeter and at plane changes to accommodate thermal expansion. Without a 1/8 inch gap filled with 100 percent silicone sealant, the tiles will tent or pop when the house shifts. These gaps are structural safety valves that prevent the mortar bond from being sheared by lateral pressure.
Houses are living things. they move. They breathe. When the sun hits a bathroom floor, the tiles expand. If those tiles are shoved tight against the wall, they have nowhere to go. They will press against each other until the weakest point gives way. Usually, that means the tile pops off the floor. I call it the ghost in the gap. People hear a loud bang in the middle of the night and they think they have an intruder. It is just the floor exploding because the installer didn’t leave a gap. You must use silicone in the corners of a shower, never grout. Grout is rigid. It will crack the moment the house settles. Silicone is flexible. It acts as a shock absorber. This is especially true if you are transitioning from different materials, like a carpet install in the bedroom to tile in the bath. That transition point is a high-stress zone. Use the right materials and give the floor room to move. If you don’t, the physics of the house will eventually win.
Impact of moisture vapor transmission on bond strength
Moisture vapor transmission occurs when water vapor moves through a concrete slab or wood subfloor, exerting upward pressure on the tile assembly. If the vapor drive is too high, it can de-bond the mortar and cause hollow spots. Using a vapor barrier or a moisture mitigation system is essential for ground-level installations.
In high-humidity areas like the Gulf Coast or the Pacific Northwest, the ground is always wet. That moisture wants to get inside your house. It travels through the concrete as a gas. When it hits your mortar bed, it turns back into a liquid. This creates pressure. If you have used a cheap, non-modified mortar, that pressure will eventually break the bond. I always use a moisture meter on the slab before I start. If the reading is high, we apply a liquid moisture barrier. It is an expensive insurance policy, but it works. This is also why floor leveling is so important. If you have puddles of leveler that are too thick, they can trap moisture and take weeks to dry. If you tile over them too soon, the moisture will be trapped forever. It will turn the mortar into a soft mush. Take your time. Let the substrate dry. The chemistry of the bond depends on it.
Choosing the right notch for the substrate
The trowel notch size must be matched to the tile dimensions and the substrate flatness to ensure proper coverage. Large format tiles require deeper notches to compensate for tile warpage and subfloor irregularities. Selecting the incorrect trowel is the primary cause of insufficient mortar transfer and hollow tile syndrome.
While most people want the thickest underlayment, too much cushion actually causes the locking mechanisms on LVP to snap under pressure. The same logic applies to tile mortar. If you use a massive 3/4 inch notch for a tiny mosaic tile, the mortar will squeeze up through the joints and make a mess. If you use a 1/4 inch notch for a 24-inch porcelain plank, you will have huge hollow spots. Most large tiles are slightly bowed from the kiln. You need enough mud to fill that bow. I prefer a U-notch or a specialized Euro-notch for big tiles. They are designed to collapse easier than a square notch. It takes less effort to set the tile, which means you are less likely to get tired and start taking shortcuts. At the end of the day, it is about the sweat you put into the prep. If you start with a flat floor and you use the right trowel, the tile will stay put for a lifetime. If you try to fix a bad floor with a big trowel, you are just building a house of cards. Stick to the standards. Check your coverage. Do the job right the first time so I don’t have to come in and tear it out in three years.