I remember the first time I poured hours into a flawless carpet installation, only to have it wrinkle and bubble within months. That lightbulb moment hit hard — I had overlooked a crucial step in floor leveling, and it cost me dearly. Since then, I’ve learned that precision in preparation isn’t just a detail; it’s the foundation of durability. If you’re tackling a home upgrade, chances are you’ve faced similar frustrations or fear that your effort won’t stand the test of time.
Why Skipping Proper Floor Leveling Can Cost You Big
One of the most overlooked yet vital aspects of professional-grade carpet and flooring installation is proper floor leveling. An uneven surface might seem like a minor detail during the prep stage, but it directly impacts the longevity and appearance of your flooring. I once tried rushing through leveling a room to save time, only to find that my new carpet had visible bumps and dips after a few months. This experience taught me that tackling floor leveling with care isn’t optional — it’s essential for lasting results. For comprehensive tips on effective leveling techniques, check out this guide on expert floor leveling.
Is It Really Worth the Extra Effort? Absolutely.
Many homeowners and DIY enthusiasts wonder if investing time and resources into meticulous leveling is justified. Early in my career, I made the mistake of thinking quick fixes would do. But I soon realized that skipping or rushing this step only leads to costly repairs down the road. According to industry experts, floors that aren’t properly leveled can suffer from premature wear, cracking, and even safety hazards. This is why taking the time to prepare your subfloor thoroughly will save you headaches later. For proven strategies, explore premier floor leveling tips.
So, have you ever faced uneven floors that ruined an installation? If yes, you’re not alone. The good news is, with the right techniques, you can prevent this common pitfall and ensure your flooring remains perfect for years to come. In the sections ahead, I’ll share hands-on advice to help you get it right the first time, reducing stress and boosting your home’s durability.
Start with a Solid Foundation by Properly Preparing the Subfloor
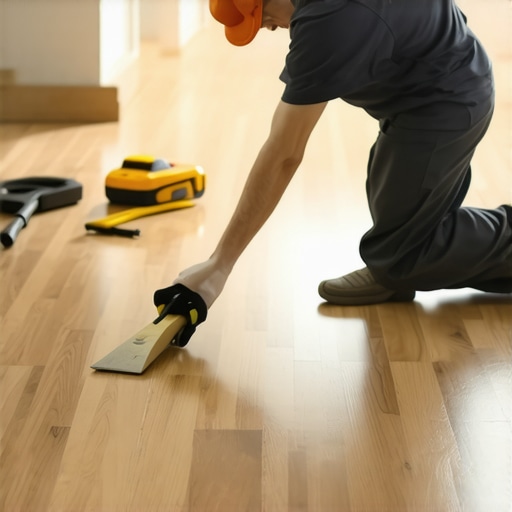
Before laying down any carpet or laminate, ensure your subfloor is clean, dry, and free of debris. Remove old adhesives, nails, or splinters that could cause unevenness. Think of this step like preparing a canvas before painting—if the surface isn’t smooth, the final picture won’t be either. I once skipped this initial cleanup in a small bedroom, assuming a quick sweep was enough. The result was subtle dips that became noticeable once the flooring was installed. This experience underscored the importance of meticulous prep, which can be guided by expert carpet installation tips.
Identify and Fill Low Spots with Self-Leveling Compound
Use a long straightedge or level to scan the entire floor surface, noting dips and high spots. For low areas, apply a quality self-leveling compound, which flows into depressions and creates a uniform surface. Imagine pouring pancake batter into a pan—if the batter isn’t spread evenly, pancakes will be uneven—just like flooring. I once had to fix a poorly leveled bathroom floor by applying a self-leveler in sections, which initially looked messy but resulted in a perfectly flat surface. This method ensures your flooring sits uniformly, preventing bumps or gaps later. Learn more about expert floor leveling techniques here.
Address Highs and Low Areas Effectively
High spots can be ground down carefully with a concrete grinder or sander. Be cautious to avoid creating uneven patches. For uneven high spots, use a grinder with a diamond blade to shave down the peaks gradually. Remember, patience is key to avoid over-correcting. For intricate projects involving shower renovations or waterproofing, proper leveling is just as critical—see shower upgrade tips for related considerations. When done precisely, these steps prevent future squeaks, cracks, or uneven wear.
Check Your Progress with a Long Straightedge
After applying leveling compounds and grinding high spots, recheck the entire floor, making sure the surface is consistently flat within a 1/8-inch tolerance. Use a long spirit level or straightedge across different sections—don’t rely on just a few spots. I learned this the hard way when I only checked the center of a living room and missed the dips near the thresholds, which caused seams to swell over time. Consistent checking guarantees a stable base for your flooring, whether for carpet, laminate, or even shower areas requiring waterproofing solutions (shower renovations).
Seal and Protect Your Leveling Job
Once leveling is complete, allow the compound to cure fully according to manufacturer instructions. Prime the surface if needed, especially before applying laminate or moisture-sensitive flooring. Think of this phase as sealing a new concrete slab—necessary to prevent future moisture issues or shifting. I once skipped sealing after leveling my garage floor; humidity caused minor cracks, leading to additional repairs. Protecting your work ensures the durability of your final installation, which ties into the overall home upgrade durability discussed in floor leveling resources.
Even seasoned DIY enthusiasts often operate under assumptions that can lead to costly mistakes. One widespread myth is that selecting a high-end flooring material automatically guarantees durability, but without proper preparation, even the best materials can falter prematurely. For example, many believe that laying laminate directly over uneven subfloors won’t cause issues; however, neglecting to level thoroughly can result in warping, squeaks, or gaps over time. The key is understanding that the true secret lies in mastering the nuances of subfloor preparation and installation techniques, which are often overlooked by amateurs. According to industry experts, improper handling of these details can drastically reduce the lifespan of your flooring, regardless of material quality. To avoid these pitfalls, dive into comprehensive guides like this expert advice on floor leveling. Moreover, many mistakenly assume that waterproofing solutions alone can prevent future damage in bathroom showers. While essential, waterproofing must be combined with precise slope installation and proper drainage planning—something often underestimated. For advanced tips on shower renovations, explore these expert shower upgrade strategies. It’s also common to overlook the importance of controlling moisture during installation, especially in areas prone to humidity, which can compromise adhesives and cause mold growth. For a deeper understanding, review this detailed guide on bathroom waterproofing. Have you ever fallen into this trap? Let me know in the comments. Ultimately, the hidden nuance is that successful installation isn’t just about choosing the right product but understanding and executing the detailed steps that ensure longevity. From meticulous subfloor prep to advanced waterproofing techniques, each nuance can make or break your project’s success. Remember, the difference between a durable finish and recurring issues often comes down to attention to these advanced details—so don’t skip them and always keep learning.
How do I keep my flooring and showers functioning perfectly over time?
Maintaining your installed floors and showers requires more than occasional cleaning; it demands the right tools and a systematic approach. One of my go-to tools is a digital moisture meter, which I use regularly to monitor humidity levels in bathrooms and beneath flooring substrates. This device helps prevent moisture buildup that can lead to mold or wood warping, especially critical in laminate and shower renovation projects. For detailed monitoring, I rely on a reputable model like the Tramex Moisture Meter, trusted by professionals for its accuracy in detecting unseen moisture issues that could compromise your work over time.
Equally important is a high-quality, telescoping straightedge—think of it as your inspector for flatness. I often use the Empire EM77, which extends up to 96 inches, allowing me to quickly identify high and low spots without crawling on hands and knees. This tool is invaluable during the leveling phase, especially when working with self-leveling compounds or grinding high spots in preparation for laminate or shower installation. Regularly checking your surface with such a straightedge ensures the integrity of your project, helping you catch issues before they become costly repairs.
In addition to hand tools, I integrate specific software solutions to plan and track progress for large-scale renovations. For example, starting with 3D modeling programs like SketchUp enables me to visualize the entire space, anticipate problem areas, and plan strategic interventions—saving time and reducing errors. For precise measurements and project management, a laser distance meter like Leica Disto is a game changer, especially for ensuring consistent slope gradients in shower pans or leveling in multi-room laminate installations.
Looking ahead, I predict that the integration of smart technology will become standard in home renovation. Devices that automatically monitor humidity, temperature, and surface flatness, linking directly to your smartphone, will streamline maintenance and alert homeowners to issues before they escalate. This proactive approach fits perfectly with the trend toward smarter, more durable home upgrades.
What’s the best way to keep your floors and showers durable over the long haul?
One of the most effective maintenance tips I can share is applying annual protective sealants and moisture barriers, especially around shower areas. These products act as your first line of defense against water infiltration. For instance, utilizing a product like RedGard Waterproofing Membrane regularly can extend the lifespan of your shower walls and floor, preventing leaks that might cause structural damage down the line. Moreover, maintaining proper ventilation in bathrooms helps keep moisture at bay, reducing the frequency of repairs.
Beyond tools, always adhere to expert advice on post-installation care. For example, well-maintained floor joints and seals prevent water from seeping into subfloors, which can lead to bubbling, warping, or mold growth—common issues I’ve seen in neglected projects. To stay ahead, consider scheduling bi-annual inspections using moisture meters and visual assessments, addressing minor issues before they become major headaches. For comprehensive guidance, visit this resource on expert floor leveling and adopt a proactive maintenance routine that integrates these tools and practices.
Imagine employing a laser level to ensure your shower slope remains perfect over years—it’s a simple yet powerful step that guarantees long-term performance. I recommend trying this technique on your next project; it could be the difference between a quick fix and lasting success. Remember, long-term results hinge on regular monitoring, proper tools, and a disciplined maintenance schedule—invest in these today to ensure your home upgrades last for decades.
What I Wish I Knew When I Started Taming Uneven Floors
- Embrace the prep work early on: I once believed rushing through subfloor cleaning saved time, but it only led to recurring issues. Now, I prioritize meticulous cleaning and preparation from the outset, understanding that a solid foundation anticipates future problems.
- Never underestimate the power of the right tools: Using a long straightedge or a moisture meter transformed my projects. These tools reveal hidden issues, guiding me to make precise corrections rather than guesswork, ultimately saving time and money.
- Learn from seasoned professionals’ advice: Resources like this expert guide on floor leveling have been invaluable in refining my techniques and understanding subtle pitfalls many overlook.
- Patience beats shortcuts every time: I used to rush to finish, but now I focus on doing it right, respecting curing times and verifying flatness multiple times. It’s a game-changer for long-term durability.
- Maintain your skills with ongoing learning: Attending workshops or reviewing detailed guides keeps my techniques sharp. Remember, each project teaches you something new—keep seeking knowledge.
Tools and Reads That Elevate My Work
- Laser distance meters like Leica Disto—My go-to for precise measurements, especially for consistent slopes and level checks in large spaces.
- Moisture meters: Devices like Tramex help monitor subtle moisture variations that could compromise your work, saving costly repairs later.
- Professional guides: This comprehensive resource on floor leveling has transformed my approach, ensuring every step is optimized for durability.
- 3D modeling software: Visualization tools like SketchUp assist in planning complex layouts, preventing surprises during installation.
Seize the Moment: Your Home’s Future Starts Today
Remember, achieving a flawless, durable flooring or shower isn’t just about tools or techniques—it’s about your commitment to excellence. Choosing to invest time and attention now means your home will reward you with beauty and resilience for years to come. Don’t let small missteps become long-term headaches; the distinction lies in your daily dedication to mastery. Jump in, learn continuously, and transform your space into a lasting masterpiece. How are you working to improve your flooring or shower projects today? Share your experiences below—your journey could inspire others to perfect their craft.