Ever stepped into your bathroom after a long day only to be greeted by uneven tiles or a shower that drips constantly? I remember the moment I realized that my home’s charm was being overshadowed by small but persistent issues—wobbly laminate floors and outdated, leaky showers. It hit me: these little flaws weren’t just aesthetic; they affected comfort, safety, and even home value. That “lightbulb” moment prompted me to dive into solutions that truly work, not just quick fixes. If you’re tired of feeling frustrated every time you look at your bathroom or walk across your uneven flooring, then you’re in the right place. Today, I promise to share proven strategies that will make your home both stylish and durable.
Why Fixing Showers and Floors Should Be a Priority Now
Modern homeowners often overlook the importance of solid, long-lasting upgrades because they think small issues aren’t urgent. But did you know that poorly installed or-maintained showers and laminate floors can lead to bigger problems down the line? Water leaks from a subpar shower can cause mold, structural damage, and skyrocketing repair costs. Similarly, uneven flooring isn’t just uncomfortable—it can pose safety risks, especially for children or elderly family members. The good news is that with proper renovation techniques, you can prevent these hazards while boosting your home’s appeal. Plus, investing now pays off when it’s time to sell: buyers love move-in ready spaces with modern upgrades that promise longevity. As a matter of fact, according to industry experts, smartly upgraded bathrooms and floors significantly increase property value and appeal, attracting more interest and higher offers.
Is It Really Worth the Hype? My Early Flooring Mistakes
I’ll admit, my first attempt at leveling a section of laminate was a disaster. I thought I could save some money and skip professional help, only to end up with a wobbly surface that creaked every step. That mistake taught me a vital lesson: DIY is great, but some tasks demand expert strategies—especially when aiming for lasting results. If you’ve ever worried about choosing the wrong materials or ending up with uneven surfaces, don’t fret. There are reliable methods and tips that can help you avoid my pitfalls. For example, learning about proper floor leveling techniques can save you both time and money. Stick with me, and I’ll show you how to achieve flawless, durable upgrades with confidence.
Start with a solid plan for your bathroom renovation
Before grabbing tools, measure the space meticulously. Sketch a layout highlighting areas needing repair or upgrade. Decide whether you’ll handle tasks DIY or hire professionals for complex steps. This initial planning ensures you avoid costly mistakes and helps you organize your workflow efficiently.
Assess and prepare your surfaces
Begin by inspecting existing tiles or flooring for damage or looseness. Remove any debris and thoroughly clean the area. For uneven surfaces, a gentle grind with a concrete grinder or sanding tool can level out small imperfections. This preparation creates a smooth foundation, vital for lasting results.
Master the art of floor leveling
Micro-level imperfections can cause long-term issues, so proper leveling is crucial. Use a self-leveling compound—mix according to manufacturer instructions—and pour it into the low spots. Spread evenly with a trowel or long-handled squeegee. Allow it to cure fully. This technique is akin to pouring pancake batter, ensuring a flat surface for your laminate or carpet installation. I precisely followed a trusted guide from this resource, which helped me achieve a smooth, durable foundation that lasted years.
The essentials of installing laminate flooring
Lay the laminate planks following the manufacturer’s pattern—often with a tongue-and-groove system. Use spacers against the wall to allow expansion. Lock each plank firmly—this is similar to puzzle pieces clicking together. For added durability, I employed a premium underlay to reduce sound and cushion minor imperfections, as recommended in these tips. When I finished, the result was a stable, sleek surface that withstood years of traffic.
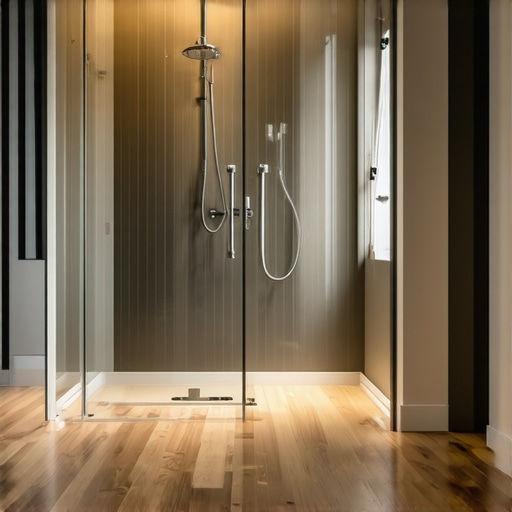
Achieve professional results with shower upgrades
Start by removing old tiles and fixtures, ensuring the surface is solid and waterproof. Apply a waterproof membrane over the prepared substrate—without this, leaks will eventually cause damage. Then, lay new tiles or install a shower panel, carefully sealing seams with high-quality grout or caulk. I used these expert guidance to avoid common leaks, which saved me from future headaches. Proper sealing prevents water intrusion, keeping your bathroom healthy and stylish for years.
Installing new carpet with durable techniques
Begin by removing old flooring, inspecting subfloor stability. Use a leveling compound if necessary, following expert instructions. Roll out the carpet, pinning it with a tack strip along the edges. Stretch the carpet tightly using a power stretcher—like tightening a drumhead—so it doesn’t wrinkle or shift over time. I practiced the stretching technique on a small patch first, which made a noticeable difference in achieving a smooth, long-lasting finish. Sealing edges with appropriate adhesives seals in durability and prevents tripping hazards.
Final checks and finishing touches
Once all installations are complete, walk across the surface to identify any wobbliness, unsealed edges, or uneven spots. Make adjustments promptly—tighten loose planks, reseal grout lines, or re-stretch carpet sections. These micro-adjustments solidify your work, ensuring your home upgrades withstand daily wear and tear. Precision in these last steps prevents future repairs and maintains the aesthetic appeal you worked so hard to establish.
Many homeowners operate under misconceptions that can sabotage their renovation projects. For instance, a prevalent myth about laminate flooring is that it’s inherently fragile and prone to damage, but modern high-quality laminates are engineered to withstand heavy traffic when properly installed—dismissing this outdated belief can open the door to durable, cost-effective upgrades. Similarly, in shower renovations, beginners often ignore the critical importance of waterproofing, mistakenly believing that grout alone suffices. This oversight can lead to leaks and mold issues down the line; comprehensive waterproofing strategies are essential for long-lasting results, as emphasized in expert guides. When it comes to carpet installation, many assume that a perfect stretch is achieved simply by pulling the carpet tight. However, improper stretching can cause wrinkling and premature wear, highlighting the necessity of mastering professional techniques like using a power stretcher, detailed in this resource.
Maintaining your upgraded flooring, showers, and carpets requires the right tools and a strategic approach. Personally, I swear by a high-quality laser level for ensuring perfect flatness during floor leveling projects. Unlike traditional bubble levels, laser levels provide a comprehensive and precise reference across large surfaces, which is essential for seamless laminate or carpet installation. I recommend the Leica Lino laser level; its visibility in bright conditions and long laser lines make it indispensable for accurate leveling. For stubborn grout lines in shower upgrades, a grout removal tool like the V-shape grout saw minimizes tile damage and speeds up the process. My personal favorite is the Bosch Grout Saw — it’s ergonomic and efficient, making the repair process much smoother.
How do I keep my home upgrades working in top shape?
Regularly inspect for signs of wear or damage, and address issues promptly using the right tools. A misted spray bottle filled with a mixture of water and a few drops of mild detergent helps prevent mold and mildew in showers, keeping surfaces pristine without harsh chemicals. Additionally, investing in a quality steam cleaner can rejuvenate carpets and tile surfaces, removing embedded dirt and extending their lifespan. For ongoing maintenance, I keep a set of multi-tools, like oscillating tools, on hand—perfect for quick touch-ups around grout lines or under edges without removing large sections. As trends evolve, developing a proactive maintenance routine with these precise, professional-grade tools ensures your home remains durable and beautiful for years to come. Trend prediction leans toward smart, automation-integrated maintenance systems—think sensor-based leak detectors or app-controlled cleaning devices—making upkeep more efficient and less time-consuming. So, dare to incorporate one advanced tool, like a laser level or steam cleaner, into your routine and witness the long-term benefits firsthand. These investments will save you time and money while preserving your home’s integrity and style for years to come.
The Hardest Lesson I Learned About laminate,showers,carpet install,floor leveling
One of my biggest realizations was that rushing through the preparation phase often led to inferior results. I once attempted a DIY laminate floor without adequate leveling, only to face squeaks and uneven surfaces later. This taught me that meticulous surface prep and patience are essential, especially when working with materials that demand precision for durability.
3 Myths About laminate,showers,carpet install,floor leveling That Held Me Back
I believed that laminate flooring was too fragile for high-traffic areas, but modern engineering has improved their resilience significantly—trusting outdated myths can hold you back from making cost-effective upgrades. Similarly, I thought grout was enough to prevent leaks in showers, but comprehensive waterproofing is non-negotiable for long-lasting results. Challenging these misconceptions early saved me time and money.
What Experts Won’t Tell You About laminate,showers,carpet install,floor leveling
Professionals emphasize the importance of tools like laser levels and proper sealing techniques, which aren’t always highlighted in DIY guides. For example, using a high-precision laser level ensures flatness across large surfaces—something I initially underestimated, but now consider indispensable. Learning these insider tips can make the difference between a temporary fix and a lasting upgrade.
My Essential Toolkit for Renovating Floors and Showers
Over the years, I’ve come to rely on specific tools: a laser level like the Leica Lino for accuracy, a grout saw such as the Bosch for precise tile work, and a high-quality self-leveling compound for thorough surface preparation. These tools are trusted because they’ve consistently delivered professional results in my home upgrades—making my DIY efforts durable and elegant.
Transform Your Home with Confidence and Care
Embarking on home improvements, especially with laminate, showers, carpet, and floor leveling, can be nerve-wracking but incredibly rewarding. Remember, each project is an opportunity to learn. By applying the lessons learned and leveraging trusted tools, you’ll create a space that not only looks beautiful but stands the test of time. Your willingness to grow and adapt is the real secret to mastering home upgrades—so go ahead, start your next project today and watch your home transform into a true sanctuary.
What part of home renovation do you find the most challenging? Share your thoughts below—I’d love to hear your experiences!