Ever had that sinking feeling when your new laminate or carpet starts showing wear just a few months after installation? I remember the exact moment I realized I’d rushed a flooring project without proper preparation. The seams didn’t align right, and the finish looked dull faster than I expected. It was a lightbulb moment for me — I knew there had to be better ways to ensure longevity and beauty.
Why Cutting Corners Can Cost You Big Time
When I first started tackling DIY flooring, I thought the key was just laying down the materials quickly. Turns out, that’s the fastest route to problems. From uneven surfaces to unfinished edges, skipping expert tips can turn a promising upgrade into a frustrating experience. According to the National Wood Flooring Association, improper installation is the leading cause of flooring failure, which can cut your investment’s lifespan in half. That’s why I now swear by a few tried-and-true techniques to get lasting results.
Have You Faced This Problem with Your Floors?
If you’ve ever experienced uneven surfaces, gaps, or early wear, you’re not alone. It’s a common mistake to overlook proper leveling and acclimation. Early on, I made the mistake of ignoring the importance of floor leveling, which caused my laminate planks to buckle after just a few months. Fortunately, I found that following expert advice, like those shared in top laminate floor leveling tips, can make all the difference. Today, I want to walk you through what I wish I’d known from the start so your floors stay beautiful for years to come.
Level the Surface Before You Start
Think of installing flooring like building a house; if the foundation isn’t solid, everything else will wobble. I once skipped this step and ended up with uneven planks that buckled after a few months. Always use a high-quality floor leveler, like those detailed in expert laminate floor leveling tips. Spread the compound evenly with a trowel, working from the farthest corner toward the door, ensuring a perfectly flat surface. Let it cure fully before laying any flooring. This step is crucial for avoiding gaps and uneven wear over time.
Acclimate Your Materials Properly
Imagine bringing a cold shirt into a warm room—immediately wrinkled and uncomfortable. Similarly, flooring materials need time to adjust to your home’s environment. Store laminate or carpet in the installation area for at least 48 hours. This prevents expansion or contraction after installation, which can cause buckling or gaps. When I first learned this, I kept my planks in a different room, and the result was a perfect fit once installed, lasting much longer than hurried projects.
Prepare Your Subfloor with Precision
Think of the subfloor as the canvas for a painting—if it’s rough or dirty, the final work suffers. Clean the surface thoroughly, removing dust, debris, and old adhesive residues. For carpets, ensure the floor is smooth and free of bumps. For laminate, check for moisture issues and fix any squeaks or cracks. I used a moisture meter to test my concrete slab, as suggested in shower and bathroom renovation tips, which saved me from future problems.
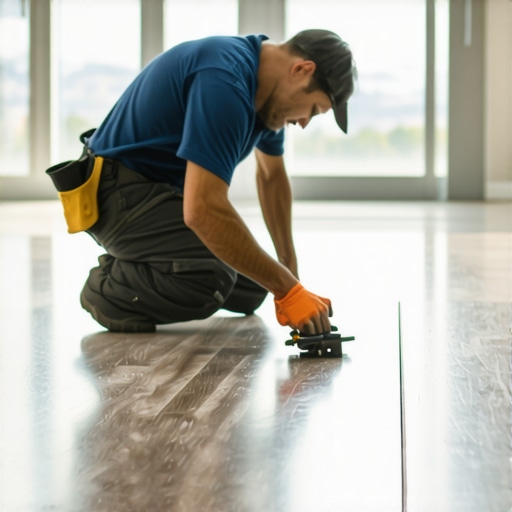
Use Proper Installation Techniques
This is where many DIYers falter. For laminate, click the planks together snugly, avoiding gaps. Use spacers along walls to accommodate expansion, then remove them after laying the last row. For carpets, stretch and secure the padding firmly, then lay the carpet with a power stretcher for a tight fit. I vividly remember my first carpet installation where I skipped the stretching step, resulting in wrinkles that I had to fix later. Following detailed laminate and carpet install tips made a huge difference.
Seal the Edges and Transitions
Proper sealing prevents water and dirt from seeping under your floors, which can cause damage and wear. Use silicone sealant around the edges, especially in moisture-prone areas like kitchens and bathrooms. For transitions between different flooring types, choose high-quality transition strips. I learned this firsthand when I added a threshold strip between my laminate and tile; it kept dirt out and created a seamless look, significantly extending the lifespan of my flooring.
Maintain and Regularly Inspect
Even after a flawless installation, ongoing care is key. Regular vacuuming, gentle cleaning, and prompt repairs keep your floors looking new. Check edges and seams periodically, especially in high-traffic areas. I once ignored a small gap in my carpet, which quickly expanded, but catching it early with a quick re-stretch saved me a costly replacement later. For comprehensive maintenance advice, review carpet installation and leveling strategies.
Many DIY enthusiasts and even seasoned homeowners often fall prey to misconceptions when it comes to flooring installation. Let’s dig deeper into some of these pitfalls and uncover what truly makes a difference in ensuring a durable, beautiful finish. One of the most persistent myths is that rushing through the preparation phase won’t impact the long-term performance of your floors. In reality, skipping steps like proper leveling or acclimation can lead to buckling, gaps, and uneven wear, ultimately costing you more time and money in repairs. For example, I once ignored the importance of floor leveling and paid the price with cracked and uneven planks within months. Experts agree that thorough surface preparation is essential; you can find detailed strategies in top laminate floor leveling tips that can save you headaches later.
Another common misconception is that all flooring materials behave the same way in different environments. Many believe that laminate, carpet, or tile can be installed without considering room-specific factors like humidity and temperature. This is a dangerous oversimplification. For instance, laminate planks need to be acclimated properly—stored in the installation area for at least 48 hours—to prevent expansion or contraction post-installation. Overlooking this step can cause warping or gaps, especially in areas with fluctuating moisture levels. I learned this lesson the hard way when I stored my laminate in a different room, only to see it fit perfectly after proper acclimation. For more advanced tips, check out expert laminate floor leveling tips.
What about the trap of ignoring moisture issues? Many underestimate how critical subfloor moisture testing is. Installing flooring over a damp concrete slab without testing can lead to mold, warping, or delamination down the line. Use a moisture meter to assess your subfloor’s condition—something I wish I had done before laying my laminate. This simple step can prevent costly repairs and ensure your investment lasts. For advanced moisture management strategies, consult shower and bathroom renovation tips.
Finally, many people believe that finishing touches like sealing edges or installing transition strips are optional extras. In truth, these details are crucial for protecting your floors from water damage, dirt, and wear. Proper sealing especially in moisture-prone areas can extend your flooring’s lifespan significantly. I added a threshold strip between my laminate and tile, which prevented dirt buildup and maintained a seamless look, proving that these small details matter. For comprehensive guidance, explore top installation strategies.
In conclusion, mastering advanced flooring techniques involves understanding these nuances and avoiding common pitfalls. Have you ever fallen into this trap? Let me know in the comments and share your experiences or questions!
Keeping your flooring in top shape over the years requires more than just initial installation. It’s about using the right tools and adopting consistent maintenance routines that protect your investment and ensure lasting beauty. In this post, I’ll share the specific equipment I rely on and the practices I’ve found most effective for maintaining various flooring types, especially laminate, carpet, and tile.
Why Invest in Quality Tools for Flooring Maintenance
Quality tools make all the difference when it comes to keeping your floors looking pristine. For example, a microfiber dust mop is my daily go-to for quick cleanup—it traps dust and hair without scratching the surface. Unlike traditional brooms, microfiber mops prevent dirt from being pushed into seams or grout lines, extending the life of your flooring. Similarly, I never skip using a damp (not wet) microfiber cloth for routine spot cleaning, which avoids excess moisture that can cause warping or mold, especially on laminate floors.
Powerful Equipment for Deep Cleaning and Repairs
For more intensive maintenance, I recommend a handheld steam cleaner designed for hard floors. It effectively loosens dirt and sanitizes without harsh chemicals—perfect for high-traffic areas. When it comes to repairs, I rely on a small, precision caulking gun to reseal edges and transitions, preventing water damage and dirt ingress. A good-quality floor roller can also be invaluable for pressing down loose tiles or repositioning stubborn planks, ensuring a seamless surface that lasts longer.
Tools I Use for Long-Term Results
To keep my flooring in excellent condition over time, I schedule regular inspections using a moisture meter—this is especially critical for concrete slabs under laminate or carpet. Detecting moisture early helps avoid expensive issues like warping or mold. Additionally, I maintain a set of replacement transition strips and sealing silicone, which I use periodically to refresh edges and protect vulnerable joints. These small maintenance tasks, when performed consistently, significantly extend the lifespan of your floors and keep them looking fresh.
Looking Ahead: The Future of Flooring Maintenance
As technologies evolve, I believe we’ll see smarter maintenance tools, such as robotic vacuums with advanced sensors that can detect dirt buildup or moisture levels automatically. Software apps might also help schedule routine inspections and remind homeowners when to perform deep cleaning or repairs. Staying ahead of these trends will make flooring upkeep more efficient and less labor-intensive.
How do I maintain my floors over time?
The key is regular, gentle cleaning combined with periodic inspections of seams, edges, and transitions. Using specialized tools like microfiber mops, steam cleaners, and moisture meters—tools I highly recommend—helps prevent small issues from becoming costly repairs. Don’t forget to refresh sealing and transition strips as part of your routine. I encourage you to try one of these maintenance tips today; for example, check your moisture levels before laying new laminate or carpet, and you’ll thank yourself later for the proactive approach.
The Hardest Lesson I Learned About Flooring Mastery
One of my biggest lightbulb moments was realizing that rushing through surface preparation, like floor leveling and acclimation, can drastically cut your flooring’s lifespan. I once skipped proper leveling and paid the price with buckling and gaps within months. Now, I always ensure the surface is perfectly flat using a high-quality leveler, as detailed in top laminate floor leveling tips. This simple step has saved me from costly repairs and kept my floors looking pristine for years.
Three Myths About Flooring That Might Hold You Back
Many believe that all flooring materials behave the same regardless of environment, which isn’t true. For example, laminate must be acclimated in your home for at least 48 hours to prevent warping. I learned this the hard way when I stored my planks elsewhere and faced gaps later. Always test your subfloor moisture with a reliable meter, like the ones recommended in shower and bathroom renovation tips, to avoid surprises.
What Experts Won’t Tell You About Flooring Maintenance
One crucial tip I wish I’d known sooner is to seal edges and transitions properly. Water infiltration can cause damage over time. I added a threshold strip between my laminate and tile, which kept dirt and water out, extending my floor’s life. Regular inspections with a moisture meter and refreshing sealing and transition strips can make a significant difference, as discussed in carpet installation tips. Small maintenance efforts pay off big in durability and appearance.
Where to Go from Here
If you want your floors to stay beautiful and durable, focus on proper preparation, acclimation, and ongoing maintenance. Invest in quality tools like microfiber mops, moisture meters, and a good caulking gun. These are game-changers for long-term care. As technology advances, I believe we’ll see smarter maintenance gadgets that can automatically detect issues, saving time and preventing damage. Start today by checking your subfloor moisture or resealing your transitions—your floors will thank you. What’s the first step you plan to take towards better flooring upkeep? Let me know below.